HID upgrade, which one to go with?

[MENTION=113833]e60ral[/MENTION] where did you ground your XD kit for your install? care to share some pics of your mounting locations for the ballasts/relays as well?

thanks for the confirmation on the grommet size, helps a lot

http://www.toyota-4runner.org/5th-gen-t4rs/214398-consolidated-lighting-info-thread.html

MTNRNRs build thread will probably help you out a bit.

You don't ground anything.

I mounted my ballasts and all under the plastic covers on the sides of the engine bay, just like [MENTION=134187]zehyani[/MENTION] mentions 7 or 8 posts back in this thread.
 
[MENTION=113833]e60ral[/MENTION] where did you ground your XD kit for your install? care to share some pics of your mounting locations for the ballasts/relays as well?

thanks for the confirmation on the grommet size, helps a lot

My mounting location is temporary until it warms up a bit. the double tape seems to work just fine, but i plan on eventually bolting everything down.

I used existing ground locations. The passenger side is mostly hidden by everything. The passenger side is the hardest to get to, you have to remove the air pump cover and squeeze your hand in there, mechanics gloves are good for this.

Right now I have both hardwired to the battery, this is also temporary until I install a power distribution block for some accessories (also waiting for it to warm up a little). To mount on the battery post I had to replace the ring connector with one that was a little bigger, doing this also allowed me to heat shrink the wire all the way to the fuse to stiffen it a little more to prevent any fatigue at the connector.

Pictures are below, I'm probably not a good example to copy since this is pretty messy until I get a chance to mount things more permanently

After you install yours you may need to adjust your aim a little, don't forget to check

(also, posting this reminded me that I forgot to go back and loom the blue and black wires so I'm doing that this weekend)

e60ral-albums-mine-picture38695-imag0243.jpg
e60ral-albums-mine-picture38694-imag0241.jpg

e60ral-albums-mine-picture38693-imag0240.jpg


just above and to the left of the battery you can see the drivers side ground point. there is a ground on the passenger side near the air pump that looks the same that I used on that side.

__
 
Last edited:
thanks for the responses guys, i finished the install of the XD H11 Xtreme HID Kit with 4300K Phillips bulbs today, ended up using both relays because i wanted to keep it uniform and the passenger side would not fire without one (tried switching polarity first).
very happy with how it turned out, so far i just have a few pics to show the general layout on each side.
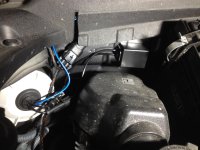
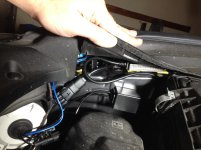
1st and 2nd pics are passenger side where i hid the relay and ballast under the plastic/rubber cover above the wheel wells and the other black box thing (?) that comes off the ballast onto the side of the sheet metal below where the ballast sits. zip tied the relay positive under the radiator cover to the battery. used the provided 3M for the attachments, seems like it will hold up pretty well.
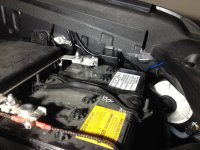
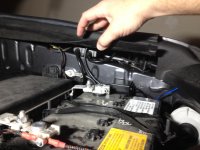
3rd and 4th pics are the driver side, pretty much same setup but the relay is on the other side of the ballast. you can also see the positive wires from the 2 relays attached to the battery here.
 

Attachments

  • HID_02.jpg
    HID_02.jpg
    131.5 KB · Views: 1,855
  • HID_02A.jpg
    HID_02A.jpg
    129.4 KB · Views: 2,240
  • HID_03.jpg
    HID_03.jpg
    134.3 KB · Views: 1,882
  • HID_03A.jpg
    HID_03A.jpg
    127.3 KB · Views: 1,873
Last edited:
thanks for the responses guys, i finished the install of the XD H11 Xtreme HID Kit with 4300K Phillips bulbs today, ended up using both relays because i wanted to keep it uniform and the passenger side would not fire without one (tried switching polarity first).
very happy with how it turned out, so far i just have a few pics to show the general layout on each side.
1st and 2nd pics are passenger side where i hid the relay and ballast under the plastic/rubber cover above the wheel wells and the other black box thing (?) that comes off the ballast onto the side of the sheet metal below where the ballast sits. zip tied the relay positive under the radiator cover to the battery. used the provided 3M for the attachments, seems like it will hold up pretty well.
3rd and 4th pics are the driver side, pretty much same setup but the relay is on the other side of the ballast. you can also see the positive wires from the 2 relays attached to the battery here.

So with your setup w/relays how exactly does it wire up? Also you think you post up a couple pics of the wiring diagram they sent if they sent one?
 
thanks for the responses guys, i finished the install of the XD H11 Xtreme HID Kit with 4300K Phillips bulbs today, ended up using both relays because i wanted to keep it uniform and the passenger side would not fire without one (tried switching polarity first).

That's weird. I wonder why.

I don't think I've seen anyone have to use them?
 
That's weird. I wonder why.

I don't think I've seen anyone have to use them?

not sure, i am definitely no expert on this stuff, but i was able to get most everything hidden away from sight even with the relays so i don't mind having to use them. definitely a cleaner setup without them.

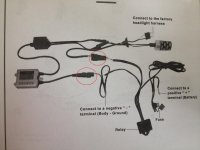
So with your setup w/relays how exactly does it wire up? Also you think you post up a couple pics of the wiring diagram they sent if they sent one?

here is the pic from the install guide. the 2 clips circled in red is where the relay jumps in between the bulb and ballast, this would be a straight connection between the 2 for those not using the relay.
 

Attachments

  • IMG_2633.jpg
    IMG_2633.jpg
    134.5 KB · Views: 1,855
Last edited:
not sure, i am definitely no expert on this stuff, but i was able to get most everything hidden away from sight even with the relays so i don't mind having to use them. definitely a cleaner setup without them.


here is the pic from the install guide. the 2 clips circled in red is where the relay jumps in between the bulb and ballast, this would be a straight connection between the 2 for those not using the relay.

Ok so if I don't use the relays then it looks like I don't need to connect anything to the battery is that right? It would all just connect to the factory harness?
 
Last edited:
I used 55w 6000k VVME on my Lexus GS300 for 3 years already and it works just fine. No color fade or flickering.

For my 16 T4R I'm trying out this brand called Innovited.
 
I want to share my experience with my Morimito Elite HID kid, originally purchased about two and a half years ago. I did a ton of research on the best brands and from what I saw, Morimoto was top-end OEM quality (so that's what I went with) followed closely by Xenon Depot Phillips kits.

About a year and a half into ownership, I had a problem where my headlights wouldn't come on, or one or the other would come on. I brought it in for inspection and the shop I used for installation (highly reputable, #1 recommendation from The Retrofit Source) and they told me this generation of Morimoto HIDs had some problems with igniters failing. The whole system was replaced under warranty and I was told the new units were the best of the best, 3 generations ahead of what I had.

Fast forward another year, now I am having the same issue again, and the passenger side bulb does not come on at all (going in today).

Just curious if anyone has had problems like this with Morimoto? I'm pretty disappointed.
 
I want to share my experience with my Morimito Elite HID kid, originally purchased about two and a half years ago. I did a ton of research on the best brands and from what I saw, Morimoto was top-end OEM quality (so that's what I went with) followed closely by Xenon Depot Phillips kits.

About a year and a half into ownership, I had a problem where my headlights wouldn't come on, or one or the other would come on. I brought it in for inspection and the shop I used for installation (highly reputable, #1 recommendation from The Retrofit Source) and they told me this generation of Morimoto HIDs had some problems with igniters failing. The whole system was replaced under warranty and I was told the new units were the best of the best, 3 generations ahead of what I had.

Fast forward another year, now I am having the same issue again, and the passenger side bulb does not come on at all (going in today).

Just curious if anyone has had problems like this with Morimoto? I'm pretty disappointed.

Morimoto did have issues with their ballasts for basically every kit. Problem was "fixed" and new ballasts were given under warranty. I wish the denso ballasts would work on the h11 kit but I would have to do an entire retrofit and change to d2s. IMO things happen but they do warranty the product
 
It appears that every hid kit for the 2016 headlights require some drilling into the back plastic cover of the headlight. Is this true? I was hoping for some plug and play xenon type hid lights. I was worried that if I did have to drill into the back of the headlight it might not be sealed and get condensation.

I went with the XS kit, drilled the back covers, added silicone to the rubber grommets that come with the kit for added protection and I have condensation in my right headlight. To the point beads of water are running down the inside of the light. It occurred roughly 3 months after install.

Last night I took a hair dryer, blew out the inside of the light and that took care of the condensation. Got up this morning, checked the light and found no water, drove from my garage to the office and the condensation came back. I'm not sure where it's coming from as it was a gorgeous morning with no rain or fog.

Perhaps I got a bad headlight from the factory. Not sure. May resort back to OEM stock setup and go from there.
 
The cover in the back is just a dust cover, the headlight itself should be sealed at the bulb. Make sure that your o-ring is in place and not pinched or something
 
The cover in the back is just a dust cover, the headlight itself should be sealed at the bulb. Make sure that your o-ring is in place and not pinched or something

For good measure I removed the bulb again, made sure the rubber seal was intact w/ no damage, and replaced. We'll see what happens over the course of the next couple of days.

Thanks for the reply e60ral.
 
[MENTION=127657]codyHTX[/MENTION] - You should not have to use the relay harness on your vehicle. It's possible that the polarity was reversed on one of the connectors, which is why the ballast did not fire.

Steve
 
[MENTION=127657]codyHTX[/MENTION] - You should not have to use the relay harness on your vehicle. It's possible that the polarity was reversed on one of the connectors, which is why the ballast did not fire.

Steve

thanks, we did reverse polarity per the instructions after it did not fire the first test to no avail. I'm trying to think of some way we error-ed in connecting the bulb/ballast for testing that caused the passenger side not to fire like the driver side did. it's so simple tho i don't know how we could have screwed it up!

with the way things are organized under that plastic flap thing, I have the ability to try reconnecting the bulb directly to the ballast. this weekend i may try that again just to see what happens. Will report back.

other than having to deal with hiding additional components/wires/etc is there any downside to installing with the relays? I imagine the result is the same in terms of light output etc, yes?
 

Members online

Forum statistics

Threads
278,316
Messages
3,554,109
Members
248,016
Latest member
Advally Service

Trending content

Back
Top