How-To-Guide (TRD CAI) Installation

Kinda strange, I have an UltraGauge and I never saw mine do what you have described.

Nevertheless, I'm glad it is coming back in line with your previous mileage!

Yea im glad to, i can live with being in the 17mpg range but would be better if i got to the 18mpg range again.
 
Typically when anything in the air flow is changed, it takes time for the fuel mapping to adjust. A drop in MPG isn't abnormal, but it shouldn't exist for more than a 100 or so miles.

otherwise, disconnect the battery for 30 minutes, let all the capacitors reset, and you'll be fine.
 
Typically when anything in the air flow is changed, it takes time for the fuel mapping to adjust. A drop in MPG isn't abnormal, but it shouldn't exist for more than a 100 or so miles.

otherwise, disconnect the battery for 30 minutes, let all the capacitors reset, and you'll be fine.

That is more than likely why the OP pointed to disconnect the battery in the first post, Step 2!
 
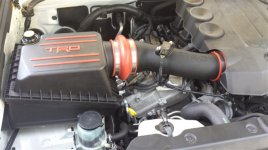
Received a delivery from my friendly FedEx driver today, installed after work, ALL DONE!

20160601_184917.jpg
 

Attachments

  • 20160601_184917.jpg
    20160601_184917.jpg
    64.5 KB · Views: 1,982
You can purchase the following for about 235 shipped....
from Camelback Toyota Parts - Genuine OEM Parts - Free Shipping

(TRD Air Filter Lid Replacement w/clips) TRD INTK FLTE LIDR PTR03-35090-AA $80.93
(TRD Lower Air Box Replacement w/clips) TRD INTK LWDAIRBXREP PTR03-35090-AF $63.35
(TRD Replacement Intake Flow Accelerator for CAI) TRD INTK FLW ACC PTR03-35090-AC $6.88
(TRD Replacement Intake Air Tube for CAI) TRD INK AIR TUBE RPL PTR03-89100-AA $29.69
(TRD REPLACEMENT coupler & clamp hardware kit for CAI) TRD INTK HRDWRE REP PTR03-89100-AB $35.42
(TRD, Air Flow Monitor, Cold Air Int) TRD GAGE INT TUN PTR03-34071 $19.50

It will not come with an oiled TRD Air Filter. Your stock air filter fits without issue. (Personally, I preferred not to run an oiled filter. YMMV)
It will not come with 15" of wire loom....cheap at auto parts store!
It will not come with 20" of 5/32 or 1/8" vacuum hose, also cheap at auto parts store!
It will not come with zip ties...IIRC, also cheap at auto parts store!
As described in this thread, a little O2 safe Silicone, and a small plug to seal a hole on the side of the air box and to seal a hole next to a mounting grommet on bottom of air box.
Silicone spray to facilitate inserting the tube into the couplers and you have just saved yourself $150.00

I can't help any more than this unless I do it for you! :becky:

Maybe I'm missing something, but when I search these part numbers, they all come up as "No parts found with that search text".
 
Ok,

Maybe this will help clear things up.

If you buy the complete TRD CAI intake (PTR03-89100 ) for $400.00+-, you will get the following as described in http://toyotaparts.sparkstoyota.com/install/PTR03-89100inst.pdf

Part Number(s): PTR03-89100
Kit Contents
Item # Quantity Reqd. Description
1 1 Air Filter (P/N: PTR43-00083)
2 1 Upper Air Box
3 1 Lower Air Box
4 1 Hump Coupler
5 1 Throttle Body Coupler
6 1 Air Inlet Tube
7 1 Air Flow Accelerator
Hardware Bag Contents
Item # Quantity Reqd. Description
8 1 #52 Hose Clamp
9 1 #56 Hose Clamp
10 2 #72 Hose Clamp
11 1 Plastic Nipple, 1/8”
12 1 Plastic Nipple, 5/8”
13 1 Hose, 5/32” ID X 20”
14 1 Convoluted Split Loom , 15”
15 2 Air Box Clip
16 1 Filter Minder Grommet
17 1 Filter Minder
18 3 Nylon Tie Strap, Tree Mount
19 3 Nylon Tie Strap, 6”
20 1 Bracket, Wire Harness
21 1 Plug, Plastic Tree Clip
22 2 Bolt, Socket M4 X 0.7 X 8mm

If you purchase this you will now have any use for #18 or #21, as the holes do not exist. You really don't need them if you have some zip ties to secure the wire looms as needed.

----OR----

You can purchase the following for about 235 shipped....
from Camelback Toyota Parts - Genuine OEM Parts - Free Shipping

(TRD Air Filter Lid Replacement w/clips) TRD INTK FLTE LIDR PTR03-35090-AA $80.93
(TRD Lower Air Box Replacement w/clips) TRD INTK LWDAIRBXREP PTR03-35090-AF $63.35
(TRD Replacement Intake Flow Accelerator for CAI) TRD INTK FLW ACC PTR03-35090-AC $6.88
(TRD Replacement Intake Air Tube for CAI) TRD INK AIR TUBE RPL PTR03-89100-AA $29.69
(TRD REPLACEMENT coupler & clamp hardware kit for CAI) TRD INTK HRDWRE REP PTR03-89100-AB $35.42
(TRD, Air Flow Monitor, Cold Air Int) TRD GAGE INT TUN PTR03-34071 $19.50

It will not come with an oiled TRD Air Filter. Your stock air filter fits without issue. (Personally, I preferred not to run an oiled filter. YMMV)
It will not come with 15" of wire loom....cheap at auto parts store!
It will not come with 20" of 5/32 or 1/8" vacuum hose, also cheap at auto parts store!
It will not come with zip ties...IIRC, also cheap at auto parts store!
As described in this thread, a little O2 safe Silicone, and a small plug to seal a hole on the side of the air box and to seal a hole next to a mounting grommet on bottom of air box.
Silicone spray to facilitate inserting the tube into the couplers and you have just saved yourself $150.00

I can't help any more than this unless I do it for you! :becky:

Maybe I'm missing something, but when I search these part numbers, they all come up as "No parts found with that search text".

:wow:

You missed it totally. It's really easy.....

You need to go this route instead of putting the numbers in that "Search Accessory Catalogs" box!

Follow this drill down:

Parts Catalogs > Toyota Accessories >OEM PARTS > 2015 > Toyota > 4Runner > 4Runner SR5 > Then put the part #'s in the Part # / Keyword Search box and hit GO

Maybe this is what someone has to do for you...."I can't help any more than this unless I do it for you!"
Hope this helps and clears it up for you!
 
Last edited:
Someone needs to parts and price source a supercharger for these new gens like that for some real power gains! Lol.

Nice work on the parts sourcing guys!

Sent from my XT1254 using Tapatalk
 
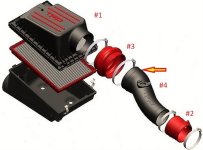
After reading several posts with people having difficulty connecting couplers, air tube, and air box, thought I would share my experience.........

1. As others have mentioned Silicone spray is your friend

2. Install air box, filter, and lid completely (#1 on diagram)

3. Loosen all hose clamps fully, so just a couple of threads are engaged

4. Slide 2 hose clamps on small coupler #2, inset 2 vacuum ports, spray silicone on both internal coupler surfaces and engine intake, slide coupler onto engine intake. Rotate coupler so ports line up with hoses, connect hoses, then tighten clamp on intake

5. Slide 2 hose clamps on large coupler #3, spray silicone on both internal surfaces and air tube, slide coupler onto air tube past lip indicated by red/yellow arrow. This is an important step as it will allow plenty of room for connection to air box later.

6. Spray more silicone on remaining small internal coupler and small end of air tube, insert air tube onto coupler #2 already installed

7. Spray more silicone on remaining large internal coupler and air box, slide coupler to the left onto air box. Coupler should also fully seat in groove on air tube

8. Rotate air tube so it lines up with air box and engine intake (sensor on top). Ensure both couplers are fully seated, tighten three remaining hose clamps.

Hole process should only take a few minutes with no fighting to get couples on and aligned.
 

Attachments

  • TRD CAI.jpg
    TRD CAI.jpg
    62.4 KB · Views: 1,964
Camelback Toyota - Backordered

FYI for anyone who ordered their parts from C.B. Toyota recently:

I just called to check on my order from 2 weeks ago and was told that the parts are on back order till at least the week of 7/11/16.

Not terrible, but I am anxious to install my CAI... guess I'll have to wait a couple more weeks.
 
FYI for anyone who ordered their parts from C.B. Toyota recently:

I just called to check on my order from 2 weeks ago and was told that the parts are on back order till at least the week of 7/11/16.

Not terrible, but I am anxious to install my CAI... guess I'll have to wait a couple more weeks.

I'm waiting on mine also, ordered a week or so ago. Thanks for the info.

-A
 
I'm waiting on mine also, ordered a week or so ago. Thanks for the info.

-A

Email just received:

Hello, We wanted to inform you that your part(s) have arrived and will be shipping out to you within 24 hours. We thank you for your support and appreciate your business. Thank you, Camelback Toyota Parts


Looks like I'll have at least one project for this weekend :-)

-A
 
Email just received:

Hello, We wanted to inform you that your part(s) have arrived and will be shipping out to you within 24 hours. We thank you for your support and appreciate your business. Thank you, Camelback Toyota Parts


Looks like I'll have at least one project for this weekend :-)

-A
Partznet has the parts in stock and it's cheaper. mine was about 220 shipped.
if you fill out your information and then leave the site they will email you a discount code for 10% off.
 
Partznet has the parts in stock and it's cheaper. mine was about 220 shipped.
if you fill out your information and then leave the site they will email you a discount code for 10% off.

To tag on to this post, I just got an email with the following!!!!

Help celebrate July 4th with a Bang! We are offering an extra 10% off our already discounted prices!
Enter coupon code BOOM10
Sale starts June 29 and ends July 8th!


:usa2::usa2: :usa2::usa2: :usa2::usa2: :usa2::usa2:
 
Last edited:
Just installed mine and a few things to mention that I noticed durning and after the install.

- if your following the steps on pg. 1 and keep track of your mileage in the trip computer... Write it down, cause it won't be there later after you unplug the neg bat terminal.

- silicon spray, as others have mentioned it can help but I really didn't need much and on some connection I didn't use it at all. Now mind you that might have had something to do with it being close to 100 degrees in my garage when I did the install, so the flex joints were pretty soft. But if you follow the tips further back in this thread as others have added and learned over time the install is super easy.

- on start up, as others have experienced it immediately died. Second start was fine, but even tho I unplugged the battery, I still had it die.

- surprisingly my GPS info was saved, last destinations ect, I think it needs 4hrs for a complete reset of the NAV.

- right on start up it said I was averaging 6.2 MPG.... And I didn't even drive anyplace. Before the install the comp read 17.5 mpg... So not sure how the comp came up with 6.2 mpg when it was just started after battery disconnect for 1hr and zero driving....

Just thought I should document for others, sounds Bad A$$ when you stomp on it. Otherwise so far I can't even tell its under the hood. I like that, no need to run back to my early 20's GTI days...

-A
 
Last edited:
Great writeup. I do not even own the intake yet, but I still appreciate the work you put into this write up. When finally can afford this intake, I will be referring to these instructions.
24.gif
6.gif

4.gif
 
Last edited:
Installed mine today with the tips listed in this thread. Thank you all for that. Install went pretty easy. I did not use any silicone to install it. It was tight but I didn't find it necessary. Mine did not stall on the first try
Can't say I felt a huge difference, but the sound it makes is worth the price alone :thumb3:

Thanks for the tip of ordering it separately. Sure was nice to save $150.

2zfk1n7.jpg
 
Need help missing intake box rubber plug

Need help I'm missing the intake box rubber plug. I have contacted camelback and they don't know what I'm talking about. At the moment I have electrical tape over the hole and that just does not sit well with me. Can anyone help me locate the part or another fix?
 

Members online

Forum statistics

Threads
278,312
Messages
3,554,086
Members
248,016
Latest member
Advally Service

Trending content

Back
Top