If you have a TRD Skid Plate Read This!

Anyone know the thread and pitch size of the other skid plate bolts?

Update:
Front skid plate(TRD) 10mm 1.25
Transfer case skid 8mm 1.25
 
Last edited:
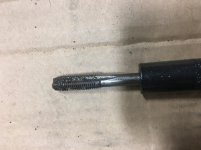
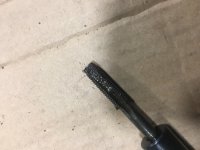
Weird. Trying to tap the front 2 bolt holes and the tap isnt catching. I feel like I'm just grinding the threads away.

I feel like i should have drilled the hole a bit bigger first before tapping it.

Edit. Looks like i ****ed up. I needed cobalt drill bits first to drill the hole bigger. Then tap. Fml.
 
Last edited:
Weird. Trying to tap the front 2 bolt holes and the tap isnt catching. I feel like I'm just grinding the threads away.

I feel like i should have drilled the hole a bit bigger first before tapping it.

Edit. Looks like i ****ed up. I needed cobalt drill bits first to drill the hole bigger. Then tap. Fml.

Why would you need to drill the hole bigger? The tap is just cleaning out the existing threads so the bolts dont seize. Drilling out the hole will destroy the existing threads and require you to tap it a size larger.
 
That's what I thought and read! Lol might be different amongst years or something, but the front 2 bolts on the trd skid plate are 10mm bolts. The current bolts are 8mm up front. So a tap isnt gonna make that hole 2mm bigger.

I bought the exact same products (tap, handle, cutting oil) as linked in the OP so i know i didnt screw up there.

Trust me, Im as confused as you are lol
 
That's what I thought and read! Lol might be different amongst years or something, but the front 2 bolts on the trd skid plate are 10mm bolts. The current bolts are 8mm up front. So a tap isnt gonna make that hole 2mm bigger.

I bought the exact same products (tap, handle, cutting oil) as linked in the OP so i know i didnt screw up there.

Trust me, Im as confused as you are lol

I couldn't get the Tap started without it cutting new threads my self. Maybe an issue with Amazon or the supplier? Non issue for me as I have the plates down on the regular and added grade 8 bolts.
 
So nobody's had to drill the front 2 holes bigger?

Are you running longer 8mm bolts up front instead of the 10mm bolts that come with the trd skid plate?
 
So nobody's had to drill the front 2 holes bigger?

Are you running longer 8mm bolts up front instead of the 10mm bolts that come with the trd skid plate?

I used the same tap for all 4 holes. I have a '17OR and replaced the stock skid with a pro skid. I used the original stock bolts, but the bolts on the rear that came with the pro skid were the same same size and pitch, just longer.

Edit...I just remembered the front bolts were already in the PRO skid with the spacers
 
Last edited:
So nobody's had to drill the front 2 holes bigger?

Are you running longer 8mm bolts up front instead of the 10mm bolts that come with the trd skid plate?
Just to ask - are you using the holes from the stock mounts? To mount the pro plate you have to remove 4 bolts (10mm, 14mm head) and the original 8mm mounting holes are unused.
 
Just to ask - are you using the holes from the stock mounts? To mount the pro plate you have to remove 4 bolts (10mm, 14mm head) and the original 8mm mounting holes are unused.

Fair question lol that's correct -Im using the original 4 holes that the oem skid plate was using.

Not any of the 8mm holes (10mm head) used to hold that plastic part just above the oem skid plate.

The front 2 plate bolts seem to be a different size on the SR5 vs the OP/TRD Pro/TE. I think.
 
Fair question lol that's correct -Im using the original 4 holes that the oem skid plate was using.

Not any of the 8mm holes (10mm head) used to hold that plastic part just above the oem skid plate.

The front 2 plate bolts seem to be a different size on the SR5 vs the OP/TRD Pro/TE. I think.

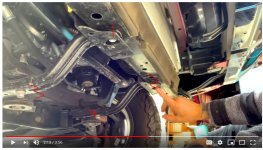
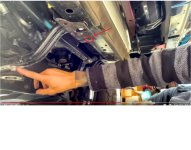
Re-watch this video. I think you're working on the wrong holes in the frame.

YouTube

I re-used the rear 2 bolts. #3 & #4 in this pic. I broke off the fasteners (or spacers) holding the 2 large front bolts to the skid and connected those bolts to the front two holes (#1 & #2) in the frame.
 

Attachments

  • bolts.JPG
    bolts.JPG
    81.5 KB · Views: 4,254
Last edited:
Oh shit. No joke. I have been using the wrong holes.

I assumed you were supposed to use the holes the skid plate was originally mounted on.

Holy shit. How do I send you beer?!!

(pic of the front hole I was trying to mount the plate to -since it spaced out properly with the rear holes... derp)
 

Attachments

  • T4ROops.jpg
    T4ROops.jpg
    111.7 KB · Views: 3,908
Oh shit. No joke. I have been using the wrong holes.

I assumed you were supposed to use the holes the skid plate was originally mounted on.

Holy shit. How do I send you beer?!!

(pic of the front hole I was trying to mount the plate to -since it spaced out properly with the rear holes... derp)

All good! :cheers:
 
this thread is a time saver

I installed my TRD skid last night on my SR5 and this thread was a major time saver. THANKS!! its a 2018 and I couldn't believe the amount of crud I got out of ALL 4 holes even though there were bolts in them AND I did try to just spray lube on the new bolts, screw them in and bypass the tap out step, NOPE, it didn't work, I had to tap all 4 holes out. when I installed my sliders a few weeks ago I tapped all 12 holes and got a ton of crud out of them too so I shouldn't of been surprised the skid holes were full of crud.
 

Attachments

  • IMG_6720.jpg
    IMG_6720.jpg
    124.3 KB · Views: 3,813
  • IMG_6721.jpg
    IMG_6721.jpg
    122.8 KB · Views: 3,865
Last edited:
Now this is not new information. In fact [MENTION=103267]Saker[/MENTION] discussed this and wrote the following post 2.5 years ago.
Toyota 4Runner Forum - Largest 4Runner Forum - View Single Post - TRD Pro parts

There have been repeated issues with the bolts getting stuck or not fitting properly with the TRD Skid plates. Now since this is Father’s Day I was going to call this the “I Told You So” thread, but I figured it wouldn’t get as many views or help as many people.


Last weekend I took my 4runner in for its 30K service a little early because we are leaving Friday for our biannual trip up to Maryland for 3 weeks to visit family. So in preparation I removed my skid plates (because I didn't want the dealership messing them up with their power tools)…except the back passenger driver side bolt on the TRD Skid was stuck. My reaction was pretty much “Oh Shit I know where this is going!” as I’ve read all of the threads on the issues with this. I also read but did not heed the advice of Saker (hence when the “I told you so” potential thread name) when initially installing the skid plate as the bolts seemed to go in just fine, maybe a little snug on the last few turns. Luckily the dealership was able to remove the bolt without any damage to the radiator support or destroying the threading of the hole (edit: I told them not to re-install the skid once they got it off as I'd didn't trust them to not lock the bolt on place permanently). As I said, I was lucky! As soon as I got back from the dealership I ordered a M10 x 1.25 Chaser Tap, some Tap Lubricant and a Die (same materials as in Saker’s post above) from Amazon.
https://www.amazon.com/CHANNELLOCK-8339-10mm-1-25-Metric/dp/B0002JT0Y6/ref=pd_lpo_vtph_469_bs_lp_t_2?_encoding=UTF8&psc=1&refRID=C4HF5HA7VKD963DYP57N
(I just bought the "Frequently Bought Together Trio of Parts)

I have never done a drill tap before in my life. Thank god for YouTube! Watched a couple videos on it and it seemed very straightforward. For those of you that haven’t done this, here is the quick and dirty of it.

1. Line up the chaser tap with some lubricant on it with the bolt hole.
2. Initiate the tap with a couple of turns; you will feel it catch the previous threads.
3. Complete a couple of hand turns then back it out about a half turn and repeat for the length/depth you need.
4. Back the tap out turning slowly.

You can see in the pics below how dirty and how much material the tap removed from the bolt hole. This is why there have been so many issues. After completing this procedure on all 4 bolt holes I could literally hand screw the bolts in and then tighten easily using the M14 Socket Wrench.

If you have a TRD Skid Plate, this is worth the $20 in materials. It could save you hundreds of $ in the long run. Oh and I used some anti-seize just for good measure.



Sorry noob question. Does this apply to trd pro model also? Or this only applies to other models (sr5, off-road) upgrading to trd skid plate?
 
Sorry noob question. Does this apply to trd pro model also? Or this only applies to other models (sr5, off-road) upgrading to trd skid plate?

It is the same support areas in all of the models, if I had a TRD Pro I would still check the bolts and have a tap on hand just in case...just my $.02.
 
I installed my TRD skid last night on my SR5 and this thread was a major time saver. THANKS!! its a 2018 and I couldn't believe the amount of crud I got out of ALL 4 holes even though there were bolts in them AND I did try to just spray lube on the new bolts, screw them in and bypass the tap out step, NOPE, it didn't work, I had to tap all 4 holes out.

It's weird.

When I tapped the 4 holes, each time, the tap went in easily and the first 3-4 turns were easy (i.e. I'm pretty sure I wasn't creating new threads right off the bat), but with each hole, I encountered a fair bit of resistance half way through (half the threads of the tap were in the hole). I used a LOT of cutting fluid so I know a lack of cutting fluid wasn't an issue.

Pulling the tap after I finished each hole, it almost seemed like it was all metal shavings that came out. I didn't notice very much gunk (my 4runner only has 9K kms or like 6k miles so not a lot of time to develop too much debris).

Curious what was up with the shavings? Half way through each hold, there's a little bit of metal shavings (no debris), but not enough to be a concern. Once I encountered resistance, I was obvious creating new threads from something... that's when I noticed a lot more metal shavings.

I realize this post is useless without pics.
 
It's weird.

When I tapped the 4 holes, each time, the tap went in easily and the first 3-4 turns were easy (i.e. I'm pretty sure I wasn't creating new threads right off the bat), but with each hole, I encountered a fair bit of resistance half way through (half the threads of the tap were in the hole). I used a LOT of cutting fluid so I know a lack of cutting fluid wasn't an issue.

Pulling the tap after I finished each hole, it almost seemed like it was all metal shavings that came out. I didn't notice very much gunk (my 4runner only has 9K kms or like 6k miles so not a lot of time to develop too much debris).

Curious what was up with the shavings? Half way through each hold, there's a little bit of metal shavings (no debris), but not enough to be a concern. Once I encountered resistance, I was obvious creating new threads from something... that's when I noticed a lot more metal shavings.

I realize this post is useless without pics.


are you sure you were using a metric tap? I was using 10mmx1.25 and didn't get any thread shavings, just crud.
 

Members online

Forum statistics

Threads
278,316
Messages
3,554,121
Members
248,016
Latest member
Advally Service

Trending content

Back
Top