

iFORCE
New member
Here's a write up to "How I blacked out my headlights" - By Ryan M
Pictures can also be found on fellow member "HRunner" and his writeup. He removed his headlights without removing the bumper but installed JDM headlights instead of painting them. For best results.. I'd suggest reading both our threads. Thanks for the pics! (I accidently deleted mine off my server) Hrunner's Thread
[Main Tools Needed:]
oven
wrench
screwdriver
black spray paint
silicon
lunch
CAUTION: This requires lots of time and patience. This procedure includes the removal of your front bumper, trim pieces, and the headlights. Make sure you organize all the little screws and nuts when removed.
[Procedure:]
1) You will need to remove the screws holding the bumper together from underneath the car and the trim piece around the engine bay.

2) After removing all the bolts and screws that hold the bumper together.... It should be fairly easy to feel if you've missed any. By now the whole bottom end of the bumper should be loose. Disconnect any lightbulbs from the fog lights + headlights.
3) Now.. a difficult part I ran into. There are trim pieces in the middle of the bumper that are held on by clips. What I did was took a flat screwdriver and push the clips from the back to unclip them. Very tight space in there but don't pull on the trim piece too hard... it might break.

4) After removing the trim pieces.. you're front bumper should be on the floor... provided that you placed it there and not dropped it.
5) Time to remove the lights. Held on by a couple screws/bolts that you can see and one that was pretty hard to find. The last bolt can be accessed via a circular hole in the wheel well.

6) After removing one light... you can either remove the other one, or wait till you start spray painting this one.
7) This is where the oven comes into place. preheat oven to 260F then put it in for 3-4 min. I was kind of nervous when I was doing this do I kept watching it. After the alloted time, use two oven mitts and take it out. Set it on a heat resistant surface and quickly use a flathead screwdriver to pry the two pieces apart. The two pieces are the clear plastic and the not clear plastic. Be patient as they will eventually come apart. If the glue has cooled down.. put it back in the over for a minute and repeat process. Sooner or later you can just split the two parts up like a bag of chips.
8) Spray paint time. I used a semi-gloss black spraypaint. You can use whatever color/texture here. BBQ paint has texture to it so test out the paint before you spray it on. What you want to spray paint is the PLASTIC molding that comes off the reflectors. DO NOT SPRAY PAINT THE REFLECTORS... JUST THE PLASTIC MOLDING.

Like any spray paint jobs, have lots of ventilation. Do thin coats of paint.. and keep coating it till your happy. Just be sure to let it dry before you put on another coat. I used a fan + the oven to bake it a little. When your waiting for this one side to dry... take off the other headlight if you haven't done so already. DO NOT DROP the painted plastic... IT WILL CRACK so treat it like a supercharger for your 4runner.
10) Now that you have a nicely painted black plastic molding... spray some clear coat over it. It'll protect the paint and make it nice and glossy. Once your happy with the results, reverse the steps and put it all back together. To seal it up again, Place it back i nthe over for a minute or two and the glue will melt, therefore sealing it up again. Just to be safe, I took the silicon and squeezed it into all the cracks. I didn't want it fogging up.
11) reverse all the steps into putting back the lights on... the trim pieces on... the bumper back on, and reconnect your lightbulbs.
If you have any questions, feel free to PM me. If I forgot sometime.. let me know so I can edit this procedure.
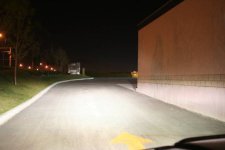
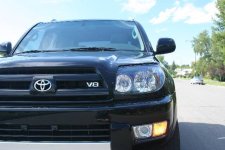
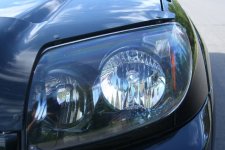
End Product =


Pictures can also be found on fellow member "HRunner" and his writeup. He removed his headlights without removing the bumper but installed JDM headlights instead of painting them. For best results.. I'd suggest reading both our threads. Thanks for the pics! (I accidently deleted mine off my server) Hrunner's Thread
[Main Tools Needed:]
oven
wrench
screwdriver
black spray paint
silicon
lunch
CAUTION: This requires lots of time and patience. This procedure includes the removal of your front bumper, trim pieces, and the headlights. Make sure you organize all the little screws and nuts when removed.
[Procedure:]
1) You will need to remove the screws holding the bumper together from underneath the car and the trim piece around the engine bay.
2) After removing all the bolts and screws that hold the bumper together.... It should be fairly easy to feel if you've missed any. By now the whole bottom end of the bumper should be loose. Disconnect any lightbulbs from the fog lights + headlights.
3) Now.. a difficult part I ran into. There are trim pieces in the middle of the bumper that are held on by clips. What I did was took a flat screwdriver and push the clips from the back to unclip them. Very tight space in there but don't pull on the trim piece too hard... it might break.
4) After removing the trim pieces.. you're front bumper should be on the floor... provided that you placed it there and not dropped it.
5) Time to remove the lights. Held on by a couple screws/bolts that you can see and one that was pretty hard to find. The last bolt can be accessed via a circular hole in the wheel well.
6) After removing one light... you can either remove the other one, or wait till you start spray painting this one.
7) This is where the oven comes into place. preheat oven to 260F then put it in for 3-4 min. I was kind of nervous when I was doing this do I kept watching it. After the alloted time, use two oven mitts and take it out. Set it on a heat resistant surface and quickly use a flathead screwdriver to pry the two pieces apart. The two pieces are the clear plastic and the not clear plastic. Be patient as they will eventually come apart. If the glue has cooled down.. put it back in the over for a minute and repeat process. Sooner or later you can just split the two parts up like a bag of chips.
8) Spray paint time. I used a semi-gloss black spraypaint. You can use whatever color/texture here. BBQ paint has texture to it so test out the paint before you spray it on. What you want to spray paint is the PLASTIC molding that comes off the reflectors. DO NOT SPRAY PAINT THE REFLECTORS... JUST THE PLASTIC MOLDING.
Like any spray paint jobs, have lots of ventilation. Do thin coats of paint.. and keep coating it till your happy. Just be sure to let it dry before you put on another coat. I used a fan + the oven to bake it a little. When your waiting for this one side to dry... take off the other headlight if you haven't done so already. DO NOT DROP the painted plastic... IT WILL CRACK so treat it like a supercharger for your 4runner.
10) Now that you have a nicely painted black plastic molding... spray some clear coat over it. It'll protect the paint and make it nice and glossy. Once your happy with the results, reverse the steps and put it all back together. To seal it up again, Place it back i nthe over for a minute or two and the glue will melt, therefore sealing it up again. Just to be safe, I took the silicon and squeezed it into all the cracks. I didn't want it fogging up.
11) reverse all the steps into putting back the lights on... the trim pieces on... the bumper back on, and reconnect your lightbulbs.
If you have any questions, feel free to PM me. If I forgot sometime.. let me know so I can edit this procedure.
End Product =
Last edited:

 Its also at the bottom of my sig.



 Its the easiest way. The trim pieces all interconnect and with the brush guard there... it'll be easier taking it off then to work around it.


