Low Beam issue on 2000 4Runner

Sorry, I had a really busy weekend. You guys are making good progress, but I came back at an opportune time, as you need some additional info to do that test on the cluster. It is Pin 1 and 5 on the C27 plug. There are five or six plugs on the cluster. Go back to the Connector list I linked to earlier in Post #31 to see the Pin out (page 262). C27 is a white 2-row plug with 18 pins, 7 on top and 11 on the bottom. IBall wants you to test those for ground (clip on positive, headlights on). Also keep an eye out for any more post factory wiring involved, and let us know exactly what it is and take pics.

Test results
Clipped to positive battery terminal and touched probe to Pin #1 black wire with a red stripe and No Test light with the lights turned on or off.
Touched probe to Pin #5 yellow wire black stripe and the test light came on with light switch off and on.

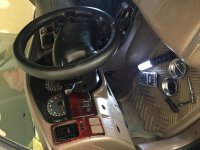
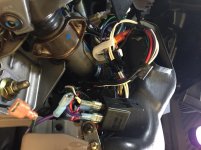
I do see the additional wiring for the alarm and my fog lights which are running through a relay with a fuse. The two connectors you see are for the fog light switch that is in a pop out panel.
 

Attachments
  • 96AB9812-BC97-4ED4-B08A-F95EAAEB48CE.jpg
    96AB9812-BC97-4ED4-B08A-F95EAAEB48CE.jpg
    130.7 KB · Views: 258
Last edited:
Test results
Clipped to positive battery terminal and touched probe to Pin #1 black wire with a red stripe and No Test light with the lights turned on or off.
Touched probe to Pin #5 yellow wire black stripe and the test light came on with light switch off and on.

I do see the additional wiring for the alarm and my fog lights which are running through a relay with a fuse. The two connectors you see are for the fog light switch that is in a pop out panel.

OK, so I show that pin 1 should be the same Red/yellow wire you tested at the stalk switch. Are you sure you have the correct connector. I don't know where on the comb meter it is, but it should be a 20 pin connector, two rows of 10 pins. If you look at the connector disconnected from the connection side, pin 1 should be upper left.
Pin 5 would be a green wire, same as you tested at the Main DRL relay pin 5.

I show same colors or the 2000 and for 2002. Maybe Le Duhrk can tell us if it is the same all years. [MENTION=10169]TheDurk[/MENTION]
 
OK, so I show that pin 1 should be the same Red/yellow wire you tested at the stalk switch. Are you sure you have the correct connector. I don't know where on the comb meter it is, but it should be a 20 pin connector, two rows of 10 pins. If you look at the connector disconnected from the connection side, pin 1 should be upper left.
Pin 5 would be a green wire, same as you tested at the Main DRL relay pin 5.

I show same colors or the 2000 and for 2002. Maybe Le Duhrk can tell us if it is the same all years. [MENTION=10169]TheDurk[/MENTION]

You're right, he has the wrong connector. The colors are the same. But I have it as 18 pins, one row 11 pins and the other 7. it should be C27 on page 262 here:

http://www.toyota-4runner.org/attachments/3rd-gen-t4rs/313335d1538110090-low-beam-issue-2000-4runner-260-connector-list.pdf
 
Last edited:
I only have the headlight pages for a 2000, the 02 manual doesn't even have 262 pages. So we'll go with your description.

Thanks for the clarification. I was thinking the colors were suppose to be the same but I wasn’t sure. I’ll try the other connector similar to that one after work today.
 
You're right, he has the wrong connector. The colors are the same. But I have it as 18 pins, one row 11 pins and the other 7. it should be C27 on page 262 here:

http://www.toyota-4runner.org/attachments/3rd-gen-t4rs/313335d1538110090-low-beam-issue-2000-4runner-260-connector-list.pdf

Corrected results. Had the correct plug i just read Pin 1 from the wrong side

Pin#1 Dark Red with yellow stripe. Connected clip to Positive Batt post and Probe to the wire on connector 27. Test Light came on when i turned the Headlight switch to the ON position.

Pin#5 Green Wire. Connected Prob to wire in clip and the test light DID NOT turn on with headlight switch ON/off
 
Corrected results. Had the correct plug i just read Pin 1 from the wrong side

Pin#1 Dark Red with yellow stripe. Connected clip to Positive Batt post and Probe to the wire on connector 27. Test Light came on when i turned the Headlight switch to the ON position.

Pin#5 Green Wire. Connected Prob to wire in clip and the test light DID NOT turn on with headlight switch ON/off

Well I hate to say I told ya so, but that indicates a bad combination meter. You can try making a jumper and test, or just ground the green wire at pin 5 and the lights should work. Technically they shouldn't work with out turning on the switch, but since they turned on when you were testing at the Main DRL relay, I'd guess they will when you ground here too:frusty:. But we haven't figured out why, and it doesn't really matter. Check both!

If you make a jumper, think about making a permanent one and you'll be golden!
:cheer2:
 
Well I hate to say I told ya so, but that indicates a bad combination meter. You can try making a jumper and test, or just ground the green wire at pin 5 and the lights should work. Technically they shouldn't work with out turning on the switch, but since they turned on when you were testing at the Main DRL relay, I'd guess they will when you ground here too:frusty:. But we haven't figured out why, and it doesn't really matter. Check both!

If you make a jumper, think about making a permanent one and you'll be golden!
:cheer2:

Well, when there is weird stuff going on, and there is post-factory wiring in the neighborhood, the latter is frequently the cause of the former.

Good work!
 
Last edited:
Well I hate to say I told ya so, but that indicates a bad combination meter. You can try making a jumper and test, or just ground the green wire at pin 5 and the lights should work. Technically they shouldn't work with out turning on the switch, but since they turned on when you were testing at the Main DRL relay, I'd guess they will when you ground here too:frusty:. But we haven't figured out why, and it doesn't really matter. Check both!

If you make a jumper, think about making a permanent one and you'll be golden!
:cheer2:

Thanks guys, you both were dead on, the Dang Cluster. Id be curious to know what exactly caused it to go bad after all this time as well but if we can get a perm fix. I'm fine with that as well. I hate its the cluster especially after being connected and working fine for 15years since the alarm was installed but Sh..$ happens.

IBall, you said test both so am I taking a wire and connecting the Pin #1 to Pin#5 for a jumper for the 1st test and then running a wire from Pin#5 the Green wire to a good ground to see if that works for the 2nd test?

Where is a Radio Shack when you need one now? If I go the permanent jumper route, what do you all normally use to insure it stays in each Pin# and not come out?

I'll report back after work today with both test results. I have some speaker wire I can use to test and I will probably look for a stiffer wire to use for a permanent jumper unless you have better recommendations on making one?

I plan on going by the local electronics store during lunch to pick up some pins to use on the end of the wire to make a good jumper. Open to any suggestions you two may have.
 
Last edited:
Thanks guys, you both were dead on, the Dang Cluster. Id be curious to know what exactly caused it to go bad after all this time as well but if we can get a perm fix. I'm fine with that as well. I hate its the cluster especially after being connected and working fine for 15years since the alarm was installed but Sh..$ happens.

IBall, you said test both so am I taking a wire and connecting the Pin #1 to Pin#5 for a jumper for the 1st test and then running a wire from Pin#5 the Green wire to a good ground to see if that works for the 2nd test?

Where is a Radio Shack when you need one now? If I go the permanent jumper route, what do you all normally use to insure it stays in each Pin# and not come out?

I'll report back after work today with both test results. I have some speaker wire I can use to test and I will probably look for a stiffer wire to use for a permanent jumper unless you have better recommendations on making one?

I plan on going by the local electronics store during lunch to pick up some pins to use on the end of the wire to make a good jumper. Open to any suggestions you two may have.

Yes, although if the first test works, the 2nd test is redundant.

As for jumpers, I think if it were mine I'd solder a wire across both wires, not in the connector but back far enough to make it easy to see, troubleshoot and repair. This way if you ever do swap the cluster, you can just cut the wire off and be normal. Heh, normal...
 
Yes, although if the first test works, the 2nd test is redundant.

As for jumpers, I think if it were mine I'd solder a wire across both wires, not in the connector but back far enough to make it easy to see, troubleshoot and repair. This way if you ever do swap the cluster, you can just cut the wire off and be normal. Heh, normal...

Thanks, I will look at trying that. It is tight back there so I will see how a jumper connected works 1st and let you all know the results of that before attempting the solder. Many thank again. Hope to have this tested by 5pm EST
 
Well, when there is weird stuff going on, and there is post-factory wiring in the neighborhood, the latter is frequently the cause of the former.

Good work!

[MENTION=102597]IBallEngineer[/MENTION] and [MENTION=10169]TheDurk[/MENTION]

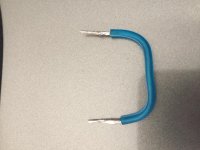
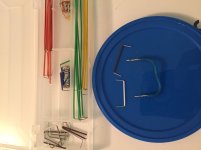
I am so grateful to the both of you for sticking with me through this. I now have lights in low/high beam as normal. It was very tight to try to make a cut and solder on those two wires so i attempted to make a small jumper with a piece of wire i had by putting a small amount of solder on the end to keep it stiff but it was still too big to go in the pin hole. During lunch i had ran by a local electronics store and picked up a small jumper kit of pre-made jumpers in different lengths and there was one that matched perfect. The White jumper in the 2nd pic was a perfect fit. I was able to push it in flush to the connector an tested it multiple times before and after buttoning everything back up. The 2nd best part is there was no extra screws or bolts after everything was put back together.

Would the two of you PM me your PayPal address as i would like to send you two something to show my gratitude for taking your time and maintaining patience in helping me with this issue?

THANK AGAIN.. below are some pics of the jumper i attempted to make along with the ones i bought
 

Attachments

  • 3AF1A65F-9A4D-4EF1-96C5-3508BB924176.jpg
    3AF1A65F-9A4D-4EF1-96C5-3508BB924176.jpg
    136.7 KB · Views: 211
  • B2A88758-34D9-4175-8567-8BED8EB7ED21.jpg
    B2A88758-34D9-4175-8567-8BED8EB7ED21.jpg
    124.4 KB · Views: 222
  • A09A1FD9-40AC-4679-9BC1-B64A68D23AAD.jpg
    A09A1FD9-40AC-4679-9BC1-B64A68D23AAD.jpg
    128.9 KB · Views: 214
Last edited:
[MENTION=102597]IBallEngineer[/MENTION] and [MENTION=10169]TheDurk[/MENTION]

I am so grateful to the both of you for sticking with me through this. I now have lights in low/high beam as normal. It was very tight to try to make a cut and solder on those two wires so i attempted to make a small jumper with a piece of wire i had by putting a small amount of solder on the end to keep it stiff but it was still too big to go in the pin hole. During lunch i had ran by a local electronics store and picked up a small jumper kit of pre-made jumpers in different lengths and there was one that matched perfect. The White jumper in the 2nd pic was a perfect fit. I was able to push it in flush to the connector an tested it multiple times before and after buttoning everything back up. The 2nd best part is there was no extra screws or bolts after everything was put back together.

Would the two of you PM me your PayPal address as i would like to send you two something to show my gratitude for taking your time and maintaining patience in helping me with this issue?

THANK AGAIN.. below are some pics of the jumper i attempted to make along with the ones i bought

No need. If I'm in your vicinity someday, you can buy me a drink somewhere.
 
No need. If I'm in your vicinity someday, you can buy me a drink somewhere.

That is very fair and I am open to that. Again many thanks to you both. Now I can look towards a Tundra Brake upgrade and research that more to do later.

I hope I can be helpful to someone as you two were to me.
 
That is very fair and I am open to that. Again many thanks to you both. Now I can look towards a Tundra Brake upgrade and research that more to do later.

I hope I can be helpful to someone as you two were to me.

All the payment I need! That and confirming the diagnosis. For the record you did your part and communicated well, always seems to be an issue for some when trying to solve issues on this forum.

Back to the peanut gallery I go.

:popcorn:
 
All the payment I need! That and confirming the diagnosis. For the record you did your part and communicated well, always seems to be an issue for some when trying to solve issues on this forum.

Back to the peanut gallery I go.

:popcorn:

I really do appreciate it. Hopefully this thread will help others. I researched on here before posting my own issue was hoping the two of you would jump in. I agree the communication makes a big deal. I was at the mercy of your knowledge and time and could get impatient plus I wanted this to be something others could use as well.

Thanks again
 
They say timing is everything...
Just like "GRNT4R00", I noticed this morning that my low beams were not working. High beams do. Going out to trouble-shoot, following the steps listed here to determine the cause; thank you "IBallEngineer" and "theDurk" for the guidance.
One question I have;
Could this have resulted from jumping the battery on another vehicle? With winter fast approaching us up here in the north, I wanted to get one more drive in with the top down in my little red convertible yesterday, but had to jump the battery to get it started. I'm positive I had low beam lights prior to doing that.
Its cold here today. Not what I wanted to deal with, but it's also getting darker earlier. Hoping its just the headlight relay. I'll let you all know.
Thanks again
 
Good luck pilgrim. Do the high beams only work on flash to pass? They may need a little more info such as the year of the runner as some of the wiring diagrams change from 2000 - 2001. Hopefully you find it quick, I wouldn’t think the jump would cause it but I guess anything is possible. They will reply and they are the Kings of resolution for this.
 
They say timing is everything...
Just like "GRNT4R00", I noticed this morning that my low beams were not working. High beams do. Going out to trouble-shoot, following the steps listed here to determine the cause; thank you "IBallEngineer" and "theDurk" for the guidance.
One question I have;
Could this have resulted from jumping the battery on another vehicle? With winter fast approaching us up here in the north, I wanted to get one more drive in with the top down in my little red convertible yesterday, but had to jump the battery to get it started. I'm positive I had low beam lights prior to doing that.
Its cold here today. Not what I wanted to deal with, but it's also getting darker earlier. Hoping its just the headlight relay. I'll let you all know.
Thanks again

Just jumping it should not cause a problem. Jumping it backwards can do all kinds of stuff, including frying relays.
 

Members online

Forum statistics

Threads
278,310
Messages
3,554,078
Members
248,016
Latest member
Advally Service

Trending content

Back
Top