paddlenbike's Build Thread

could you please add a few more detailed posts about your lights, particular the components and exactly how you wired everything?
 
can you post a shot of your kayak cradles on your roof rack?

I just removed the saddles a few weeks ago since I am doing more mountain biking right now than paddling. The best photo I have at this point is the first photo in the 1st post of this thread. I have the basic Yakima round bar system with the old-style "Yakima TLC saddles." Yakima hasn't made TLC saddles for years but the newer versions work fine too.
 
could you please add a few more detailed posts about your lights, particular the components and exactly how you wired everything?

The floor lights would be too difficult to explain, however the hatch light and rear cargo light are a little easier. I use Cree XR-E or XP-G stars available from places like ledsupply.com. Cut a piece of aluminum to act as a heatsink and use Arctic Silver or JB Weld to glue the star to the heatsink.

The easiest way to hook them up is to buy a "wired buckpuck" driver from that same site. There are four wires, one to the + of the power supply and one to ground, then the "+ out" goes to the positive side of the LED and the "- out" goes to the negative side of the LED. That's pretty much it, in a nutshell. Until you get the hang of heatsinking I would stick to 350 milliamp drivers, maybe 500. Any more than that and heat becomes an issue.
 
The floor lights would be too difficult to explain, however the hatch light and rear cargo light are a little easier. I use Cree XR-E or XP-G stars available from places like ledsupply.com. Cut a piece of aluminum to act as a heatsink and use Arctic Silver or JB Weld to glue the star to the heatsink.

The easiest way to hook them up is to buy a "wired buckpuck" driver from that same site. There are four wires, one to the + of the power supply and one to ground, then the "+ out" goes to the positive side of the LED and the "- out" goes to the negative side of the LED. That's pretty much it, in a nutshell. Until you get the hang of heatsinking I would stick to 350 milliamp drivers, maybe 500. Any more than that and heat becomes an issue.

how/where are you running your wires to your power source?
 
how/where are you running your wires to your power source?

Depends on the application. On the factory dome light I used the same power and ground that the bulb would have used to power the driver. So the + for the bulb went to the + of the LED driver, the ground for the bulb went to the - of the driver, then the + and - wires out of the driver went to the + and - of the LED.

For the hatch light I added, power came from a random wire that has power all of the time in the rear hatch, I just probed until I found a constant hot. Then there's a wire that goes to ground when the rear hatch is opened and I used that to ground the driver and give it power when the rear hatch is open. I don't have the wiring diagrams in front of me, but I seem to recall a blue wire that gives ground when the hatch is opened.
 
I like power. And apparently that includes horn power too. I have always been amused by the horns on the massive Cadillacs, they sound more like a train than a car. Some quick research revealed that some 1970s Cadillac Broughams were equipped with an optional "trumpet horn package" that included 4 giant horns as opposed to just the standard two horn arrangement. While at the junkyard I scoped out the biggest car I could find, thinking it would have all of the bells and whistles, so to speak. The car ended up being a 1970 Cadillac Fleetwood Brougham d'Elegance Royale Landau Signature Series, a name as long as the car.

Looked like this:
1970-Cadillac-06.jpg

...only rusty.

And in that house-sized engine bay I found the elusive trumpet horn set.

I will let you guess which belong to the Cadillac and which were OEM Toyota. Following a de-rustification and painting:
IMG_3682.JPG


These horns are enourmous, so I mounted two in the stock location behind the grill and two more adjacent to the battery. On Cadillacs, they are mounted in a similar location on either side of the car.
IMG_3690.JPG


You must use a relay with these, they pull an un-godly 22.2 amps.

Looking down from above:
IMG_3691.JPG


The trumpet horn package has one A note, one C, one D and one F note. They sound fabulous. It doesn't just sound loud, it sounds awesome.

I will leave you with a quick video/audio of them installed:
<iframe width="420" height="315" src="//www.youtube.com/embed/ljZWstarTsc" frameborder="0" allowfullscreen></iframe>
 
I have become increasingly frustrated with the lack of range when attempting to communicate by CB radio on wheeling trips, so I bought a Yaesu FT-1900R 2M radio to replace the CB. Not only is the range of CBs pathetic, the trend of people amp-ing up their CBs to put out thousands of watts and flooding all of the channels with garbage is becoming increasingly common. Initially I was frustrated at the need to take a test to become licensed for ham radio use, but now I realize it's an important way to keep the ham radio channels civilized and useable, something I can't say about CB.

The ham radio is much smaller than the DIN slot, so I trimmed it with perforated steel to allow for heat dissipation and make it easier to hear out of the up-facing speaker.
%255BUNSET%255D.jpg


The picture above makes me realize how bad that silver headunit looks...might need to do something about that.

I bought a custom-length coax and routed it behind the rear cargo compartment panels, being sure to keep the coax away from electrical wires.
20130610_214328.jpg


I drilled a 3/4" hole in the roof for a permanent mount antenna. Here it is without the antenna or the rain cap.
20130610_210715.jpg


I am taking my ham licensing test this Saturday and look forward to doing more than just listening.
 
A few more changes.

Plasti-dipped roof rails and emblems:
%255BUNSET%255D.jpg


Added Homelink:
%255BUNSET%255D.jpg


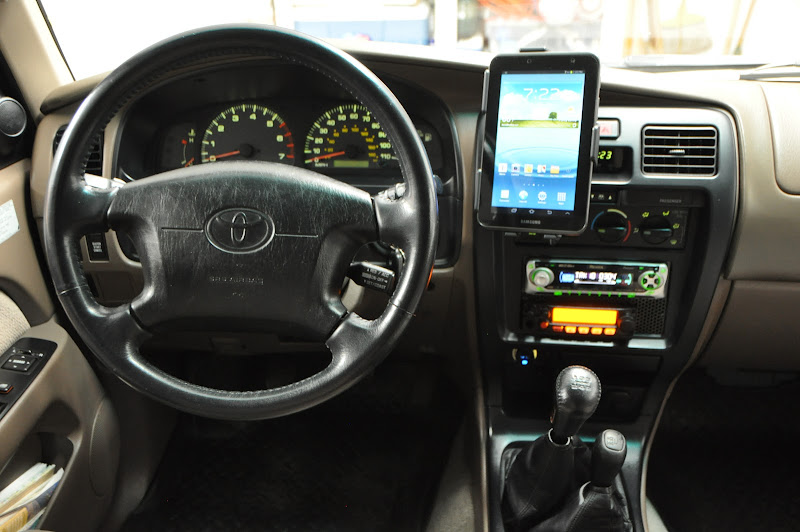
And a mount to hold my Samsung Galaxy 7" tablet.
DSC_0024.JPG


I can't say enough good things about this tablet. I take it everywhere I go. I write blogs with it, edit and post photos online, use the internal GPS for navigation and with the internal SD card slot I can store gigs and gigs of maps for offroad travel. Backcountry Navigator software for Android is what I use for boating and boon-docking off-road.
 
With 59,000 miles on my SS 7.1 lift, I finally wore out the original Tokico shocks. The right one was blown and the left one was close behind. I ended up buying the custom valved Bilsteins from Steve at Sonoran Steel. They cost more money than off-the-shelf Tundra Bilsteins, but the lift has worked so well for me that it seemed worth the money to have them valved for the coils.

DSC_0026.jpg


With the new Bilsteins, the 4Runner has a far better ride both on and off road than it ever did when new. It is smooth enough to receive comments from passengers on how nice the truck rides, which I think speaks volumes for how well this lift works.
 
Next order of business was new tires. I quickly discovered that tire options in a 16" size are becoming more and more limited. Most trucks and SUVs now have 17", 18", 19" and 20" wheels. Another factor was that the BFG tires in a 16" size are now Load Range E only; too heavy of a tire in my opinion for a 3900 lb SUV. I had more options in a 17" size, and being a big fan of the Tundra/Sequoia split-spoke wheels, I found some on craigslist within a few days of starting my search.

DSC_0306.jpg


I am strangely attracted to the gunmetal/anthracite/graphite wheel color I am starting to see on some of the newer cars and knew I wanted this look for mine. I thought about powdercoating but I do tend to get rock rash on my wheels and wanted the ability to touch them up myself. I ended up going the spray paint route.

I applied jel-based aircraft paint stripper to strip the wheels down to bare aluminum. I used 2-3 coats of Duplicolor primer, being sure to follow the recommended time between coats, which I think is 10 minutes or less. I did two wheels at a time to be sure I could keep up with the time limits for the best results.

I then applied three coats of Duplicolor graphite paint. By the time the second and third coats went on I noticed the imperfections from spray cans start to become additive, resulting in a orange-peeled finish. I followed the instructions on the can and gave the wheels a full week to cure, then I wet sanded with 320 grit sandpaper to get the paint finish smooth again.

After cleaning the wheels up again, I added a final coat of paint followed by two coats of clear.

%255BUNSET%255D.jpg


For the center caps, I removed the chrome toyota emblems, sanded the caps to give the paint something to stick to, then painted and cleared without any other prep work. I painted the emblems black and reinstalled them.

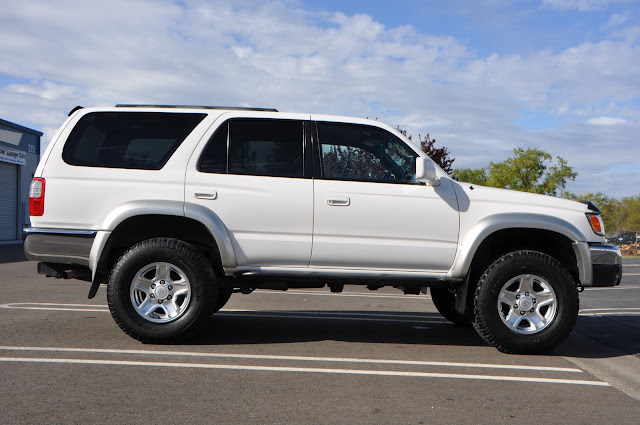
The 265/75R16 tires I had looked a little too small for my SS #7 lift...just a little too much fenderwell for my likes:
DSC_0417.JPG


But a 285 is wider and taller than I would like, so what to do? I discovered the 275/70R17 size...it is exactly 1/2" wider AND taller than my current tire and exactly 1/2" narrower and smaller diameter than the 285, splitting the difference right down the middle.

I went with a Cooper Discoverer S/T because I have read good things about them and I like the tread pattern that is more aggressive than most all-terrains.

Final product:
DSC_0416r.jpg


DSC_0404r2.jpg


DSC_0407r.jpg


DSC_0523r.jpg


I looked hard for an aftermarket wheel I liked but just couldn't settle on anything. I don't like black wheels because you can't see the detail of the wheels when they are that dark. Graphite is dark enough to look different but you can still see the spokes and details on the wheels. I think my boring white truck needed something more than just a silver wheel, but to each is own, I guess.

 
That tire and wheel set up looks awesome. I really like the ST's a lot. How is the road noise?

There is more road noise than Dueler A/Ts and the BFG A/T KOs I was running before. It is most noticeable on a concrete freeway, whereas on paved roads at 55 MPH speedlimits I can't tell a difference. So I would say somewhere between an AT and an MT favoring the AT side.

I like the look of the graphite wheels, but I know there will be haters. :evil:
 
Whenever you get time, could you post a profile shot with the 17" like the before shot
with the 16s? Also, where is the offset in relation to the wide flares? I'm really intrigued
by the 17 idea but still don't like when the lift:stance ratio is too skinny...

keep up the good work!
 
Whenever you get time, could you post a profile shot with the 17" like the before shot
with the 16s? Also, where is the offset in relation to the wide flares? I'm really intrigued
by the 17 idea but still don't like when the lift:stance ratio is too skinny...

keep up the good work!

Ghostring--Going from a 265/75R16 to a 275/70R17, I gained 1/2" in tire height but gained an inch of rim height, therefore I lost a 1/4" of sidewall height at any one point on the wheel with this setup. It's not enough difference to look noticeable.

The Tundra wheels are 1/2" wider with 1/4" more backspacing, so the wheel will sit 1/4" further out than stock 5-spokes. I have a set of 3/4" wheel spacers on order to bring the wheel and tire even with the edge of the flares.
 
Gotcha. I should have headed over to ExPo before I asked, I see you have a thread
going there about the tires and fitment (and more pics too!) :)
 

Members online

Forum statistics

Threads
278,309
Messages
3,554,063
Members
248,016
Latest member
Advally Service

Trending content

Back
Top