paddlenbike's Build Thread

Yeah but how do you keep yours looking so good?

dunno, I've never done anything to it.

My 99-02 bumper had the Hella Micro DE foglights that I converted to HID, and they were great. They provided a lot of light out to the side for curvy night road driving. The cutouts in the new bumper are 4", much too big for the Micro DE's. I have plenty of off-road light so I wanted to find some larger LED-style fog lights to fit the new bumper.

I ended up finding some LED fog lights that I modified to fit. These fog lights have a very sharp cutoff line, so it's important to have the lights dead level to one another, both in elevation as well as ensuring the light is straight up and down in its mount. To achieve that I have one side of the mount fixed and the other can slide in and out on a slotted bracket, and that bracket can slide in a slot I cut into the bumper. I was able to easily adjust the lights to get the cutoffs aligned.

51953701805_8ccb969653_c.jpg


These lights also have a separate DRL hookup. I unplugged the Toyota DRL resistor box under the hood, cut the plug off and tapped the DRL circuit in. Now whenever the factory DRLs would have been on, I get this:
51952117922_21edb89f45_c.jpg


I think it makes for a good aesthetic without looking too cheesy.

Completed product:
51952117902_18c23870f9_c.jpg
 
Last edited:
good looking truck! Thanks for sharing all the info. I'm getting back into a 5spd and will be copying a few of your steps
 
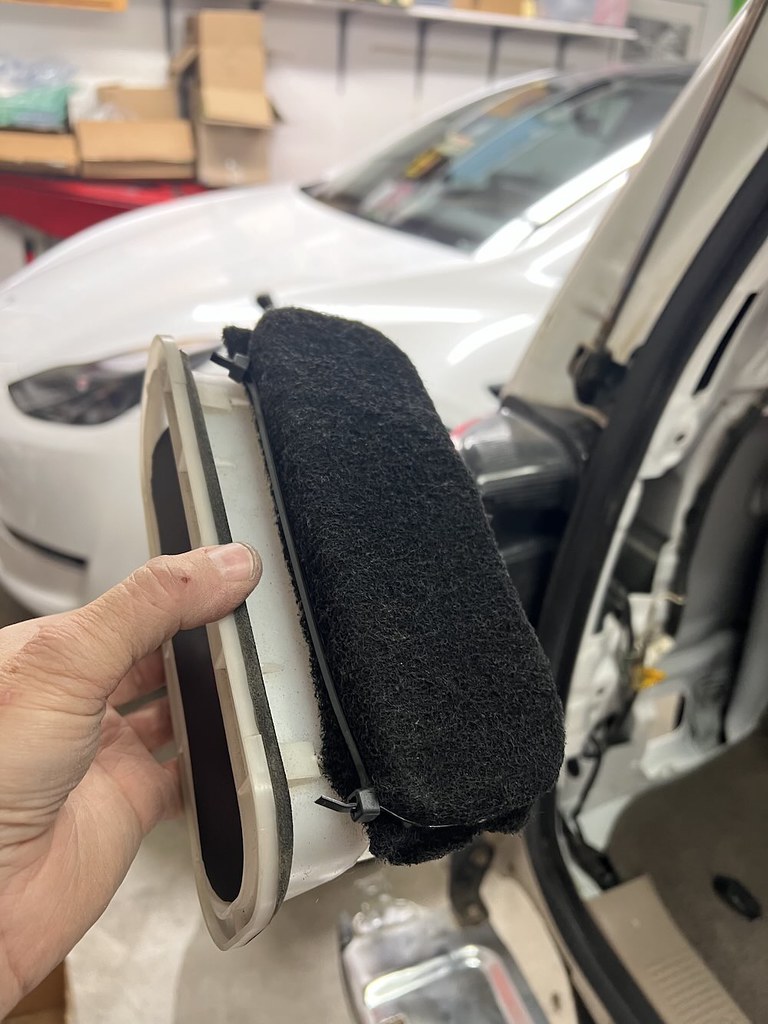
Got home from my last outing and noticed the rear cargo area of the 4Runner was absolutely covered in dust, mainly on the driver's side. I was aware of the presence of an air vent behind the bumper that allows air to escape when you close a door or use the HVAC, so I became suspect of that part. A quick google search showed me there is supposed to be a thin flapper door to cover the opening, but mine was completely gone, so I made a new one.

Here is the finished product, simply a rubber insert cut to fit the opening, secured with 4 zip ties:
54340822706_a9ed7e22e5_b.jpg


I did not have to drill any holes, I simply ran the zipties around some slots that were already there.
54341240980_949a040906_b.jpg


To reduce dust even more I used some leftover carbon filtration material that I had leftover for the pre-filter for my house HEPA filter. Once again, zipties to the rescue.
54339919912_557fccbd42_b.jpg


And here's with the vent back in place. With the driver's side rear plastic trim removed you can see the modified vent with the filter in place.
54341036589_356da54d72_b.jpg


If you're finding a lot of dust in the cargo area, this is likely the culprit.

Happy motoring!
54053821071_9a7f2a3297_b.jpg
 
Interesting, I just started noticing some dust accumulating in my rear cargo area and had no idea about that vent. Thanks for the tip!
 
There’s a company that makes a slick 3D printed cover for this purpose too. But you solved it in a cheaper and also highly effective way. Nice work!
 
If you're finding a lot of dust in the cargo area, this is likely the culprit.
The factory flap has little "T" pieces that stick up there to hold it in place. Obviously, they fail with time. This same issue is why I did this when I got my 4Runner many years ago:

TVm1Bg0.jpg


I also just got a whole brand-new unit:
jKoEAdy.jpg


Not sure if they are still available...

-Charlie
 
There are variations of that flap too...I saw this one on a 01/02 4Runner, which was a different color and had a wiring pigtail coming out of it. Of course the flapper door was broken on it too.

54342519395_47f719c8b2_z.jpg
 
There are variations of that flap too...I saw this one on a 01/02 4Runner, which was a different color
and had a wiring pigtail coming out of it. Of course the flapper door was broken on it too.

I almost got that one when I was shopping for my own replacement.
I forget why I didn't, but I purchased a new one that matches my '98 instead.
 
There are variations of that flap too...I saw this one on a 01/02 4Runner, which was a different color and had a wiring pigtail coming out of it. Of course the flapper door was broken on it too.

54342519395_47f719c8b2_z.jpg
In '01/'02, all 4Runners had trailer wiring, so they ran it through there. A little nicer than running it through the body plugs under the rear hatch opening trim.

-Charlie
 
There are variations of that flap too...I saw this one on a 01/02 4Runner, which was a different color and had a wiring pigtail coming out of it. Of course the flapper door was broken on it too.

54342519395_47f719c8b2_z.jpg

I picked up one of these at the junkyard for my 96, and made a flap similar to what you did (cut out barbs rather than zip ties, same end result...zips would have been easier...).
Haven't come across a use for the pigtail yet, but if I do then there it is.
 
Just finished a new round of updates to the 4Runner. It all started with an offer to buy this 4Runner that I thought I couldn't refuse. After driving all of the potential replacements (V8 4Runners, GX470s, GX460s, Land Cruisers), I came to realize that none of them are as unique, fun, nimble, powerful, and engaging as what I already have. They would also cost a lot more money to bring up to the off-road capability of my 3rd gen. I've owned this truck for almost 22 years, and basically I fell in love with it all over again.

Having a Tesla as a daily driver, I at least wanted to modernize the 4Runner with a bluetooth headunit.

I started by installing this really cool retro-looking bluetooth headunit. Behind the "tape" door is micro-usb, usb an and c ports, and other ports. My favorite feature was the ham radio that I hid behind a spring-loaded door. It is totally concealed when flipped-up.

55516068107_68b14f83b2_c.jpg


It looked badass but I hated the illumination (retina-piercing bright, with no dimming circuit), and the audio just sounded off. I ended up replacing it with a Pioneer headunit.

It doesn't look nearly as cool as the retro one, but it sounds great and still fit okay with the interior. I maintained the hideaway ham radio.

55517166308_96efdb4bd9_c.jpg


While I was in there, I added a USB A & C combo port in the location of one of the previous 12V outlets below the stereo. I also took the opportunity to replace a couple of burned out switch bulbs and replaced the A/C switch that would fly out everytime I went up a steep hill. Oh and a new shift knob.

Next up was replacing the crusty 26 year old speakers. I used some affordable Hertz component speakers in my Sprinter van and ended up replacing the factory 4Runner tweeter and front door woofers with something similar.

55517165278_f32c1013b1_c.jpg


But while you're in there, might as well clean 26 years of dust out of the door shells, add some Kilmat butyl sound dampening to the doors. It's an easy and inexpensive mod and an E-class Mercedes owner would be envious of the sound the doors make when closing them.

55516047762_9340dc7107_c.jpg


And while you've got the door panels off, might as well add some Thinsulate SM600L insulation to further isolate road noise.

55517213574_203c2bb5e8_c.jpg


Rear speakers were replaced with some basic Kickers. I ordered everything from Crutchfield, which I highly recommend. They included the Metra stereo harness, 4 harnesses that adapt regular speaker blade inputs to the Toyota door harness plugs, as well as adapter rings for the rear doors.

I've also had a boost gauge rolling around in the glovebox since 2011. Time to get that mounted in an Autometer pillar pod. I learned from this forum that SEM Color Coat “Castella” 15223 is a near perfect match for the oak interior, as these ship in black.
55517164233_ed018f74e0_c.jpg


Here's a little video of how it all came together:
4Runner interior updates - YouTube

 

Members online

Forum statistics

Threads
278,309
Messages
3,554,063
Members
248,016
Latest member
Advally Service

Trending content

Back
Top