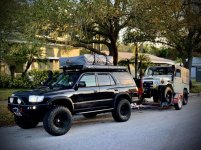
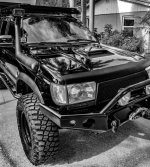
Papabeach's Mod Thread

Small change up with switch placement. I liked the custom switch bezel I made for the cupholder cubby but the rocker style switches would get easily bumped when using the rear cupholder. Rather than switch to the OEM style push button switches I tried the DIYOverlanders switch panel and everything fit with some minor trimming around the bottom left switch. The panel is a little bit more recessed which keeps the switches from getting bumped. The USB charger will get in the way of the rear cup holder when in use but that is not common...if it gets annoying I will move it to the top horizontal switch position and order a new rocker from OTRATTW and move one of the other switches. Overall, very happy with this switch panel. Oh yeah...I pulled my seat heater. I live in Florida...totally unnecessary and the extra wires were a PITA.
 
Did some maintenance today and lots of running around….Bass Pro, Walmart, Costco, Wawa and still took my 5yo daughter on a bike ride….feels good to get stuff done.

Well…not sure if it was needed but decided to check/change the gear oil in the new crawlbox. I have maybe 500 miles on it now. I didn’t take a pic but it looked fine…no metal. Filled back up with Redline 75W-90. Topped off the rear case. Topped off the front/rear diff with Lucas 85W-140 and topped off the MT with Redline MT-90. I have had a slow leak with the MT for some time…was about ½ quart low. Will have to better investigate the source of the leak another day but I do have some hairline cracks in the case (see pics) …wondering if I can seal them from the outside….I am not really interested in replacing my MT…at least not right now. Anyone else have this problem? I had to replace from my front diff actuator d/t a leaking hairline crack.


I will be checking more frequently from now on…shifting was sooo much better after topping it off.

Also replaced the drivers door-stay…very straight forward job.


Shiny new stuff!


Going to take me a minute to get use to the door not swinging wide open anymore….holding it open has become second nature.

While I had the panel off I followed the Timmy the Toolman video to replace the drivers door lock actuator….works like a charm now!


New (top) vs old (bottom)

Topped of the hydraulic fluid for the rack and pinion…I have a slow leak there as well, bottom of both boots have stains from slow seepage…guessing inner seals. I do have another R&P just not ready to replace yet.

One of my front bumper switchback LEDs bit the dust…so replaced them both and my corner lights to match. Went with VLED WHITE AMBER SWITCHBACK 70 LED 1157 and WHITE HIGH OUTPUT 360° 26 LED 194 921, both 5.5K color temp.

Also, changing the camping storage setup. Decided to go with a couple of the Front Runner Wolfpacks and corner brackets/stratchits to keep them from sliding. We are gearing up for a good camping season with the family and I have one overland challenge I am going to. Gotta keep the fishing pole holder for now…have a red snapper trip coming up in a couple weeks, and thinking about getting my kids some new fresh water combos. Good times!
 
Will have to better investigate the source of the leak another day but I do have some hairline cracks in the case (see pics) …wondering if I can seal them from the outside….I am not really interested in replacing my MT…at least not right now. Anyone else have this problem? I had to replace from my front diff actuator d/t a leaking hairline crack.

I think it is unlikely those are actually cracks. Definitely clean it up and see where the weeping/leaking is really coming from. Those are likely just leftover effects of the casting of the case.

-Charlie
 
How did the Redline triple-stick boot turn out? I can't sew and I can't find another company that will make one...
 
Last edited:
Ok so I should have posted so long ago...but life happens.

Went with a group up to Uwharrie in NC for Southern Expeditions Overland Challenge a while back. What a great event and group of people. Will be going back next year! Dual cases was nice on some of the technical stuff on Daniel...really a game changer to have the gearing. Maybe not necessary but definitely made life better. I used the lower gearing more on descents for better control then anything else. My brakes got a break :-). Also picked up some sweet 4-way air lines for airing up/down. Super easy and very slick...


Also added a new member to the family...1979 FJ40...factory soft top prior import from Columbia. Suffice to say will be distracted for a bit. Have power steering, disk brakes, suspension, wheels, tires, electrical overhaul....etc all planned out.

 
Ok...not a new issue on this forum but perhaps a new take on it. The stupid retainer clip on the headlight adjuster screw broke and my drivers side headlight was not able to adjust up or down. Apparently this part is impossible to source. I nearly just glued it in place when my wife says...try a zip tie...BOOM! It might not hold forever but it catches enough of the lip on the adjuster to hold it in place. Pretty sure I married a genius! Thanks babe!


Here is what the factory retainer clip looks like


Here is my "creative" solution :-)
 
I did break a few things at Uwharrie....at some point I lost the ADD on the front diff...and 3-wheeled through some obstacles. Not exactly sure what happened but the collar wouldn't engage. I think it was a faulty vacuum line but I also ripped the wire harness in half...something obviously got stuck and ripped stuff up. When I got home I permanently "fixed/defeated" the ADD but killing it, locking the collar in place and disconnecting the air lines. I should have done this when I went manual hubs but I figured it worked fine then so why do more....should have known better....just more stuff to fail on the trail. I also wired the 4wd light so it comes on normally by shorting the harness.


Not pictured, I broke the rear sway bar mount (bolt broke), ripped one of the skid plate mounting tabs off the frame and have some new suspension sounds to keep me company....I was able to drive there and back no problems.
 
Last edited:
Apologies for slow response. I haven't been on here for a long while... It turned out great!!!!


You can see more pics on the Redline website under custom boots
Custom shift boots by RedlineGoods leather shift boots - RedlineGoods

no worries I know how it goes, not trying to hijack the thread but I also ended up going with redline for my own triple setup, there were some issues with fitment (not redline's fault at all, I had cut and reweld the trans shifter and gave them incorrect measurements which threw things off), their customer service was great and the finished product looks awesome once everything gets massaged into place

Aep0zHi
 
Toy-1 towed Toy-2 (‘79 FJ40) today. Getting some
Power steering, disc brakes, suspension, lockers, fj60 rear end and some other goodies! This combo makes me pretty damn happy!
 

Attachments

  • D55FAB9E-63C9-4460-9D18-BA94C2C6C304.jpg
    D55FAB9E-63C9-4460-9D18-BA94C2C6C304.jpg
    144.5 KB · Views: 348
First Detail in a long time...looks so pretty...time to go get her dirty again! Just need to replace the steering rack, timing belt/wp. Maitenance time!!!
 

Attachments

  • FA10D7DC-92A1-417C-96CD-814F28538951.jpg
    FA10D7DC-92A1-417C-96CD-814F28538951.jpg
    87.3 KB · Views: 316
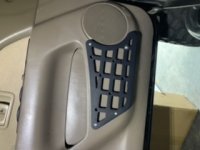
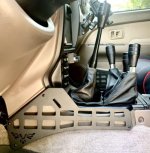
Victory 4x4 --4RUNNER DOOR MOLLE PANEL | 3RD GEN (96-02)
Install

Purchase here: 4Runner Door MOLLE Panel | 3rd Gen (96-02) - Victory 4x4

Install time:
-30-45 min (maybe quicker if you don’t remove your door panels)

Difficulty:
1 banana

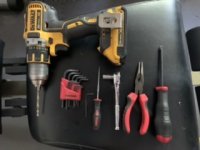
Tools:
-Phillips Screw driver
-9mm ratchet
-5/64” allen wrench
-5/32” drill bit
-Pliers

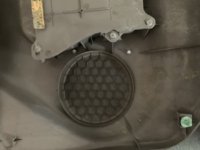
The most difficult part is removing your door panel which I suppose is not required but I thought it made life easier and this didn’t come with install instructions so I thought it best to see what I was doing.

1.Remove door panel, I used a pick to release the clip on the door handle rod (hardest part of the process aside from taking your time so you don’t break any of the 20 year old door panel clips).
2.Line panel up with edge of speaker
3.On the Victory website it has a picture of the molle panel mounted with nuts/bolts on all four corners. However, the molle panel I received had larger hole pre-drilled on the bottom inside corner and the screws would not hold without a washer. There are smaller holes you can mount through but I chose to use this hole with a washer as it moved the screw mounting location behind the panel instead of inside the door cubby.
4.Drill corresponding holes
5.Insert bolt through panel, through spacer and secure with lock nuts. The top bolt mounting position nearest the speaker required me to hold in place with a pair of needle-nose pliers…not enough space to get a ratchet on it.


Thoughts: Too easy…haven’t used yet but seems practical. I don’t love the extra length of the bolts sticking into the door cubby and will likely remove them and cut them down later.
 

Attachments

  • 7ED01D40-8BC2-4E02-B028-64BD9234C3ED.jpeg
    7ED01D40-8BC2-4E02-B028-64BD9234C3ED.jpeg
    24.1 KB · Views: 375
  • DA98B699-DD41-468E-84A7-D652ED429861.jpeg
    DA98B699-DD41-468E-84A7-D652ED429861.jpeg
    22.5 KB · Views: 372
  • ABE7B131-8D8A-468A-8778-6186103A3DC0.jpeg
    ABE7B131-8D8A-468A-8778-6186103A3DC0.jpeg
    19.3 KB · Views: 375
  • E70EF31E-5866-4C29-8587-1B9B161CF4B0.jpeg
    E70EF31E-5866-4C29-8587-1B9B161CF4B0.jpeg
    10.8 KB · Views: 376
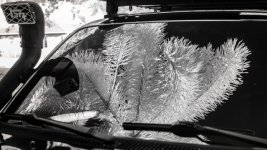
So I did a thing...added SunTek clear window film to my windshield with the goal of heat reduction. It worked very well! Here is an unusual pic taken with a full spectrum modified camera with a 850nm filter showing blockade of IR light (windshield is black) and a really sharp reflection. If you feel like you get significant heat through your windshield and don’t want a tinted film (illegal I think), this clear stuff worked better than expected!
 

Attachments

  • F7307255-3B54-42EA-B56E-A9AE5902F934.jpeg
    F7307255-3B54-42EA-B56E-A9AE5902F934.jpeg
    99.6 KB · Views: 504
Last edited:
So I did a thing...added SunTek clear window film to my windshield with the goal of heat reduction. It worked very well! Here is an unusual pic taken with a full spectrum modified camera with a 850nm filter showing complete blockade of IR light (windshield is black) and a really sharp reflection. If you feel like you get significant heat through your windshield and don’t want a tinted film (illegal I think), this clear stuff worked better than expected!

Wow, nice update and a cool photo effect!

I have LLumar AIR80 window & windshield tint which is optically clear but blocks UV and IR frequencies -- sounds like what you got. It makes a huge difference! Whenever we drive down into sunny Florida I am so grateful for it.
 
Wow, nice update and a cool photo effect!

I have LLumar AIR80 window & windshield tint which is optically clear but blocks UV and IR frequencies -- sounds like what you got. It makes a huge difference! Whenever we drive down into sunny Florida I am so grateful for it.

Sounds very similar....really wish I did this years ago. I went with 15% ceramic on the rear and it is so much cooler overall. If you make it down to the Tampa area would be great meet the famous JZiggy!
 
Sounds very similar....really wish I did this years ago. I went with 15% ceramic on the rear and it is so much cooler overall. If you make it down to the Tampa area would be great meet the famous JZiggy!

Gee whiz!! We are usually on the east FL coast to see family but maybe we could meet up for some wheeling!
 

Members online

Forum statistics

Threads
278,306
Messages
3,554,045
Members
248,016
Latest member
Advally Service

Trending content

Back
Top