Parking Brake Repair Procedure Question

I had long needle nose pliers I borrowed from a co-worker, I don't know what kind they were but they were far thinner than the ones I have.

That entire shoe system is a *****! Funny story I'll share. A few days after I purchased this 4Runner I noticed while my window was down going about 20 mph I could a high pitched squeak. It was a late afternoon on a Friday after a pretty damn long day already. My wife wanted to go out that night and spend some time together. I figured I'm just gonna pull the wheels off and see what's going on, shouldn't take long at all. Oh.......After I discovered t was coming from the back, behind the rotor I pulled it off for a little more surgery. Some moron had pulled the rotor off without loosening the tension on the springs. If the shoes are real tight and you force the drum off the shoes you can actually stretch the shoe pins. The locking caps on both pins were up against the axle shield, causing the squeak. I figured this won't take long to fix.... Holy dog smack was I pissed after 2 hours of messing around with it.
I called my wife and told her no go on dinner as I was on a mission to finish this abortion of a brake repair. I took a deep breath, ate a snack and let my brain and frustration regroup.
I bet I tried 20 times to get that freaking clip on. Then it hit me! Just hold the clip, spring and cap and then slide the shoe over it all. I was at a satellite shop of mine and did not have all my usual crap to get a hold of. I cut a piece of 18 gauge wire about 8"s long and did it.

Lord, I have done some frustrating jobs over my years of being a technician but holy hell this kicked my butt. I did the other side in about 30 minutes after I figured out the trick. Toyota should be brow beaten for this particular setup. Why oh why???[/QUOTE]


my mechanic managed to mess this up... I'm convinced I have the same issue.

which exactly is the shoe pin? Shall i get the autozone kit or just get this part from toyota and keep the rest.

thanks!
 
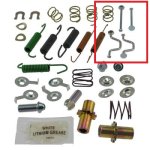
The shoe pin is the 2" straight nail looking part. It goes in from the backside of the backing plate. Aftermarket will be just fine. You can get a complete kit for like 10.00 bucks.
 
The shoe pin is the 2" straight nail looking part. It goes in from the backside of the backing plate. Aftermarket will be just fine. You can get a complete kit for like 10.00 bucks.

these guys? (Attached)
 

Attachments

  • 4.jpg
    4.jpg
    51.3 KB · Views: 2,183
Oh yes. Totally forgot about the funky shaped *****!

This is a late bump, but I'd like to add that I used this advice above and it worked wonderfully. I bought the tiniest ones I could find at Walmart (pic of bag below). Remember to clip/remove them before assembling the rest of the hardware. Also, do NOT waste your money on a hardware kit from AutoZone. Very inferior parts such as the star wheel adjuster being shorter and c-clips being flimsy. I ended up re-using most of the stock stuff instead.

I do agree with you the star wheel adjuster was a bit smaller than the oem one.

Question for you all, I realized all my springs were way more compressed then the new ones from the autozone kit. In fact my parking brake isn't releasing. is the fact that the autozone kit more elastic does that means mines are just worn out, or the autozone one is wrong?? some parts are 2/3 the size of the autozone one.

just had to leave my car on jack stands because the parking brake was a nightmare! Ill finish it in the morning.

Open the parking brake at your own risk!!!!!!!!
 
I'll post my feedback on this. I just got done having this fixed. What a mess and never want to ever deal with it again. I'm no mechanic though this you just about need 3 buddies over helping on this one. After spending 2-3 hrs on mine I threw in the towel and called up the local shop I take my car to (not a Toyota dealership)

In all it cost me $960.00 to have this fixed. It's fixed properly and I agree this is the biggest pain in the butt to fix.

So yes if you don't have to touch the parking break dont. :)
 
*BEEPP BEEPP BEPP* the amount of cursing while putting everything back together

and still doesn't work right. it moves around from one side to another, not completely out! i think we got it 80 percent of the way there but there is some small details we must be missing.....

we didn't have a U/C type hold down pin when we took it apart like the picture shows. any ideas???? it was the long one.... I feel like we are so close, I hate to give up at this point

EDIT: At this point is the C/U hold down pin, is it suppose to face into the wheel hub or out towards the shoe??? That is the only thing I can thing that can be the issue.
 
Last edited:
I do agree with you the star wheel adjuster was a bit smaller than the oem one.

Question for you all, I realized all my springs were way more compressed then the new ones from the autozone kit. In fact my parking brake isn't releasing. is the fact that the autozone kit more elastic does that means mines are just worn out, or the autozone one is wrong?? some parts are 2/3 the size of the autozone one.

just had to leave my car on jack stands because the parking brake was a nightmare! Ill finish it in the morning.

Open the parking brake at your own risk!!!!!!!!

All the springs should be about the same size. Are you sure they didn't sell you the wrong kit?

I'll post my feedback on this. I just got done having this fixed. What a mess and never want to ever deal with it again. I'm no mechanic though this you just about need 3 buddies over helping on this one. After spending 2-3 hrs on mine I threw in the towel and called up the local shop I take my car to (not a Toyota dealership)

In all it cost me $960.00 to have this fixed. It's fixed properly and I agree this is the biggest pain in the butt to fix.

So yes if you don't have to touch the parking break dont. :)

$960?!?!?! Holy hell man. Was that just for labor?

*BEEPP BEEPP BEPP* the amount of cursing while putting everything back together

and still doesn't work right. it moves around from one side to another, not completely out! i think we got it 80 percent of the way there but there is some small details we must be missing.....

we didn't have a U/C type hold down pin when we took it apart like the picture shows. any ideas???? it was the long one.... I feel like we are so close, I hate to give up at this point

EDIT: At this point is the C/U hold down pin, is it suppose to face into the wheel hub or out towards the shoe??? That is the only thing I can thing that can be the issue.

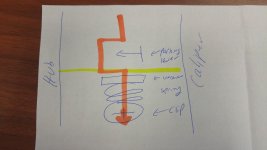
Do you mean the retaining pin that has kind of a U shape? The bent out side is supposed to face in towards the hub. The angled bend gets hugged by the slot in the shoe (see drawing below)

large.jpg
 
Do you mean the retaining pin that has kind of a U shape? The bent out side is supposed to face in towards the hub. The angled bend gets hugged by the slot in the shoe (see drawing below)

large.jpg

Yes that! I dont see why it would it would be that way. Why would a U even need to be used? is it meant so the parking lever has clearance to move? Please see the attached drawing of what i mean, Sorry for poor drawing.


I got it assemblyed again, but when i apply the parking brake it does not come out uniformly on both sides. as in it doesn't do this video
https://youtu.be/YHuNLAff1ZY?t=352 (copy and paste or go to 352 seconds)


Car is still on jacks. I noticed my caliper is slightly rusted on the inside I hope this is not a problem..
 

Attachments

  • 0921150920.jpg
    0921150920.jpg
    59.2 KB · Views: 2,097
Just did an online search,

about 65 dollars for toyota springs and hold down pins for both sides of the parking brake,

188 including the parking brake

Local toyota shop offers free inspection going to take them up on that offer, see what they say is wrong with it. I'm un sure of the calipers either as they are a tad rusted maybe this is the safest route to go.
 
Yes that! I dont see why it would it would be that way. Why would a U even need to be used? is it meant so the parking lever has clearance to move? Please see the attached drawing of what i mean, Sorry for poor drawing.


I got it assemblyed again, but when i apply the parking brake it does not come out uniformly on both sides. as in it doesn't do this video
https://youtu.be/YHuNLAff1ZY?t=352 (copy and paste or go to 352 seconds)


Car is still on jacks. I noticed my caliper is slightly rusted on the inside I hope this is not a problem..

It's shaped like that so it can straddle the lever which actuates the shoes. If it was straight like the other pin it would interfere with it.

It might not spread out uniformly with the rotor off because there is nothing holding it centered so it can just shift to one side. Obviously when you have the rotor back on it will be forced to stay centered so this isn't a problem.

The caliper is rusted of the rotor? Caliper rust is fine as long as the piston moves. If the rotor is rusty just make sure it's not on any of the actual braking surfaces (where the pads touch on the outside and where the shoes touch on the inside). Post a pic if you don't understand this.
 
It's shaped like that so it can straddle the lever which actuates the shoes. If it was straight like the other pin it would interfere with it.

It might not spread out uniformly with the rotor off because there is nothing holding it centered so it can just shift to one side. Obviously when you have the rotor back on it will be forced to stay centered so this isn't a problem.

The caliper is rusted of the rotor? Caliper rust is fine as long as the piston moves. If the rotor is rusty just make sure it's not on any of the actual braking surfaces (where the pads touch on the outside and where the shoes touch on the inside). Post a pic if you don't understand this.

Thanks [MENTION=63323]DG&BRM[/MENTION] !!! So detailed, Just a little clarification. That makes sense that the shoe hold down pin is meant not to get in the way of the lever. But when you say actuates the shoe, do you mean shoe hold down pin hold the pressure of the lever to force the shoe out (in the opposite direction of the lever), or is that the job of the middle strut. to push the shoe out.
 
Thanks [MENTION=63323]DG&BRM[/MENTION] !!! So detailed, Just a little clarification. That makes sense that the shoe hold down pin is meant not to get in the way of the lever. But when you say actuates the shoe, do you mean shoe hold down pin hold the pressure of the lever to force the shoe out (in the opposite direction of the lever), or is that the job of the middle strut. to push the shoe out.

The pins are just pivot points for the shoes that also hold them in place. The lever is what actuates the spreading motion. That middle strut piece at the top as well as the star wheel at the bottom simply help keep the shoes aligned on the same plane. The spring on the top piece helps apply pressure to keep it spread outward. We are both way overthinking this lol but it's my job as a product Designer to be this way I guess :loco:
 
The pins are just pivot points for the shoes that also hold them in place. The lever is what actuates the spreading motion. That middle strut piece at the top as well as the star wheel at the bottom simply help keep the shoes aligned on the same plane. The spring on the top piece helps apply pressure to keep it spread outward. We are both way overthinking this lol but it's my job as a product Designer to be this way I guess :loco:

To clarify your post, a bit. Yes, the pins are there to keep the shoes in place, against the backing plate. The parking brake is actuated by the lever, which is pulled by the parking brake cable on the bottom of the lever. The "middle strut", is used to transfer the action of the lever to the other shoe, opposite the rear one, and thus force the trailing shoe to move outward and contact the drum surface on the inside of the disc. The two springs, upper and lower are there to keep the shoes in the retracted position, and the lower one also keeps the bottom end of the shoes from disengaging from the star wheel adjuster.
 
The pins are just pivot points for the shoes that also hold them in place. The lever is what actuates the spreading motion. That middle strut piece at the top as well as the star wheel at the bottom simply help keep the shoes aligned on the same plane. The spring on the top piece helps apply pressure to keep it spread outward. We are both way overthinking this lol but it's my job as a product Designer to be this way I guess :loco:

The "middle strut", is used to transfer the action of the lever to the other shoe, opposite the rear one, and thus force the trailing shoe to move outward and contact the drum surface on the inside of the disc.

Also an engineer here, so no reason why we can't overthink it. I think we can both agree that if we saw some present this as a solution to the parking brake we would fire them =P. I'm just worried because the youtube video shows both sides going out. Not the whole assembly moving to the right (in the direction of the lever) The drum part of the rotor shows clear indication the parking brake was touching.

it seems all the forces are pushing the assmebely to the direction of travel of the lever. There is not enough return forces to push both sides of the assemply out. Unless the return force is meant to be the force exerted on the inside drum.

[MENTION=937]TechWrench[/MENTION] what do you mean opposite the rear one? In this case, the pad in the direction of travel of the lever is working, its just the trailing shoe which is not being pushed outwards. I am going to place the rotor on 50% and apply the parking brake to see I can demonstrate proper operation.

My car has been on jacks since Saturday =/
 
Also an engineer here, so no reason why we can't overthink it. I think we can both agree that if we saw some present this as a solution to the parking brake we would fire them =P. I'm just worried because the youtube video shows both sides going out. Not the whole assembly moving to the right (in the direction of the lever) The drum part of the rotor shows clear indication the parking brake was touching.

it seems all the forces are pushing the assmebely to the direction of travel of the lever. There is not enough return forces to push both sides of the assemply out. Unless the return force is meant to be the force exerted on the inside drum.

[MENTION=937]TechWrench[/MENTION] what do you mean opposite the rear one? In this case, the pad in the direction of travel of the lever is working, its just the trailing shoe which is not being pushed outwards. I am going to place the rotor on 50% and apply the parking brake to see I can demonstrate proper operation.

My car has been on jacks since Saturday =/

I will try to be more specific, but bear with me if my terminology is not exactly correct....

First, so we are both on the same page, I hope, the left and right side parking brake assys, are mirror images of each other. When I speak of leading or trailing shoe, I am talking about (leading) the shoe closest to the front of the vehicle (either side), and the trailing shoe is the one closest to the rear of the vehicle (either side). At the top center of the brake assy., there is a fixed post (anchor) that both leading and trailing shoes rest against, and the two upper return springs pull the top of each shoe against this post. At the bottom of each set of shoes is the star wheel adjuster that is connected to each shoe and held in place by one spring that pulls the bottom of each shoe toward the other one and holds the adjuster in place. The two pins with springs and cup washers are designed to hold each shoe in position against the backing plate. They have nothing directly to do with actuating the parking brake. The parking brake shoe lever is connected to the top of the trailing shoe via a fixed pin, which it can pivot on. There is also a parking brake shoe strut with a compression spring that rests in slots in the top of each shoe, both leading and trailing, and also fits into a slot on the parking brake lever on the trailing shoe. The two upper return springs also serve to keep both shoes securely on the parking brake shoe strut. When the parking brake cable is pulled, it pulls the bottom of the parking brake shoe lever forward, toward the front of the vehicle. Because the lever is connected to the parking brake strut below the pin on the upper trailing shoe, it causes the top of the trailing shoe to push out toward the drum surface. ( The next few statements are specific to the left/drivers side assy., it would be the opposite for the passenger side)
When the pressure from the lever pushes the trailing shoe against the brake drum, and the vehicle is rolling forward, the trailing shoe tries to rotate counter clockwise, but because the top of it is against the anchor, it can't move. Once the trailing shoe has contacted the drum surface, the action of the parking brake lever, using the parking brake strut, then forces the leading shoe out toward the drum surface. With both leading and trailing shoes now in contact with the drum surface, and held there by the action of the lever and strut, braking force is applied. When the lever is released, the upper springs pull the shoes back into the anchor, to the rest position. When you are backing up, the leading shoe contacts the drum and because the top of the shoe is at the anchor, the force travels around the circle of shoes to force the trailing shoe outward and against the drum. When you are standing still, the lever still forces both shoes outward to the drum surface to apply braking force and hopefully hold the vehicle in place. In its simplest form, the entire lever and strut assy. is designed to make the two shoes expand the friction material surface circle to meet the drum surface circle. All the star wheel adjuster does is separate the two lower ends of each shoe enough to make the friction circle just a bit smaller than the drum circle, so the drum can turn without dragging. And, as the friction material wears off the shoes, reducing the diameter of the circle, adjusting the star wheel makes up for the loss of friction material.

I am hoping this makes sense. It is always a lot easier to explain this to someone, when I have them right with me, looking at the exposed assembly as we go.

 
Also an engineer here, so no reason why we can't overthink it. I think we can both agree that if we saw some present this as a solution to the parking brake we would fire them =P. I'm just worried because the youtube video shows both sides going out. Not the whole assembly moving to the right (in the direction of the lever) The drum part of the rotor shows clear indication the parking brake was touching.

it seems all the forces are pushing the assmebely to the direction of travel of the lever. There is not enough return forces to push both sides of the assemply out. Unless the return force is meant to be the force exerted on the inside drum.

@TechWrench what do you mean opposite the rear one? In this case, the pad in the direction of travel of the lever is working, its just the trailing shoe which is not being pushed outwards. I am going to place the rotor on 50% and apply the parking brake to see I can demonstrate proper operation.

My car has been on jacks since Saturday =/
what video?
 
Because the lever is connected to the parking brake strut below the pin on the upper trailing shoe, it causes the top of the trailing shoe to push out toward the drum surface. ( The next few statements are specific to the left/drivers side assy., it would be the opposite for the passenger side)

thank you for the great detailed analysis. I Very very much appreciate it!!!!

Still analyzing the second paragraph (quoted text). I have not made it to the rest of the post. Still wrapping my head how that statement reads.
the parking lever rests with the trailing (rear side) shoe. And that is the side that is not actuating. so maybe this is where the problem is

by brake strut do you mean brake cable?
The strut is touching the the lever, not attached persay, Sorry to be tediously strict, i really want to get this right. and the strut is above the pin not below. unless you are refering to something else I'm not understanding. Edit: do you mean the pin holding the lever shim and trailing shoe together? (Edit 2, yes it makes sense if you meant that)

are you trying to say the parking brake lever pushing on to the strut thus pushes the trailing brake outwards?

so first the lever pushes the strut which pushes the leading brake shoe out, which (leading shoe hits the drum) then therefore pushes back on the trailing shoe pad pushing that out as well. Only way i can make sense out of this. I will read the rest of your post now. or maybe reread that sentence a 100 times.

Truly appreciate the details and length. :beer:

Edit I want to make it clear I'm doing this with the rotor off. but based on the video, I dont see why it won't work correctly. Despite what DG&BRM warning me that it won't work without the rotor. Just trying to understand a bit more .
 
Last edited:

Members online

No members online now.

Forum statistics

Threads
278,316
Messages
3,554,112
Members
248,016
Latest member
Advally Service

Trending content

Back
Top