Parking Brake Repair Procedure Question

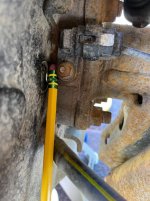
CALVAN TOYOTA BRAKE SPRING TOOL CV364
$ 20.77

Special tip is designed to engage the shoe hold down spring cup on Toyota vehicles
This application requires a lower profile brake spring tool with more a longer reach.
The user can put the tip of this tool through the access hole and engage the spring cup on 2000 and current Tacoma, Tundra, FJ Cruiser, 4Runner, Land Cruiser, and Camry.
 
Sorry to dig up an oldish thread. I'm having issues with my parking brake. Having taken it to a mechanic they have said the problem is siezed cables and that to replace them all would be $1000 ish (cad) as they have to drop the fuel tank.

Having read this thread it's helped me somewhat and most likely the level of workmanship is above me level, but I wanted to ask if there are any obvious points I can get to to try and unseize the cables? They would have only seized in the last month or so, so potentially may come loose with a bit of spray, heat and gentle persuasion.

Can anyone recommend a course of action , or at least a good starting point?

Cheers
 
You do NOT have to lower the fuel tank to replace the driver side parking brake cable. You have a total of 3 cables, 1 from the pedal assembly and then it splits into 2 separate cables. The front cable hardly ever needs replaced, just the rear right/left cables. The book time to replace the rear cables is 5.0 hours. The parts should run you no more than $175.00.
The cables either are stretched or seized up between the cable and sleeve. It is not that difficult of a job to do, just time consuming.
 
You do NOT have to lower the fuel tank to replace the driver side parking brake cable. You have a total of 3 cables, 1 from the pedal assembly and then it splits into 2 separate cables. The front cable hardly ever needs replaced, just the rear right/left cables. The book time to replace the rear cables is 5.0 hours. The parts should run you no more than $175.00.
The cables either are stretched or seized up between the cable and sleeve. It is not that difficult of a job to do, just time consuming.

That is good to know, thank you. The garage said all 3 had siezed unfortunately.

Do you know if there is a common place they tend to sieze, or will it just be randomly along the cable casing?

I will try to inspect when the weather warms up here.
 
The pins are just pivot points for the shoes that also hold them in place. The lever is what actuates the spreading motion. That middle strut piece at the top as well as the star wheel at the bottom simply help keep the shoes aligned on the same plane. The spring on the top piece helps apply pressure to keep it spread outward. We are both way overthinking this lol but it's my job as a product Designer to be this way I guess :loco:

If I can dig deeper in to the strut referenced above, on drum brakes (primary, not parking brakes as on my 4th gen) that I’ve worked on in the past, these struts usually have an oblong spring wrapped around them. Is this spring necessary?

I ask because I had my rear wheel bearings replaced by a shop just before thanksgiving and ever since I’ve occasionally noticed a metallic rattle I the rear end. I typically do all of my own maintenance but rear bearings are too specialized. Point being, I jacked up the rear end ad tapped away at various points all over the place and couldn’t shake anything so I figured it was within the drum assembly. I finally got a chance to pull the rotors and the only loose piece I can see is that strut between the shoes, and it does not have the oblong spring. I thought I had a diagram of the drum assembly but I cannot find it now. I am going to take it back to the shop and have them correct it because I had them replace the parking shoes and hardware when they replace the bearings, so this is on them. I just want to make sure there should be a spring on that strut before I go raising hell.
 
If I can dig deeper in to the strut referenced above, on drum brakes (primary, not parking brakes as on my 4th gen) that I’ve worked on in the past, these struts usually have an oblong spring wrapped around them. Is this spring necessary?

I ask because I had my rear wheel bearings replaced by a shop just before thanksgiving and ever since I’ve occasionally noticed a metallic rattle I the rear end. I typically do all of my own maintenance but rear bearings are too specialized. Point being, I jacked up the rear end ad tapped away at various points all over the place and couldn’t shake anything so I figured it was within the drum assembly. I finally got a chance to pull the rotors and the only loose piece I can see is that strut between the shoes, and it does not have the oblong spring. I thought I had a diagram of the drum assembly but I cannot find it now. I am going to take it back to the shop and have them correct it because I had them replace the parking shoes and hardware when they replace the bearings, so this is on them. I just want to make sure there should be a spring on that strut before I go raising hell.

Yes, that spring is necessary. I realize this post is a couple weeks old, so hopefully you've got it back in order. On that strut, there's a longer finger on the outside facing the rear, which doesn't engage much, requiring that spring to keep the rear part engaged. Hope you're all set!
 
Yes, that spring is necessary. I realize this post is a couple weeks old, so hopefully you've got it back in order. On that strut, there's a longer finger on the outside facing the rear, which doesn't engage much, requiring that spring to keep the rear part engaged. Hope you're all set!
Well I took it back to the shop that did the rear bearings & parking brake with little hope of them correcting it. They swore up and down that there is no spring on that strut despite the factory parts diagram showing it, which tells me that A: they forgot to install it while struggling with the parking brakes the first time and B: they no longer have the parts from the spring kit that they ordered (if in fact they replaced the springs at all) and weren't willing to buy another set just to correct their original omission, nor were they even willing to admit a mistake at all. I even told them I would pay for a new spring kit, but they continued to insist that spring wasn't needed. So yeah, it still rattles, and I will have to break it down and install it myself.
My philosophy on mechanics is, while I rarely use them, I will submit on bigger projects and will give any mechanic a chance. If they screw it up, I'll give them a chance to fix it. If they don't get it right on the 2nd pass, I'll just never use them again. To not even acknowledge that they made a mistake? Yeah that's a bad review and as much bad word of mouth that I can generate. I may not contribute a lot of dollars and so my business rarely amounts to much, but I would happily send friends and even some of my irritating regular maintenance stuff to a shop if they give me the feeling that I could rely on them.
 
Well I took it back to the shop that did the rear bearings & parking brake with little hope of them correcting it. They swore up and down that there is no spring on that strut despite the factory parts diagram showing it, which tells me that A: they forgot to install it while struggling with the parking brakes the first time and B: they no longer have the parts from the spring kit that they ordered (if in fact they replaced the springs at all) and weren't willing to buy another set just to correct their original omission, nor were they even willing to admit a mistake at all. I even told them I would pay for a new spring kit, but they continued to insist that spring wasn't needed. So yeah, it still rattles, and I will have to break it down and install it myself.
My philosophy on mechanics is, while I rarely use them, I will submit on bigger projects and will give any mechanic a chance. If they screw it up, I'll give them a chance to fix it. If they don't get it right on the 2nd pass, I'll just never use them again. To not even acknowledge that they made a mistake? Yeah that's a bad review and as much bad word of mouth that I can generate. I may not contribute a lot of dollars and so my business rarely amounts to much, but I would happily send friends and even some of my irritating regular maintenance stuff to a shop if they give me the feeling that I could rely on them.

gotta appreciate quality mechanics
 
Just a hack here, but if you compress the spring lightly in a vice and tie it with a THIN piece of copper wire, on two sides. It goes in place real easy,the pin clip is easy to rotate, and then snip the wire and pull it out. Took me 30 seconds once I tied the spring
 
The star wheel on the right side is a reversethread, that way when you adjust either side, turning the star wheel up opens the spread, down closes it
 
Great thread! Thanks to everyone who contributed! I’m located in the NY/NJ area. Anyone on here who would be willing to help a fellow T4R’er out with this repair? My local mechanic wants to drop the axle so I figured I’d try to find an experienced specialist!

Cheers!
 
Great tip

Just a hack here, but if you compress the spring lightly in a vice and tie it with a THIN piece of copper wire, on two sides. It goes in place real easy,the pin clip is easy to rotate, and then snip the wire and pull it out. Took me 30 seconds once I tied the spring

I was going to use the zip tie technique but this sounds far less tedious!
If it works I will try to remember to post back here. Glad I kept reading past the 1st page of this topic.
 
This thread was a life saver for me! In 50 years of shade tree mechanic work (usually in a garage), this was the most difficult, maddening, and frustrating car repair job I have ever done! And I have had some doozies...!!! I used to think Toyota was one of the best thought out vehicle from a repair perspective, but the way they engineered and built that parking brake assembly has given me doubts about that thought.

I used plastic coated twist wire ties for those stupid, inane, and absolutely asinine shoe hold down pins and springs. I stripped the plastic off the wires to give more room for the pins to slide through the holes in the shoe hold down spring cups, then I twisted the wire tight as I compressed the assembly with a small needle nose Vice Grip. The wires broke a few times because of the need to manipulate the assembly so many times to get everything just right. First time I got everything back in place, the brand new brake shoes I had purchased apparently were too large to allow the brand new drum to slide on. I even tried sanding a taper into the shoes so the edges of the shoes would not catch the edge of the new drum to no avail. Sooooo, to add insult to injury, I had to take the entire assembly apart and, in desperation, install the old shoes which the drum easily cleared so I could finish the job. Nothing could be worse than assembling that stupid brake shoe, hold down pin and spring, adjusting pin and return tension spring assembly, which seems if you sneeze the wrong way, will fly apart, sending parts in every direction never to be found again. However that is what I had to do.

This was all because when replacing brake pads and rotor, one of those shoe hold down spring and cup assemblies fell apart during the rotor replacement. The parking brake never worked worth a damn anyway, but I felt that I definitely had to make the parking brake functional at the very minimum. Needless to say, i passed on trying to replace the other side, since the only new parts were springs and cups when all was said and done.

One other thing, I read about removing the console to adjust the parking brake cable, but there is also an adjustment where the cable attaches to the brake pedal. I loosened the locknut, tightened the cable nut, and re-tightened the lock nut to make the adjustment. It really brought the pedal position back to where it engaged the parking brake at the seemingly correct place (5-6 clicks) Is there any reason why that was wrong?

 
I came across this thread a couple weeks ago after bending both the retaining pins on my emergency brake while removing a rotor. I ended up removing the emergency brake so I could drive it while waiting for replacement parts.

Today I finally got around to putting my emergency brake back on. I knew getting the hold down springs together was going to be difficult but really everything about installing the emergency brake seems to need three hands. I took a couple pics of things that helped me, mainly using a ratchet strap and jack stands to hold things in place and jamming a pencil eraser behind the straight pin to hold it in place. The straight pin was difficult since this was on my passenger side and I'm right handed. U pin was a little easier to hold with my left hand while working the hold down cup with my right hand.

I was kind of dreading this job and planned for a long time to get it done but managed to get it all together in about 2h45 (working in the street in front of my house :rolleyes:). FWIW I didn't tie the cups and springs together at all. I just used needle nose pliers through the hole in the rotor and once the pin was through the hole in the cup I used a pry tool to hold it down and got lucky rotating the pin into place.
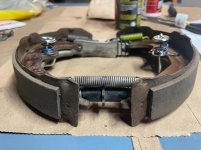
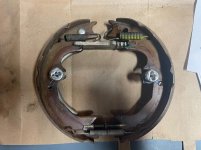
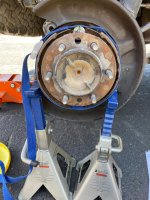
Pics:
1 & 2: putting everything together before installing to visualize how it works
3: Ratchets strap and jackstands to hold the shoe assemblies in place while dealing with the hold down springs
4: Using a pencil eraser to hold the hold down spring in place.

Edit: one more note, mine was on a 5th gen 4runner, but I believe they are apparently the same, in any case this thread helped me figure out my 5th gen.
 

Attachments

  • IMG_3275.jpg
    IMG_3275.jpg
    115.6 KB · Views: 577
  • IMG_3276.jpg
    IMG_3276.jpg
    121.3 KB · Views: 611
  • IMG_3281.jpg
    IMG_3281.jpg
    140 KB · Views: 573
  • IMG_3282.jpg
    IMG_3282.jpg
    136.2 KB · Views: 583
Last edited:
Here is my experience getting the shoe hold down pin/spring installed. After reading the whole thread, I was dreading doing this. One of the shoe hold downs had broken and the shoe was dragging. I ordered the part kit from Napa and just used what was needed to fix the one shoe.

I moved the axle hub to get the notch over the area where the pin goes. Then I took off the top spring and removed the connecting bar, leaving the bottom end hooked to allow a pivot point.

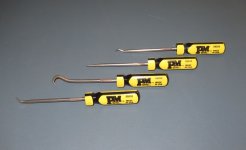
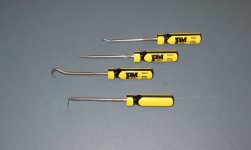
After inserting the pin from the back I assembled the backing washer (with tab), spring, and the top washer, rotating it 90 degress. Then I used this small pick with the 90 degree bend to hold it all together. The point fit into the depression on the back of the lower washer. I could then pull the spring and get the assembly started on the slot. With a small screw driver I was able to get the tab into it's retaining hole.

With the hard part done, I reinstalled the cross bar (and spring) using needle nosed pliers and a screw driver to help line it up. Then I hooked up the top spring. Done.

This went really easy and I got it on the first try !

Here is the tool that I used. It came with the three other picks in a kit. I've had them for so long I don't remember where I got them. I've used them all at one point.

Here is something similar : Precision Hook and Pick Set for Automotive | 4-Piece Hand Tools - - Amazon.com
 

Attachments

  • IMG_2393tr.JPG
    IMG_2393tr.JPG
    52.5 KB · Views: 540
  • IMG_2395tr.JPG
    IMG_2395tr.JPG
    60 KB · Views: 537
Last edited:
I realize post is 8 yrs. old but just checking to see since at dealers while replacing rear brake shoes and rotors they found one of the parking brake springs is broken and told me I'll hear a noise from this, just try not to use the parking brake if possible with a quote of $865 to repair it - springs and shoes plus hardware - at a later date. It's an '03 4Runner SR5 4WD with 135,000 miles on it, so it's 19 years old, is this a common issue due to age?
 
I realize post is 8 yrs. old but just checking to see since at dealers while replacing rear brake shoes and rotors they found one of the parking brake springs is broken and told me I'll hear a noise from this, just try not to use the parking brake if possible with a quote of $865 to repair it - springs and shoes plus hardware - at a later date. It's an '03 4Runner SR5 4WD with 135,000 miles on it, so it's 19 years old, is this a common issue due to age?

Don't think those springs would break on their own. Maybe rust through but think it unlikely. Sorry to say that I think it more likely that they (or somebody previously) broke it when they were removing the rotor because the parking brake shoe snagged on it and they forced it off rather than backing the shoe off using the star wheel on the self adjuster. When they had the rotor off, that would have been a perfect time to replace that parking brake shoe and hardware (which includes the spring). I had this exact issue when replacing rear rotors and replaced parking brake shoes and hardware. Parts were less than $50 for both sides but at a Dealer, Toyota parts would be more++++.
 
Last edited:
Excellent thread! I'm afraid I've got the dreaded squeal happening while driving at very slow speeds. I've replaced pads all around and the noise is still there. Has anyone found a video on this process? If not a video, at least a step-by-step procedure for doing this job? I'm really not looking forward to doing this and I'd love all the help I can get. TIA!
 
Zip ties worked

I found a thread somewhere in which the author illustrated the simple technique of compressing each retainer spring and cup assembly together using two of the smallest zip ties on each spring -- one on each side of each spring to even it out. It worked!

Once it was all assembled and in place on each shoe, the plastic ties were easy to snip and pull out. Thus, a frustrating job was made about as simple as one could hope for with this poor design.

04 & 05 4Runners
 
Last edited:
My hack to assemble those darn spring cups (wasted hours trying at first) was to drill 2x 3/32" holes in line with the slot and then use a thin nose plier to grip, push and rotate the cup over the pin. It worked!

https://imgur.com/a/ea93KIQ
 
Last edited:

Members online

Forum statistics

Threads
278,316
Messages
3,554,111
Members
248,016
Latest member
Advally Service

Trending content

Back
Top