Putting the red bumper lenses to use

It would seem to me that if you put resistors on the red and brown wires (the turn signal wires), then you would prevent power from getting to the turn signals themselves.
 
Sounds intelligent, but I need a break from being under the car :) I will keep everyone posted if I do it though.
THanks
 
i dont know what problem you are having, but I got a generic dual element socket (i think 1156 or something) and ordered a LED light from superbrightleds.com and everything went in fine....i had absolutely no problems and the lights look GREAT...nice and bright red :)

I originally had them hooked up as parking/brake/blinker lights...but didnt like that (they got REALLY BRIGHT as brake lights)...plus I added the led blinkers in the mirrors, and i didnt want too many lights blinking *LOL* so now they are just parking lights only (no blinker or brakes)

power source it tapped from the trailer hitch wires
 
Last edited:
Finally did this mod...

24runners said:
I originally had them hooked up as parking/brake/blinker lights...but didnt like that (they got REALLY BRIGHT as brake lights)...
I wanted them bright so I did them as parking/brake/turn signals. Thanks to bryancos and all the others who chimed in here with hints.
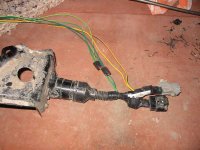
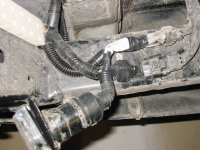
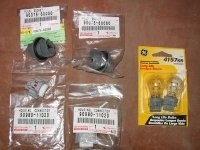
I wanted the job to be as stock looking as possible. Turns out the front DRL/turn signal hardware is the right size for this. Ordered Toyota #90980-11020 wiring connectors (C$6.93)and #90075-60060 (C$11.50) lamp sockets. These take the 4157 (dual filament) bulb. Wired the connector with the same terminals as I used in my map light mod (not sure how to link to it here.) Pin #1 is parking, pin #2 is gnd and pin #3 is brake/turn. Removed the trailer wiring harness to splice into it for the connections.
I might try an LED if heat becomes an issue but I also don't want to run into the same issues as ksneubec. Several pics to follow.
Here is the wiring harness partially reassembled on the bench:
 

Attachments

  • t4rrearlgt05.jpg
    t4rrearlgt05.jpg
    51.9 KB · Views: 1,245
Last edited:
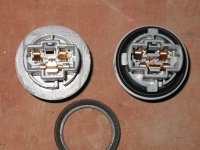
Items fitted before final assembly along with custom wire terminals:
 

Attachments

  • t4rrearlgt16.jpg
    t4rrearlgt16.jpg
    33.6 KB · Views: 1,836
Last edited:
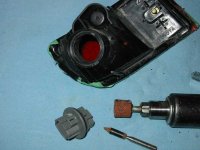
Lens housing end opened up. Used a 1/8" dia. drill to start pilot holes and then finished grinding out to size to have a slide fit for the connector. Used temporary painters tape on lens itself to avoid scratchs.
 

Attachments

  • t4rrearlgt04.jpg
    t4rrearlgt04.jpg
    40.2 KB · Views: 1,297
Last edited:
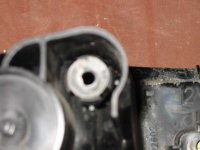
Vent cap removed and pierced end of rubber grommet, then reinstalled:
 

Attachments

  • t4rrearlgt03.jpg
    t4rrearlgt03.jpg
    31.2 KB · Views: 1,194
Last edited:
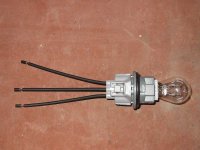
Removed the locking tabs (not needed) on the lamp socket so that it slides in and holds:
 

Attachments

  • t4rrearlgt12.jpg
    t4rrearlgt12.jpg
    50.3 KB · Views: 1,443
Last edited:
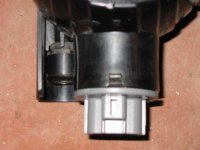
Lamp socket pressed into housing, vent cap partially reinstalled to provide venting (but keep the dirt out; if they still heat up too much I'll just remove them completely). I also used electrical tape to hold the socket in the housing just in case (not in pic.) Replaced the housing into bumper opening and snapped on the connector. Let there be light and lots of it!
 

Attachments

  • t4rrearlgt14.jpg
    t4rrearlgt14.jpg
    29.6 KB · Views: 1,194
Last edited:
Good post + pics. Just in case..

1. don't use electrical tape if weather gets cold. electrical tape will NOT hold in cold temperature. Try using duct tape. It'll give you a tight seal so that water will not create problems.

2. put some dielectric grease on the connections so you won't have any problems down the road.
 
Never had an issue with electrical tape in the past. I used it on the socket to housing joint "just in case" even though I have a snug fit. It is easy enough to remove the tape in order to change a light bulb. I am not using it to seal because if you notice the socket comes with an o-ring. There is also a stock drain hole. That is why I went with the stock parts as much as possible. No hacking and gooping or silicone to worry about.
Thanks for the dielectric grease hint.
 
Last edited:
Heat IS DEF. AN ISSUE w/ STD BULBS - USE LEDs

Kmvreter,
I think you've got one of the cleanest implementations of this mod yet! Great pics... they say a 1000 words! Heat definately becomes an issue if you run standard bulbs and use them as tail lights. Suggest you check them after a week or so to see if you see signs of melting plastic!

HEAT IS DEFINATELY AN ISSUE WITH FILAMENT TYPE BULBS.
I had a bulb blow and found that it had melted itself to the inside of the housing where I had it mounted. I manged to break it out, and cut off the extended part that comes off of the housing so I could remount a new bulb socket, but I think I'll be ordering replacement red lenses (ouch! there goes $120) and starting over and using LEDs next time to eliminate the melted plastic scenario... I've updated the procedure to indicate this along w/ suggestion on how to mitigate.. (Either use LED bulbs or dremel/cut off about 3/4" or more of the "tube" where the bulb goes so that the bulb head ends up in the housing, and not surrounded by plastic)

B.

 
Last edited:
Thanks for the heat warning. The 4157 bulb in this socket does sit inward (not in the "tube") but if heat becomes an issue I'll have to try a 4157 LED.
We'll see.
 
Why don't one of the mods here just go to the Hilux Surf site and ask one of thier members for the exact bulb which fit here. I don't understand why there would be a "heat" issue if one uses the same size bulb as used in the taillight assembly. Am I missing something here or what? I would like to do this mod....but only if I don't melt my $120 red reflective lens.
BTW, I like the idea used here by ordering the original Toyota DRL/parking lamp sockets for this modification.
 
I tried to find this info from here and elsewhere. I used the 4157 because they are used up front and nothing is melting there plus the socket was a stock almost-fit.
 
Kmvreter said:
Lens housing end opened up. Used a 1/8" dia. drill to start pilot holes and then finished grinding out to size to have a slide fit for the connector. Used temporary painters tape on lens itself to avoid scratchs.

LOL! Your dremel sanding bit looked just like mine did! Did you manage to "splash" any plastic on the walls around you too? Too funny!
 

Members online

No members online now.

Forum statistics

Threads
278,316
Messages
3,554,120
Members
248,016
Latest member
Advally Service

Trending content

Back
Top