Rear Axle Seals: The Ultimate Information and Replacement Thread (3rd gen)

I just did this last month. I 1st changed the inner seal then put it back together, then 1 week later my bearing went bad. Changed everything with GENUINE TOYOTA parts. Stealership wanted $700 out the door for 1 side. I said F that and changed both sides for half the price. Now I have a piece of mind.
 
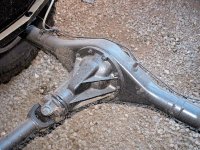
Anyone have a pic of the factory rear diff breather? It's on driver side of pumpkin?

Yes, it's the thing on the driver's side of the pumpkin. Pretty sure it's a 14mm.

0803_4wd_05_z+toyota_4runner+rear_axle.jpg
 

Attachments

  • 0803_4wd_05_z+toyota_4runner+rear_axle.jpg
    0803_4wd_05_z+toyota_4runner+rear_axle.jpg
    80.3 KB · Views: 4,385
I can't find a shop willing to do the bearings, I guess nobody wants the liability for such a small job and because I'm supply the parts myself. Where did you guys take the axles? I seriously considering buying one of those durasolid tools and a 20 ton shop press.
 
I can't find a shop willing to do the bearings, I guess nobody wants the liability for such a small job and because I'm supply the parts myself. Where did you guys take the axles? I seriously considering buying one of those durasolid tools and a 20 ton shop press.

I got mine done here Axle Repair and Parts, Driveshaft, Differential, Denver, Colorado

They were 70 dollars per axle so 140 for both axles. I removed my axles and drop them off. I was going to buy a press and the tool to do it but for over 350 dollars all said and done I would have spent more and these parts if done properly would last 10yrs or longer with the new seal design so I decided to have an axle shop do it. I provided them only the new bearings and seal spacer. They removed my speed sensor rotor and reused it and reused the outer spacer. they reinstalled it with the flat side towards the axle so the seal has more meat to ride on. A good axle shop in your area should be able to do this for you.
 
So, you guys might think this is crazy, but as I mentioned my axel seals were leaking for the past few years. Don't dive the truck that much right now. I filled the rear pumpkin over 2 months ago and was able to add about 22 ounces of diff fluid until it became full again (diff holds 96 ounces total when full, 3 quarts about). It's been 2 months and NO MORE LEAKING. Can this somehow fix itself?
 
Both my rear drum brakes were FULL of diff. fluid and brakes felt very mushy and had almost no stopping power. Shoes were nearly brand new as well...just soaked in diff. fluid.

Removed axles and wouldn't you know it, the rings and ABS gear all sat basically flush against the bottom of the backing plate. Whomever had the 4Runner before me clearly had a seal leak and took it to someone who did not know what they were doing which subsequently resulted in a new leak that I am now dealing with.

Well I took the axles to local Toyota Dealership...they charged $650 to press new bearings, retainer rings, ABS ring. As a side note, when I mentioned the previous hack job done on them and that I wanted to make sure they were pressed correctly, the Technician (who was familiar with the issue) stated that it's their policy to actually use 2 retainer rings on the outside of the Skid Control Rotor (ABS ring) and then the regular 1 retainer ring on the inside of the Skid Control Rotor. This he says, makes sure that when pressing, that the tech cannot physically push past a certain point and makes the retainer that is responsible for connecting with the seal ring to connect fully.

Essentially they added another spacer to take any guess work out of the exact distance when pressing the important retainer ring. Not sure how i felt about this in the end as it seemed like they were just taking the easy way out, but it did leave me with only a small visible polished section of the axle as is shown in most of the correctly pressed photos. IT also cost me two EXTRA retainer rings and the normal setup calls for 2 per axle...so now I have 3 per axle...at like $30 a pop :mad2:

Anywho....I'm glad its done. They dealership charged 1 hour of labor per axle at $100 per hr. So basically $200 in labor and about $400 in parts + tax. Hope this helps anyone looking to price it out.
 
My dealership wanted 5 hours LABOR just to replace the bearings.

I got everything OEM for $27x at employee cost. Had a local machine shop press it together, paid $150 after a mishap with my replacement axle which was machined incorrectly. Too much money but it's done.
 
Question about bearings...

Hey guys, so I have a leak in my rear axle. I noticed the driver side leaking more than the passenger, as you can see in my previous post :).

Now my question is, my passenger side has a little play in the bearing, is this normal? I can push it in a out maybe 1/16" but not really up and down/side to side. However, this side leaks FAR less than the driver side (which has no movement in the bearing).

I read somewhere that slight bearing play is "normal"? I think BIGFISHALLDAY said that in another post. I don't hear anything when I drive and it spins rather nicely still when up on jacks. Just wondering if I should replace the "seals" only vs the entire job!

The bearings don't look OEM either so I'm not opposed to swapping it all out. But I don't want to do it and find the bearing play is "normal". The machine shop I spoke to said it is normal but he'd have to look at it to confirm.
 
Special Service Tool

bugman-74

Hi.
I'm new to the site/forum, so please accept my advanced apologies for any infractions I may make while I'm learning.
I myself am at the stage, as to where I need to replace my bearings/seals and rather than take my axles to a Machinist and explain how to complete the task, I'd rather do it myself however, my welding skills are limited/do not have a welder. As such, as you have the exact measurements, materials list and welding skills, I was wondering if you would be willing to manufacture/ship the Special Service Tool to me? I'd gladly compensate you with a fair price and pay for the shipping.

Thanks for your time and consideration,

frymi
 
bugman-74

Hi.
I'm new to the site/forum, so please accept my advanced apologies for any infractions I may make while I'm learning.
....

frymi

I made a separate thread recently here discussing tool design and the necessary dimensions. I don't have much welding experience, but I will be attempting to put the tool together using some arc welding sticks and two old batteries.

http://www.toyota-4runner.org/3rd-gen-t4rs/217575-rear-axle-seal-axle-puller-tool-design.html
 
Last edited:
How it worked for me

My spacer ring measurement before. Note [original factory] seal lip wear line
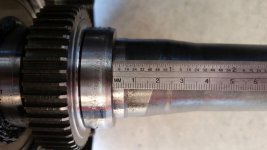
DepthM 1.jpg

The anti-skid gear reluctor wheel measurement from bearing edge. It's important to note that I'm measuring from the bearing edge because the backing plate and carrier are not tight on the bearing, that is that the bearing floats in the carrier until it is located by the axle tube.
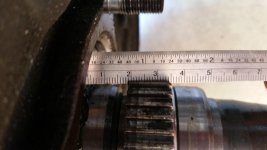
DepthM 2.jpg

I did this job back in January and I've put a few thousand miles on it since then. A huge thank you to BigFishAllDay for this write up and for all those who contributed to it.

Some pointers to anyone doing this themselves: the depth of the sensor wheel can be checked by removing the sensors from each side of the axle as seen in previous pictures; it should be basically centered. Also, there is no need to reverse the orientation of the seal ring provided two things: first, the seal must be installed with something that doesn't distort it during installation; and second, the seal ring should be installed farther away from the sensor wheel. I used a plastic cap I had lying around for the seal which happened to be the right diameter--if you use anything made of ferrous metal and don't remove the sensor, the magnet will pull it off center and the seal will get distorted/warped/damaged. Obviously, using a socket will almost certainly damage the seal by pressing the center farther in than the outside, but even a seal/bearing driver can do this because the outside edge will bottom inside the axle tube and one extra smack with the hammer can bend the center in just a little farther. Order three seals because unless you do this all the time you will ruin the first one.

As shown in my picture above (and others) the seal ring is pressed about 5mm past the edge of the polished machined section of the axle shaft which allows the old-style seal to mate about 2mm in from the bevel and installing the new ring to this depth will cause the seal lip to mate somewhere around the bevel instead of on the flat and it will leak (but this is made worse if the seal is damaged as mentioned above). The bevel is designed to guide the seal to slip on the ring easier, so instead of installing it backwards, just set it a few millimeters closer to the machined edge of the axle. I set mine at 2-3mm and it has not leaked. This means that there will be a space between the sensor gear and the seal ring, but that is inconsequential.

The ID past the inside of the seal where the axle tube starts to neck down is not so small or close that the ring can contact it (within reason), so as long as the seal is not pressed in so far that the surface is deflected inward, the seal lip should line up. Best thing to do is the 'grease test'.

Side note, in an effort to save money I purchased a set of Nachi 6308-2NSL bearings for about half of what one single bearing would have cost from the stealership. I matched the number from what came on the truck originally and they have performed flawlessly. Time will tell if I really benefited from the cost savings.

 

Attachments

  • DepthM 1.jpg
    DepthM 1.jpg
    81.5 KB · Views: 2,786
  • DepthM 2.jpg
    DepthM 2.jpg
    70.9 KB · Views: 1,748
As shown in my picture above (and others) the seal ring is pressed about 5mm past the edge of the polished machined section of the axle shaft which allows the old-style seal to mate about 2mm in from the bevel and installing the new ring to this depth will cause the seal lip to mate somewhere around the bevel instead of on the flat and it will leak (but this is made worse if the seal is damaged as mentioned above). The bevel is designed to guide the seal to slip on the ring easier, so instead of installing it backwards, just set it a few millimeters closer to the machined edge of the axle. I set mine at 2-3mm and it has not leaked. This means that there will be a space between the sensor gear and the seal ring, but that is inconsequential.

The ID past the inside of the seal where the axle tube starts to neck down is not so small or close that the ring can contact it (within reason), so as long as the seal is not pressed in so far that the surface is deflected inward, the seal lip should line up. Best thing to do is the 'grease test'.

Thanks for the excellent detail regarding the retainer positioning. This is the most crucial part of the install to get right to ensure no leaks.

In Dr Coffee's flipped retainer method, there was a mention that there is not that much space to located the retainer farther inboard (by using the original retainer position) before it starts rubbing on the axle tube. You have said that it can be positioned 2-3mm more inboard to mate with the new seal design. Can you comment on how much this tolerance actually is?

In going to be doing my seals in the next week or two, so just preparing myself. Thanks.
 
Last edited:
Thanks for the excellent detail regarding the retainer positioning. This is the most crucial part of the install to get right to ensure no leaks.

In Dr Coffee's flipped retainer method, there was a mention that there is not that much space to located the retainer farther inboard (by using the original retainer position) before it starts rubbing on the axle tube. You have said that it can be positioned 2-3mm more inboard to mate with the new seal design. Can you comment on how much this tolerance actually is?

In going to be doing my seals in the next week or two, so just preparing myself. Thanks.
What I need is a picture of the assembled axle shaft... I didn't get one after, but If I take it apart in the future now that everything has settled in I'll be sure to get one so that we can all see how it worked out.

Sent from my SM-G900V using Tapatalk
 
If any one is interested, I have a a pair of the following, OEM NEW.

Wheel bearing - 90363-40068
Wheel bearing outer seal - 90313-54001

Send me a PM
 

Thanks for your pictures and comment on the last page. I did mine this weekend and your post was one of the most helpful ones in explaining the proper positioning of all the parts.

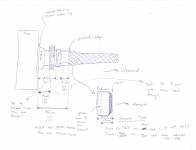
Attached is a picture I drew of the before measurements of all the components, as well as what the new spacing would be. My before measurements matched yours exactly. With the new 90310-50006 seal, the sealing lip is ~1mm MORE inboard versus the old 90310-50001 seal and therefore it is essential to locate the retainer further inboard as well. Otherwise the seal lip will rest right on the beveled edge of the retainer, which is not as good of a seal.

I think the MOST important part of this is the grease test to verify the grease seal lip is contacting the retainer properly. I also did the grease test on the bare retainer to figure out what was the maximum distance I could put the retainer inboard before it started rubbing on the axle. Dr Coffee's flipping retainer method was not necessary and I just ended up moving the retainer 2mm further inboard. The distance between the retainer and the polished edge of the axle was 5mm before, and now it is 3mm. The tolerances are very tight!

Seals perfect for now, but only time will tell.
 

Attachments

  • 1998 4Runner Rear Axle Setup.jpg
    1998 4Runner Rear Axle Setup.jpg
    106.3 KB · Views: 2,133
Last edited:
So are you just setting the inboard retainer at 3mm in from the polished edge (instead of the 5mm) & leaving the rest alone ? (abs ring at 19mm)
 

Members online

Forum statistics

Threads
278,316
Messages
3,554,113
Members
248,016
Latest member
Advally Service

Trending content

Back
Top