I THINK I solved the mystery as to why the WW does not go all the way across the rear windshield, but I never said I fixed it! That is why I am posting. If I am correct as to why, maybe some of you engineering geniuses out there can edify us as to how to correct it, if possible!
Alright, took off the rear spoiler. Pretty easy, take off the nut (10mm) holding on the rear windshield wiper arm and blade to the wiper post. Then, just to be safe, take off that little rubber shield after the arm comes off. It just lifts off the post. Make sure the wiper arm and blade was in the full retracted position when you remove it. I will explain why later.

Then take off the 4 rubber plugs just on the inside top of the rear door. Inside, 4- 10MM short bolts.


From there, just pull out carefully. There are also 3 plastic guide pins towards the inside top of the spoiler. They do not clip in, but be careful not break them pulling the spoiler off or putting it back on with too much of an angle. As you are holding the spoiler in one hand, disconnect the electrical plug that goes to the wiper motor. There is one more wire going into the door, I did not figure out where it went too or how to disconnect it , but once I disconnected the wiper motor electrical connection, I had enough slack to just rest the spoiler on top of the truck.
Ok, now you can see the wiper motor. Remember this. When you took the wiper blade off, the blade was in the full UP position. (Tucked under the spoiler). Therefore, the gears inside the motor, if removed, should be placed in the same position as you will find them right now just to be safe. It may not really matter the way this is designed, but just in case, keep this in mind.
Remove the wiper motor. 3- 10 mm bolts. No need to take them completely off, just unloosen enough to come off the back plate. The bolts will stay in the rubber bushings just fine.

Now, take the motor to a work bench area and remove the 6 screws on the back. Note: Rest the motor somehow where there is no pressure on the wiper blade post before you pull off the back plate. If you don’t, the weight of the unit will push on the post, pushing up on all the gears and when you open the plate, all the gears will pop out before you have a chance to look at how they were placed in the unit!

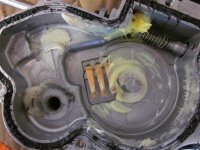
This is what you see when you open the back plate. See the screw sticking out of the top left of the unit? It has a lock nut on it. I thought that might be some sort of adjustment screw, but it would not turn all. Yes, I loosened the lock nut first. Not sure what this screw is really for, but as you will see, I do not think it has anything to do with adjusting the sweep of the WW.

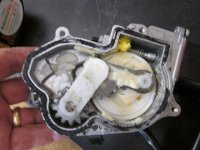
The large white plastic gear on the right seems to be the Key. If you lift up on the gear unit on the left, it allows easy removal. Note, this is where you need to keep a good mental note or photo, prior to removing any gears so you can put them back in the same place when rebuilding.
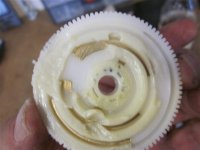
After removing the gear, you can see three electrical contacts. On the bottom side of that white gear, one can see 3 metal strips embossed onto the plastic. I am thinking the 2 strips closest to the center are the contacts which control the “sweep” of the WW. This because they are of equal distance in length and plane on the gear. I think the third metal strip is the one which controls the return of the WW up to the retracted position. That is just a guess on my part, but it makes sense in a twisted sort of way……


Ok, assuming I am correct and the sweep is controlled by the 2 equal metal strips closest to the center of the gear, then lengthening the contact points on either one side or both sides should cause the WW to continue in the sweeping motion for as long as contact is made. So maybe 1/8th or ¼ of an inch longer metal embossment would do the trick. The problem is how does one add metal contact to these metal strips? A little grinding then filling with solder? Metal tape? Any suggestions? The best solution would be to contact the manufacturer and have them replace the gear……
Alright, took off the rear spoiler. Pretty easy, take off the nut (10mm) holding on the rear windshield wiper arm and blade to the wiper post. Then, just to be safe, take off that little rubber shield after the arm comes off. It just lifts off the post. Make sure the wiper arm and blade was in the full retracted position when you remove it. I will explain why later.
Then take off the 4 rubber plugs just on the inside top of the rear door. Inside, 4- 10MM short bolts.
From there, just pull out carefully. There are also 3 plastic guide pins towards the inside top of the spoiler. They do not clip in, but be careful not break them pulling the spoiler off or putting it back on with too much of an angle. As you are holding the spoiler in one hand, disconnect the electrical plug that goes to the wiper motor. There is one more wire going into the door, I did not figure out where it went too or how to disconnect it , but once I disconnected the wiper motor electrical connection, I had enough slack to just rest the spoiler on top of the truck.
Ok, now you can see the wiper motor. Remember this. When you took the wiper blade off, the blade was in the full UP position. (Tucked under the spoiler). Therefore, the gears inside the motor, if removed, should be placed in the same position as you will find them right now just to be safe. It may not really matter the way this is designed, but just in case, keep this in mind.
Remove the wiper motor. 3- 10 mm bolts. No need to take them completely off, just unloosen enough to come off the back plate. The bolts will stay in the rubber bushings just fine.
Now, take the motor to a work bench area and remove the 6 screws on the back. Note: Rest the motor somehow where there is no pressure on the wiper blade post before you pull off the back plate. If you don’t, the weight of the unit will push on the post, pushing up on all the gears and when you open the plate, all the gears will pop out before you have a chance to look at how they were placed in the unit!
This is what you see when you open the back plate. See the screw sticking out of the top left of the unit? It has a lock nut on it. I thought that might be some sort of adjustment screw, but it would not turn all. Yes, I loosened the lock nut first. Not sure what this screw is really for, but as you will see, I do not think it has anything to do with adjusting the sweep of the WW.
The large white plastic gear on the right seems to be the Key. If you lift up on the gear unit on the left, it allows easy removal. Note, this is where you need to keep a good mental note or photo, prior to removing any gears so you can put them back in the same place when rebuilding.
After removing the gear, you can see three electrical contacts. On the bottom side of that white gear, one can see 3 metal strips embossed onto the plastic. I am thinking the 2 strips closest to the center are the contacts which control the “sweep” of the WW. This because they are of equal distance in length and plane on the gear. I think the third metal strip is the one which controls the return of the WW up to the retracted position. That is just a guess on my part, but it makes sense in a twisted sort of way……
Ok, assuming I am correct and the sweep is controlled by the 2 equal metal strips closest to the center of the gear, then lengthening the contact points on either one side or both sides should cause the WW to continue in the sweeping motion for as long as contact is made. So maybe 1/8th or ¼ of an inch longer metal embossment would do the trick. The problem is how does one add metal contact to these metal strips? A little grinding then filling with solder? Metal tape? Any suggestions? The best solution would be to contact the manufacturer and have them replace the gear……
Last edited: