Ripcord's 2002 Sport Ed. Version 2.0

There are loads of people here who are ditching the 3.0 dietsel and swapping for the lexus LS400 4ltr V8.

I'm curious, why would you prefer the turbo diesel? Is it the torque?


Any write ups on this? Wonder how hard it would be to swap out a 3.0 on a 2nd gen or a 3.4 on a fourth for the v8. Thanks
 
Because it's better than the 3.4 and it has turbo torquey goodness.

:hiding:

Let me guess... you have never driven anything with a 1KZ? (one without an intercooler at that)

If you think a 3RZ is slow, then you are in for quite a surprise. There is a reason that enthusiasts overseas dump them for petrol.
 
I'm sorry but the 1KZ is a POS, I'm a sucker who's had several, none has lasted longer than a few months before It gets pulled for a 1UZ. It's noisy, underpowered and a fuel sl*t. I get better economy from a 1UZ powered surf.

Last pics of the 1KZ before it's off to the graveyard.

029s.jpg

030s.jpg
 
how i have missed this build i dont know. i feel like a nube coming in on page 6 WTF i fail!

anyhow welcome home:jump::high5::cheers:
 
I don't know which Diesel we had in our Hiluxs overseas but those things were slower than hell, sounded like hell, and about as fun to drive as my 86 Pickup with a 22R. Maybe less.

Now if someone could massage a 1HD-FTE into our engine bay... That would be something I could get behind.
 
CB Radio w/ Motorized Mount & Amplified PA

|July 26, 2015|

Next up is the CB Radio with Motorized antenna mount & Amplified PA speaker. I still had the motorized antenna from the last build and this time I decided to go with an amplified speaker for more madness.

What/Why:
CB Radios are the main form of trail communication. They have a range of 1-10+ miles depending on terrain. They are nowhere near as powerful as portable 2M HAM radios which have a range of 100's of miles, but the increased cost and the fact that you need an FCA license to operate one is why CBs are more popular. This build will eventually have both.

Parts/Cost: $278.68
$104.59: Diamond K9000 motorized antenna (LRM)
$75.50: Speco 20W Amplified PA speaker
$42.99: Uniden 250XL Pro CB Radio
$15.99: Firestik K-8R9 Coax w/Fire-Ring
$15.59: Firestik 4' Black Firefly Antenna
$6.99: Firestick K-4A stud adapter
$6.49: Right angle "L" Coax fitting
$7.95: 3.5mm Audio plug
$2.59 Momentary center-off DPDT switch

Tools:
-Utility Knife
-Heat gun (a hair dryer will work)
-10mm socket
-Phillips screwdriver
-Wiring tools: Stripper, Crimper, heat shrink, connectors, loom, ties, etc..

Time:
2-4 hours

Procedure:
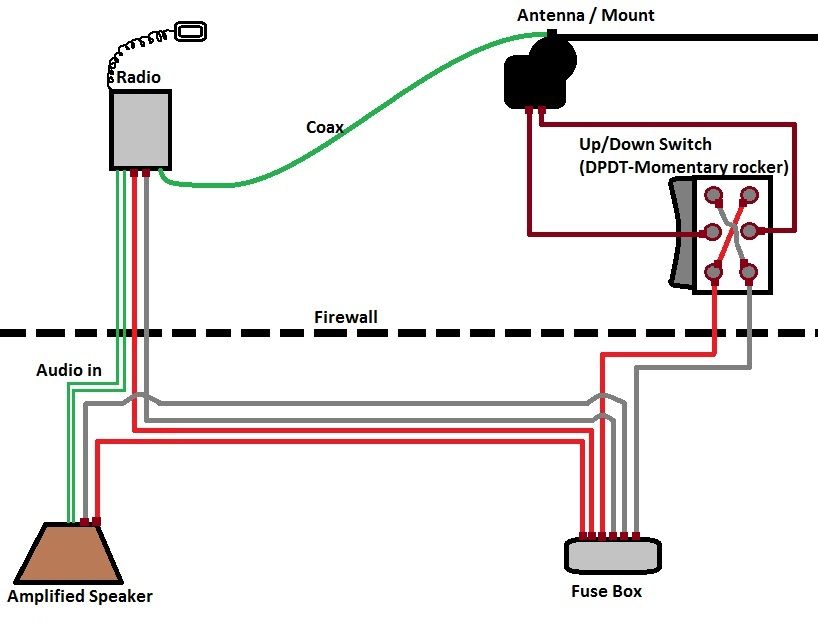
Here is the wiring diagram for this mod:
<a data-flickr-embed="true" href="https://www.flickr.com/photos/149794382@N06/34701780943/in/album-72157682523525914/" title="Wiring Diagram CB Radio"><img src="https://c1.staticflickr.com/5/4285/34701780943_78f0aa32e8_b.jpg" width="818" height="625" alt="Wiring Diagram CB Radio"></a><script async src="//embedr.flickr.com/assets/client-code.js" charset="utf-8"></script>

Parts:
<a data-flickr-embed="true" href="https://www.flickr.com/photos/149794382@N06/35472530566/in/album-72157682523525914/" title="IMG_0825"><img src="https://c1.staticflickr.com/5/4216/35472530566_a9238b0095_b.jpg" width="1024" height="683" alt="IMG_0825"></a><script async src="//embedr.flickr.com/assets/client-code.js" charset="utf-8"></script>

First step was to connect the 3.5mm audio plug to the wiring harness of the amplified speaker:

<a data-flickr-embed="true" href="https://www.flickr.com/photos/149794382@N06/35381135191/in/album-72157682523525914/" title="IMG_0834"><img src="https://c1.staticflickr.com/5/4236/35381135191_40186de0a1_b.jpg" width="1024" height="683" alt="IMG_0834"></a><script async src="//embedr.flickr.com/assets/client-code.js" charset="utf-8"></script>

Automatic wire strippers are the best invention ever! And only $20!

<a data-flickr-embed="true" href="https://www.flickr.com/photos/149794382@N06/35344632452/in/album-72157682523525914/" title="IMG_0853"><img src="https://c1.staticflickr.com/5/4287/35344632452_43d530eb0e_b.jpg" width="1024" height="683" alt="IMG_0853"></a><script async src="//embedr.flickr.com/assets/client-code.js" charset="utf-8"></script>

<a data-flickr-embed="true" href="https://www.flickr.com/photos/149794382@N06/35125455190/in/album-72157682523525914/" title="IMG_0835"><img src="https://c1.staticflickr.com/5/4208/35125455190_e84a08d8c1_b.jpg" width="1024" height="683" alt="IMG_0835"></a><script async src="//embedr.flickr.com/assets/client-code.js" charset="utf-8"></script>

Put the speaker in:
Another reason I wanted an 02' again was all the extra room in the engine bay!
<a data-flickr-embed="true" href="https://www.flickr.com/photos/149794382@N06/34670561264/in/album-72157682523525914/" title="IMG_0841"><img src="https://c1.staticflickr.com/5/4281/34670561264_c8994f68e8_b.jpg" width="1024" height="683" alt="IMG_0841"></a><script async src="//embedr.flickr.com/assets/client-code.js" charset="utf-8"></script>

All the power sources and ground sorted out:

<a data-flickr-embed="true" href="https://www.flickr.com/photos/149794382@N06/35344681152/in/album-72157682523525914/" title="IMG_0840"><img src="https://c1.staticflickr.com/5/4264/35344681152_895e899348_b.jpg" width="1024" height="683" alt="IMG_0840"></a><script async src="//embedr.flickr.com/assets/client-code.js" charset="utf-8"></script>

I am once again going with the ash tray location, so you need to dremel a bit out:

<a data-flickr-embed="true" href="https://www.flickr.com/photos/149794382@N06/35344701262/in/album-72157682523525914/" title="IMG_0836"><img src="https://c1.staticflickr.com/5/4259/35344701262_7e242a9eed_b.jpg" width="1024" height="683" alt="IMG_0836"></a><script async src="//embedr.flickr.com/assets/client-code.js" charset="utf-8"></script>

The "L" fitting is so that the CB can sit all the way back in the console.

<a data-flickr-embed="true" href="https://www.flickr.com/photos/149794382@N06/35511806565/in/album-72157682523525914/" title="IMG_0837"><img src="https://c1.staticflickr.com/5/4288/35511806565_494b5e9196_b.jpg" width="1024" height="683" alt="IMG_0837"></a><script async src="//embedr.flickr.com/assets/client-code.js" charset="utf-8"></script>

<a data-flickr-embed="true" href="https://www.flickr.com/photos/149794382@N06/35344693792/in/album-72157682523525914/" title="IMG_0838"><img src="https://c1.staticflickr.com/5/4210/35344693792_59ca550f63_b.jpg" width="1024" height="683" alt="IMG_0838"></a><script async src="//embedr.flickr.com/assets/client-code.js" charset="utf-8"></script>

Now on to the antenna mount, here is the wiring for the switch. For more details, just see the diagram at the top of the post:
<a data-flickr-embed="true" href="https://www.flickr.com/photos/149794382@N06/35125421570/in/album-72157682523525914/" title="IMG_0843"><img src="https://c1.staticflickr.com/5/4266/35125421570_abbcd3e8da_b.jpg" width="1024" height="683" alt="IMG_0843"></a><script async src="//embedr.flickr.com/assets/client-code.js" charset="utf-8"></script>

Put the mount on the crossbars on the passenger side:

<a data-flickr-embed="true" href="https://www.flickr.com/photos/149794382@N06/35381086151/in/album-72157682523525914/" title="IMG_0847"><img src="https://c1.staticflickr.com/5/4211/35381086151_2010e3449d_b.jpg" width="1024" height="683" alt="IMG_0847"></a><script async src="//embedr.flickr.com/assets/client-code.js" charset="utf-8"></script>

When attaching the firestik to a mount like this and using the Fire-ring coax, here is the instructions:
<a data-flickr-embed="true" href="https://www.flickr.com/photos/149794382@N06/34701780863/in/album-72157682523525914/" title="k4-8r18"><img src="https://c1.staticflickr.com/5/4282/34701780863_6a79030a11.jpg" width="432" height="170" alt="k4-8r18"></a><script async src="//embedr.flickr.com/assets/client-code.js" charset="utf-8"></script>

All done!

<a data-flickr-embed="true" href="https://www.flickr.com/photos/149794382@N06/35344664182/in/album-72157682523525914/" title="IMG_0844"><img src="https://c1.staticflickr.com/5/4279/35344664182_c7513c001f_b.jpg" width="1024" height="683" alt="IMG_0844"></a><script async src="//embedr.flickr.com/assets/client-code.js" charset="utf-8"></script>

<a data-flickr-embed="true" href="https://www.flickr.com/photos/149794382@N06/35511779455/in/album-72157682523525914/" title="IMG_0845"><img src="https://c1.staticflickr.com/5/4239/35511779455_7a812c5dba_b.jpg" width="1024" height="683" alt="IMG_0845"></a><script async src="//embedr.flickr.com/assets/client-code.js" charset="utf-8"></script>

Antenna DOWN

<a data-flickr-embed="true" href="https://www.flickr.com/photos/149794382@N06/35344670552/in/album-72157682523525914/" title="IMG_0842"><img src="https://c1.staticflickr.com/5/4207/35344670552_2aca5a9c75_b.jpg" width="1024" height="683" alt="IMG_0842"></a><script async src="//embedr.flickr.com/assets/client-code.js" charset="utf-8"></script>


Antenna UP

<a data-flickr-embed="true" href="https://www.flickr.com/photos/149794382@N06/35344639842/in/album-72157682523525914/" title="IMG_0850"><img src="https://c1.staticflickr.com/5/4242/35344639842_ca7a7598dc_b.jpg" width="1024" height="683" alt="IMG_0850"></a><script async src="//embedr.flickr.com/assets/client-code.js" charset="utf-8"></script>

===================================================


In other news, suspension parts are slowly rolling in. Expect that as the next major mod in september-ish. My wallet is scared of the parts list I have piled together for this suspension..

Next to arrive should be ICON extended travel remote resi coilovers

Courtesy of Group buys:
<a data-flickr-embed="true" href="https://www.flickr.com/photos/149794382@N06/35408743441/in/dateposted-public/" title="IMG_0851"><img src="https://c1.staticflickr.com/5/4240/35408743441_b75b7962ba_b.jpg" width="1024" height="683" alt="IMG_0851"></a><script async src="//embedr.flickr.com/assets/client-code.js" charset="utf-8"></script>
 
Last edited:
Oooooohhhhh purty. Awesome write up and it's awesome to have members like you and BFAD to set up these write ups. Can't wait to see this beast when it's all done up again.


Next to arrive should be ICON extended travel remote resi coilovers.

Way to represent! Love the Zia, Jim. I bet you're often asked what it is out there in OH.

You're sparing no expense with this one (nice to be out of school and have a real income, right?). I think you'll like the Icons, especially with the resi's. I've hammered mine and they soak up everything I throw at them... with resi's yours should feel even better.

Oooooohhhhh purty. Awesome write up and it's awesome to have members like you and BFAD to set up these write ups. Can't wait to see this beast when it's all done up again.

I'm pretty much retired from the write-up business, but it looks like Jim has got a new fire burning inside. Looks like we've got another 300K views caliber of thread in the works here.
 
Way to represent! Love the Zia, Jim. I bet you're often asked what it is out there in OH.

You're sparing no expense with this one (nice to be out of school and have a real income, right?). I think you'll like the Icons, especially with the resi's. I've hammered mine and they soak up everything I throw at them... with resi's yours should feel even better.


I'm pretty much retired from the write-up business, but it looks like Jim has got a new fire burning inside. Looks like we've got another 300K views caliber of thread in the works here.

I actually don't get any comments, I guess people just don't care.

It is quite amazing having spending money for once. The final mod budget for this build almost double what I paid for it. Eh you're only young once right? Gonna see what I can do to get 12" of travel from the rear end, I think that is a modest goal.

I have 2 years of not making write-ups built up in me, burning a hole in my keyboard. This is just the start.

Thanks for checking in, Nick!
 
Eh you're only young once right?

Exactly right. You can't take the money with you when you die, and college is a lot of hard work and paying dues, so I see nothing wrong with enjoying the fruits of that labor. When I was in high school I had a poster on my bedroom wall that had a picture of a big house with a 5 bay garage, each bay filled with a nice exotic (Ferrari, Porsche, Lamborghini, etc). At the bottom of the poster, it read "Justification for Higher Education". As long as you're taking care of business and saving enough to make ends meet down the road, I see no problem with spending the rest.

I stopped keeping track of what I have into mods for the '01 once I got to $10k, which is what I paid for it. That was 2-3 years ago.

I'm looking forward to seeing you really get going on this one.
 
|July 26, 2015|

Next up is the CB Radio with Motorized antenna mount & Amplified PA speaker. I still had the motorized antenna from the last build and this time I decided to go with an amplified speaker for more madness.

What/Why:
CB Radios are the main form of trail communication. They have a range of 1-10+ miles depending on terrain. They are nowhere near as powerful as portable 2M HAM radios which have a range of 100's of miles, but the increased cost and the fact that you need an FCA license to operate one is why CBs are more popular. This build will eventually have both.

Parts/Cost: $278.68
$104.59: Diamond K9000 motorized antenna (LRM)
$75.50: Speco 20W Amplified PA speaker
$42.99: Uniden 250XL Pro CB Radio
$15.99: Firestik K-8R9 Coax w/Fire-Ring
$15.59: Firestik 4' Black Firefly Antenna
$6.99: Firestick K-4A stud adapter
$6.49: Right angle "L" Coax fitting
$7.95: 3.5mm Audio plug
$2.59 Momentary center-off DPDT switch

Tools:
-Utility Knife
-Heat gun (a hair dryer will work)
-10mm socket
-Phillips screwdriver
-Wiring tools: Stripper, Crimper, heat shrink, connectors, loom, ties, etc..

Time:
2-4 hours

Procedure:
Here is the wiring diagram for this mod:


Parts:


First step was to connect the 3.5mm audio plug to the wiring harness of the amplified speaker:


Automatic wire strippers are the best invention ever! And only $20!


Put the speaker in:
Another reason I wanted an 02' again was all the extra room in the engine bay!


All the power sources and ground sorted out:


I am once again going with the ash tray location, so you need to dremel a bit out:


The "L" fitting is so that the CB can sit all the way back in the console.


Now on to the antenna mount, here is the wiring for the switch. For more details, just see the diagram at the top of the post:


Put the mount on the crossbars on the passenger side:


When attaching the firestik to a mount like this and using the Fire-ring coax, here is the instructions:


All done!


===================================================


In other news, suspension parts are slowly rolling in. Expect that as the next major mod in september-ish. My wallet is scared of the parts list I have piled together for this suspension..

Next to arrive should be ICON extended travel remote resi coilovers

Courtesy of Group buys:

What uca is that?
 
Quoted the whole post to ask about the last picture :doh:

Glad to see you making progress on the new truck man.
 

Members online

Forum statistics

Threads
278,310
Messages
3,554,079
Members
248,016
Latest member
Advally Service

Trending content

Back
Top
