Rock Rat's Imperial Jade Mica "Next Adventure" Build

I love your thread, Rock Rat! I'm always excited when I see an update. And this time I see you were in Cannon Beach! The Mrs and I were there last week, unfortunately without my runner as it was a little far to drive from Denver with only six days available. Soon though I hope to be joining you PNW folks for some adventures, the Mrs just needs to land a job and we'll be on our way.

Anyway, thanks for sharing!

Sent from my Nexus 9 using Tapatalk
If you are leaving Denver, I was about to say PNW is the only place I'd go besides maybe California.

You PNW folks are lucky.

PNW is so gorgeous it's beyond words. I'm from Denver but last year I took a vacation out in Seattle area for a few days with the wife. Rented a mustang and drove up to Canada, seriously the most beautiful driving next to California mountains and scenery imo.

Sent from my LG-LS980 using Tapatalk
 
So I have a PM into Josh. I'm hoping he can provide us with an answer. One thing I was listening for on my trip this weekend with this design was noise because of the parasitic drag. There wasn't any at all. I never knew it was up there.

EDIT: His response - "I think I did a few flat fronted racks, mostly at the request of the customer and then maybe a few others that just liked that look." So there's your answer.

Gotcha. I bet your's is a lot quieter than mine without the fairing on mine. I picked mine up from Josh in person and he said it's gonna make a droning noise on the interstate due to that one tube that sits at the top after we got it installed on the truck. Sure enough he was right, it made a racket... Put my fairing on and the noise pretty much vanished though, just have to disturb the air going over that tube in some way.
 
Carpet Installation - Rear seats

It was a very productive weekend for me as I creep closer and closer to "finishing" up some projects.

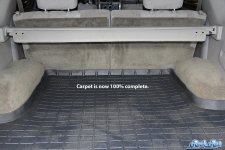
I began my sound deadening /carpet replacement quite some time ago and NEVER did the carpet on the back of the rear seats. Those seats were rarely ever used and were folded 90% of the time.

To remove the old carpet, you have to remove the staples.

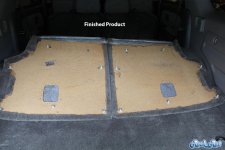
Over the weekend I finally finished carpeting the rear seats. Here goes...

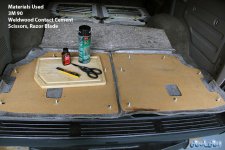
Stuff you need or could use to help the job go easier
  • GOOD Contact Cement. I like Weldwood Contact Cement by DAP
  • Sharp Scissors and/or razor blade
  • Cutting board or something to protect the carpet
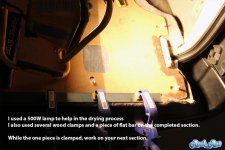
  • Heat gun or 500w light to expedite the drying process
  • Wood clamps and a piece of wood or straight flat bar to really seal up the seams.

Patience is a virtue - DO NOT RUSH this job. I did one small section at a time allowing each section to dry completely. Recommended drying time is 15 minutes to no longer than an hour.

So for me I decided to do my LED lights on my instrument panel and run my AEM gauge wires at the same time.

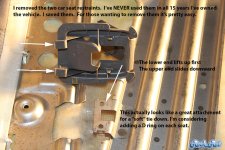
I never used the baby seat safety device on the back seats so I completely removed them. The attachment points look like they could make for a good "soft" tie down point inside the cargo compartment. I'm considering adding a D ring to each seat.

Simple Steps
  1. Not pictured is to spray the backing boards with 3M 90.
  2. Next place them on the back of the seats using a few of the white fasteners (with the seats folded down of course)
  3. When you're satisfied they are on correctly, bring the carpet up over top of them and seal the carpet down.
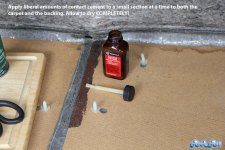
  4. After they dry you're ready to pull the carpet towards the rear cargo door and begin fitting around the board. (Pictures begin here)
  5. Using small sections at a time, apply Weldwood Contact Cement to both surfaces and LET DRY completely.
  6. Use a razor blade/scissors to cut and fold as professionally as possible.
  7. It's not necessary but I like to use wood clamps and a STIFF RIGID piece of flat steel to press down the carpet along the edges. this will give you a positive seal.
  8. When done, make sure all the fasteners are located in the key-holes properly and secure the panels to the rear seats.

DON"T RUSH - TAKE YOUR TIME

It took me two days but I did not rush the job. I wanted to ensure it was done correctly the first time.
 

Attachments

  • Rear Seats Carpet Installation.jpg
    Rear Seats Carpet Installation.jpg
    133.7 KB · Views: 2,134
  • Rear Seats Carpet Installation_1.jpg
    Rear Seats Carpet Installation_1.jpg
    138.7 KB · Views: 2,128
  • Rear Seats Carpet Installation_2.jpg
    Rear Seats Carpet Installation_2.jpg
    101.6 KB · Views: 2,113
  • Rear Seats Carpet Installation_3.jpg
    Rear Seats Carpet Installation_3.jpg
    101.1 KB · Views: 2,131
  • Rear Seats Carpet Installation_4.jpg
    Rear Seats Carpet Installation_4.jpg
    139 KB · Views: 2,134
  • Rear Seats Carpet Installation_5.jpg
    Rear Seats Carpet Installation_5.jpg
    120.1 KB · Views: 2,189
Last edited:
Looks great. I did my passenger compartment rug 2 years ago but not the back. It's clean back there unlike the front which had coffee & puppy puke stains! LOL
 
Replace Flasher Assembly - Again!

Ok so when I first replaced my flasher assy, I had regular bulbs in my rig. I've since replaced them with LED's. I've needed to replace the OEM flasher with an EP 35 to work with the LED's but hated to take a $35 flasher back out only to have it sit on my bench as a piece of art. (For sale if you're interested)

This time around I did it in three steps! You can see my original flasher process here.

Flasher Removal/Installation Steps - SHORT version!!
  1. Remove the four bolts from the lower panel and set aside
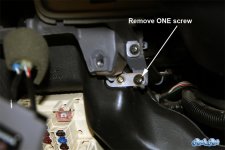
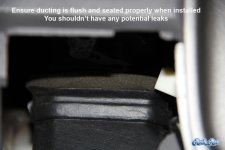
  2. Remove ONE screw from the bracket holding the ducting in place
  3. Remove the ducting
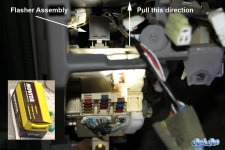
  4. Reach over top of the JB and work the flasher loose (plastic prying tool may help along with a strong grip) and remove
  5. Install the new EP35 flasher and close up

My flashers look normal again.

I remember seeing on here a while ago where someone disconnected the fuel door and the hood release. It's absolutely not necessary.
 

Attachments

  • Replace flasher_1.jpg
    Replace flasher_1.jpg
    71.5 KB · Views: 2,046
  • Replace flasher_2.jpg
    Replace flasher_2.jpg
    90.2 KB · Views: 2,240
  • Replace flasher_3.jpg
    Replace flasher_3.jpg
    69.6 KB · Views: 2,051
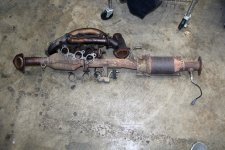
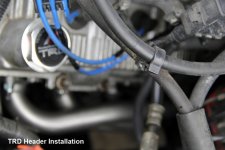
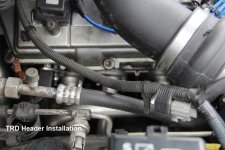
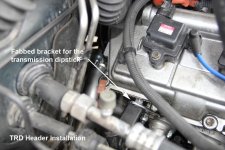
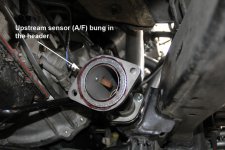
TRD Header Installation with Upstream Cat

This is the fourth day my rig has been in the shop. The first two days they just couldn't get to it. The owner called and said he just didn't have the right guy available that he wanted to work it. My response; "I'm 100% OK with that!" "I only want the right guy on it!!" "Just keep it inside at night. If not I'll come pick it up."

EDIT - Exhaust is 100% complete. Deleted some questions I had in this post about different options such as going with a straight pipe, deleting the downstream cat etc. Thanks for your inputs. I installed both cats Thanks!
 

Attachments

  • header install_1.jpg
    header install_1.jpg
    137 KB · Views: 2,050
  • header install_2.jpg
    header install_2.jpg
    73.1 KB · Views: 2,058
  • header install_3.jpg
    header install_3.jpg
    94.4 KB · Views: 2,044
  • header install_4.jpg
    header install_4.jpg
    103.6 KB · Views: 2,027
  • header install_5.jpg
    header install_5.jpg
    95.7 KB · Views: 2,175
Last edited:
I would just skip the cat and install the sensor to let the system think it has one. The old cat is gonna be a major restriction and more than likely clogged up quite a bit anyway. If you really wanna use a cat have something fabbed for the aftermarket high flow to work but I would skip it, or at least get a test pipe made so you can swap in the stock one back later on for emissions check then go back to straight pipe.
 
Decided on a Toytec Lift because it was well thought out, tried and true, great reputation as a proven performer. Furthermore, it was exactly what I was looking for to meet my needs.
20.gif
6.gif

4.gif
 
I would just skip the cat and install the sensor to let the system think it has one. The old cat is gonna be a major restriction and more than likely clogged up quite a bit anyway. If you really wanna use a cat have something fabbed for the aftermarket high flow to work but I would skip it, or at least get a test pipe made so you can swap in the stock one back later on for emissions check then go back to straight pipe.

Well I had to make the call early to the shop this morning so I needed to make a command decision. I should have posted this last night so I could have had more feedback.

Anyway, decided to replace the old cats with the new magnaflow cats. I was thinking exactly like you about the age of the cats. Even though I'm not getting any codes they've done me good over the past 15 years. With both cats installed I shouldn't need to buy the URD O2 sim.

I don't think they'll be too restrictive. Both are 49 state cats so should be OK. Not a fan of the cats but I don't ever have to worry about emissions if I decide to move. Thanks for your input!!

I'll be worrying about a heat blanket for the pipes now.
 
Well I had to make the call early to the shop this morning so I needed to make a command decision. I should have posted this last night so I could have had more feedback.

Anyway, decided to replace the old cats with the new magnaflow cats. I was thinking exactly like you about the age of the cats. Even though I'm not getting any codes they've done me good over the past 15 years. With both cats installed I shouldn't need to buy the URD O2 sim.

I don't think they'll be too restrictive. Both are 49 state cats so should be OK. Not a fan of the cats but I don't ever have to worry about emissions if I decide to move. Thanks for your input!!

I'll be worrying about a heat blanket for the pipes now.

You still made a good choice. The new high flow cat will flow much better than a 15 year old stocker. No sense in having that restriction in there with the stocker when you spent all that money on TRD headers and exhaust.

Check out my build page I just posted it. My truck is a twin to yours minus some big $$$ parts lol.
 
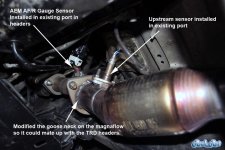
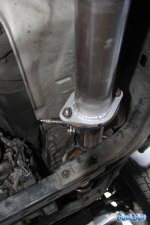
TRD Headers with Magnaflow Catalytic Converter

My exhaust is 100% complete and it sounds really nice. More importantly, it';s now opened up relieving some stress off the engine allowing it to breath better.

With the SC installed, I'll see a marked improvement over the standard exhaust.

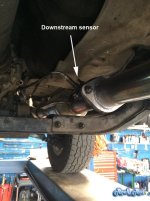
I thought about removing the downstream cat and going with a straight pipe but one day I will give this to my boys. I don't want them to worry about DEQ and I didn't want to worry about masking a 0420 code. I don't think the cats will be that much more restrictive on this. I'm not running it on a track.

I read a lot of things about the borla and the magnaflow exhaust but not much about the cats. I went the route of a direct fit 49 state converter for both.

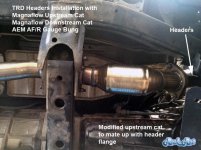
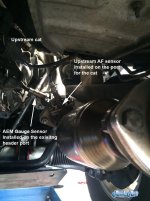
Lessons Learned - The direct fit for the upstream is for stock exhaust only, not designed for the headers. The elbow had to be modified.

Here Are the Part Numbers for my Entire Exhaust Setup
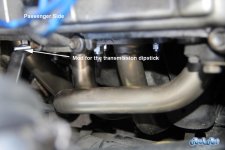
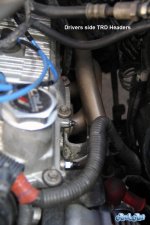
  • TRD Headers - PN# 00602-17141-007
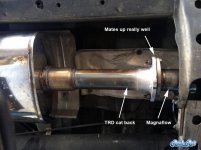
  • TRD Cat back exhaust - PN# PTR06-89990-14
  • Magnaflow upstream 48 State Catalytic Converter - PN# 93258
  • Magnaflow direct fit downstream Catalytic Converter - PN# 93379

I installed the TRD cat back system but opted to have the headers professionally installed.

Here's a few photos...
 

Attachments

  • exhaust_1.jpg
    exhaust_1.jpg
    84 KB · Views: 2,029
  • exhaust_3.jpg
    exhaust_3.jpg
    77.3 KB · Views: 2,061
  • exhaust_4.jpg
    exhaust_4.jpg
    104.5 KB · Views: 1,973
  • exhaust_5.jpg
    exhaust_5.jpg
    96.4 KB · Views: 2,038
Last edited:
I missed that you're putting a blower on it too! Nice! With the 4.88s and the s/c that should have great power! Mine feels like a bit of a slug with stock 4.10s and the 33s now and I haven't even towed my boat yet. It only weighs about 1500lbs so I'm hoping it has enough guts left in the tank.
 
TRD Headers with Magnaflow Catalytic Converter

Exhaust installation...con't...

I called around to various exhaust shops to see who would do the header installation and they all, without hesitation said; "not on a 3.4 with that crossover pipe. It will tie up my rack with two guys".

So I got in touch with Kory at A-1 in SE Portland and he said he would do them. Told him I had the direct fit cats and the sensor for the AEM gauge. Dropped it off on Tuesday but he couldn't get it on the rack until Thursday.

Gave me a shout on Thursday afternoon to tell me the cats don't bolt up. So I ran down there to look at options. Realized the upstream cat was designed to be installed on the OEM exhaust. Any modification on that cat would require a mod on the downstream cat.

Told him I wanted to think about it over night before making any decisions. I was seriously considering installing my old exhaust back on and running a straight pipe for downstream header. I didn't want to cut up the magna flow's in case I didn't like the sound.

Long story short, I called him up and told him to install both of the new cats and do whatever mods need to be done to make it work. I need both my arms and my legs so be gentle on the $ figure.

They put it on a flat bed and brought it to Darrel's on Friday morning. My buddy used to be sponsored by them when he ran his car at PIR (Portland International Raceway). These guys are the best in town.

Rig was finished up at 330 Friday afternoon. As you can see, they did an awesome job on the rest of the install from the headers to the cat back.

If I ever sell this, I'm taking the exhaust off and putting the old exhaust back on!!! I'll be eating Ramon noodles and rice for a year!! Major expense but I should never have to go near the exhaust again.

You guys are good at math - header installation and exhaust mods were $1000. Now total up the cost of the parts.

Who would ever in their right mind dump this amount of money into an exhaust system on a 15 year old rig with 338K miles - someone please have me admitted. OMG insane
 

Attachments

  • exhaust_6.jpg
    exhaust_6.jpg
    68.4 KB · Views: 1,796
  • exhaust_7.jpg
    exhaust_7.jpg
    80.7 KB · Views: 1,731
  • exhaust_8.jpg
    exhaust_8.jpg
    91.8 KB · Views: 1,791
  • exhaust_9.jpg
    exhaust_9.jpg
    74.9 KB · Views: 1,778
  • exhaust_10.jpg
    exhaust_10.jpg
    134 KB · Views: 1,771
  • exhaust_11.jpg
    exhaust_11.jpg
    136.4 KB · Views: 1,798
Last edited:
You guys are good at math - header installation and exhaust mods were $1000. Now total up the cost of the parts.

Who would ever in their right mind dump this amount of money into an exhaust system on a 15 year old rig with 338K miles - someone please have me admitted. OMG insane

A guy that's investing in his 4runner to keep forever. Would be a different story if you were constantly buying and selling different cars & dropping this kinda dough.
 
Fire Extinguisher Installation

Time for a required safety mod - installing a fire extinguisher.

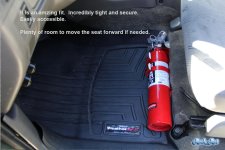
As always, it's important to do your homework before making a purchase and making decisions on your installation. For me I wanted a fire engine red fire extinguisher. I wanted it to be unmistakably a fire extinguisher. It's a piece of safety equipment. I hope I NEVER have to use it.

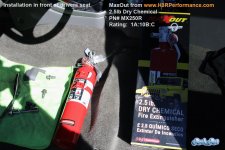
I also wanted EASY access in a moments notice. Therefore, I decided to install it right in front of the drivers seat. It was the perfect place for it. I didn't want it hidden.

The great thing about installing it in front of the drivers seat is it's actually wasted space if you think about it. Your legs are stretched out on the pedals, if you have an amp or inverter under your seat it's out of the way as well.

It's very secure, your head or knees are not going to bang up against it etc...

Here's what I picked up:

Installation Steps

  1. Remove the front seat
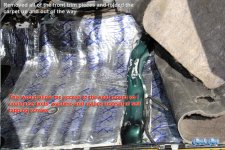
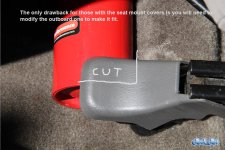
  2. Remove enough trim panels to pull the carpet back to access the area the seat mounts to
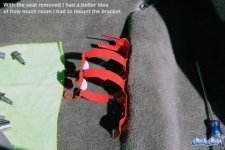
  3. Make sure the holes on the extinguisher mount can line up with some surface on the sheet metal
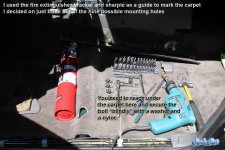
  4. Fold the carpet back over the "hump" and using a sharpie, make a dot on the carpet where you want to drill
  5. Either drill through the carpet (can mess up your bit) or through the metal only.
  6. Blindly slide your hand under the carpet behind the hump and install a washer and a nyloc (if you drop it, use a magnet to grab it and try again.)
  7. Fasten the bolts down using a 10mm deep socket.

Installation Hardware
  • M6 Washers
  • M6 Nylocs
  • M6-1.00 x25 (I think you could go with a x20 instead)

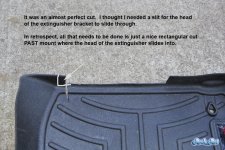
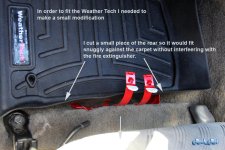
The final step in the process is to trim your floor liner to fit around the extinguisher mount. I made one cut that I could have done without. I think a longer rectangular cut would have worked just as good.

I'm extremely pleased with everything about this installation!!

It's better have one and never need it than to need one and not have it.

I should have done this a Loooong time ago.

 

Attachments

  • Fire Extinguisher Install _1.jpg
    Fire Extinguisher Install _1.jpg
    125 KB · Views: 1,770
  • Fire Extinguisher Install _2.jpg
    Fire Extinguisher Install _2.jpg
    135.8 KB · Views: 1,828
  • Fire Extinguisher Install _3.jpg
    Fire Extinguisher Install _3.jpg
    143 KB · Views: 1,683
  • Fire Extinguisher Install _4.jpg
    Fire Extinguisher Install _4.jpg
    127.4 KB · Views: 1,758
  • Fire Extinguisher Install _5.jpg
    Fire Extinguisher Install _5.jpg
    129.5 KB · Views: 1,953
  • Fire Extinguisher Install _6.jpg
    Fire Extinguisher Install _6.jpg
    137.3 KB · Views: 1,681
  • Fire Extinguisher Install _7.jpg
    Fire Extinguisher Install _7.jpg
    96.7 KB · Views: 2,009
  • Fire Extinguisher Install _8.jpg
    Fire Extinguisher Install _8.jpg
    127.8 KB · Views: 1,828
I won't be able to park next to you, my runner will get jealous :llama:

Everything is so clean and methodical, really, really nice man!

Hey when you think about it text me if you could, I broke my phone and lost all my numbers...
 
I won't be able to park next to you, my runner will get jealous :llama:

Everything is so clean and methodical, really, really nice man!

Hey when you think about it text me if you could, I broke my phone and lost all my numbers...

Thanks Tim. Hey anytime you need a hand you know I'm usually available to help. I'm not as limited as you are. :cheers: I attribute this site to so much of my build it's amazing. I spend so much time researching and weighing out the pros and cons before I move forward with anything. There are so many great builds on here to pull information from.
 
Last edited:

Members online

No members online now.

Forum statistics

Threads
278,317
Messages
3,554,129
Members
248,016
Latest member
Advally Service

Trending content

Back
Top