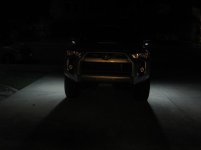
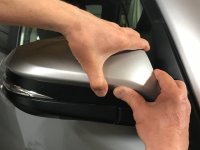
Side mirror puddle light upgrade

I installed mine tonight and I have to thank everyone who posted pictures, advice, useful links and videos for mirror housing disassembly.

The vLED units are really bright, like little arc reactors from Iron Man's suit. :biggrin1:

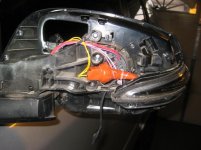
Once I plugged the Meso wires into the bulb socket I wrapped it in Fusion tape to make it more water resistant. I also pushed the round Meso power connector through the square hole in the plastic so as to help keep things from rattling around
 

Attachments

  • IMG_7532-1.jpg
    IMG_7532-1.jpg
    75.1 KB · Views: 839
  • IMG_7534-1.jpg
    IMG_7534-1.jpg
    69.9 KB · Views: 893
  • IMG_7538-1.JPG
    IMG_7538-1.JPG
    29.6 KB · Views: 863
I bought the CarTrimHome Sequential turn signals and didn't like them. Sold them and helped a local member install them instead.
 
Last edited:
I installed mine tonight and I have to thank everyone who posted pictures, advice, useful links and videos for mirror housing disassembly.


The vLED units are really bright, like little arc reactors from Iron Man's suit. :biggrin1:


Once I plugged the Meso wires into the bulb socket I wrapped it in Fusion tape to make it more water resistant. I also pushed the round Meso power connector through the square hole in the plastic so as to help keep things from rattling around
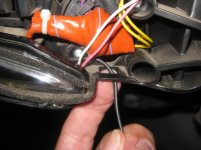
Doesnt the OEM bulb somewhat exposed to the connector as well? Just like the meso connector? I see alot of people concerned with the connector getting wet

Sent from my ONEPLUS A6013 using Tapatalk
 
I used a length of heat shrink tubing to cover the connector and factory connectors. I pulled the plastic bulb holder away from the wire/connectors, put heat shrink over the wires, connected the tabs to the plug base shaped LED adapter connection and heated the heat shrink up around the connection. Once it was all secured in place, the plastic bulb base slid back down over the heat shrink and held everything in place. I do not anticipate any problems.

I am also curious what Friggen Idiot didn't like about the signals. I think they're a very clean and worthwhile upgrade for $60. Anything that increases visibility to other traffic is worth my $.
 
Last edited:
I am also curious what Friggen Idiot didn't like about the signals. I think they're a very clean and worthwhile upgrade for $60. Anything that increases visibility to other traffic is worth my $.

What didnt you like about them?

I'm a pretty picky guy, so these are likely not issues for most.

1) Mounting is not OEM. OEM are retained by clips in the structure, this is just sort of wedged into place by surrounding pieces. The pressure is enough to keep it from moving around, though I'd prefer if it was a direct replacement. I could probably live with this because anything strong enough to dislocate it would be enough to break something else on the mirror. I've already had to replace the passenger side mirror housing, and both sides have taken some hard strikes off-road.

2) The LED's are more yellow-orange than the orange of my LED turn signal so they don't match but OEM does.

3) More subtly, the OEM is a clear lens over a chrome reflector (like the rest of the truck). These are a clear lens over white diffuser, and a chrome accent. It really took me about 5 minutes of looking back and forth to figure out this is what bothered me when they weren't flashing.

Functionally I like the brighter output and the sequential flash (even w/hazards). But once I had replaced all but the color cap on the driver's side and stood back, aesthetically I knew I wouldn't be keeping them.
 
Doesnt the OEM bulb somewhat exposed to the connector as well? Just like the meso connector? I see alot of people concerned with the connector getting wet

The OEM bulb is fairly well protected from most water. The OEM socket has a gasket or O-ring that fits into the lamp housing and the gasket/O-ring is brought under compression when the socket is 1/4 turned into the lamp housing.
 
So is scored some used side mirrors to this mod but the plastic are all pitted. Wondering if anyone has any ideas to fix it? Sand and hit it with sem black trim paint?
2edf21759bc3bdc3b027ae85a3175920.jpg


Sent from my ONEPLUS A6013 using Tapatalk
 
So is scored some used side mirrors to this mod but the plastic are all pitted. Wondering if anyone has any ideas to fix it? Sand and hit it with sem black trim paint?
2edf21759bc3bdc3b027ae85a3175920.jpg


Sent from my ONEPLUS A6013 using Tapatalk

That's what I would do, sand them down and paint them
 
Test fit on the mesos as i refurb my mirrors to have the puddles. This is on OEM mirror housing. Ignore the color mismatch as the housing has been sanded
5a39f496aaa3d4690dc52be088877de3.jpg
56c953ec41628fe8edb36c68a3f37ac3.jpg
fe6be243e3c37fbcd6f4a8ae1483d49e.jpg


Sent from my ONEPLUS A6013 using Tapatalk
 
Got mine in today and once in place it clips in and screws hold it tight and secure. The wiring was easy, plenty of room up top to use the supplied connector high and dry.
Many have said the bottom mounting plate is not flush. Same here and had a slight gap. It was no big deal as its next to the drain hole but just the same used some black pipe wrap like silly putty and filled in the micro small gap.
As far as the switch? I'll dive in another time to look for interior splice or tap points. Guessing won't have to pop the mirror as it's all in the cab anyway.
 
Last edited:
MESO Puddle Light Upgrade

I just received my new puddle lights from MESO Customs (pictured). The kit looks great. Top notch. I’ve been thinking about the install and reviewing old threads. I found a good general write-up, done by [MENTION=145836]LowCountrySilverTP[/MENTION], and I found this as well: Puddle Lights (Side Mirror) Lights LED SWAP on 5th Gen 4Runner


There seems to be some conflicting information concerning the removal of the actual mirror (the glass). Some say it doesn’t need to be removed, others say it does. Also, even after reading the write-ups, I’m still scratching my head about how the painted portion of the cover is to be removed. What makes me a bit nervous about the install is many have reported that they’ve broken small pieces and parts during the install.

In light of the above, can anyone offer some advice on the disassembly and installation of the lights?
9d6750da9c9bcbd86d0c19446a74d105.jpg


Sent from my iPhone using Tapatalk
 
[MENTION=148968]Bill_Sanderson[/MENTION], I have had my side mirrors apart many times, and have yet to break a clip or part. The key is to go slow and not blindly yank on parts.

Once you remove the glass and have access to the clip on the painted mirror cap, release it. Then start along the top outermost edge/corner of the cap and slowly separate it from the side mirror assembly and work your way towards the edge closest to the cab.

The write up's you found are pretty good. Just follow those and you should be fine. :thumb:
 
[MENTION=148968]Bill_Sanderson[/MENTION], I have had my side mirrors apart many times, and have yet to break a clip or part. The key is to go slow and not blindly yank on parts.


Once you remove the glass and have access to the clip on the painted mirror cap, release it. Then start along the top outermost edge/corner of the cap and slowly separate it from the side mirror assembly and work your way towards the edge closest to the cab.


The write up's you found are pretty good. Just follow those and you should be fine. :thumb:


Thanks, Red. I’ll give it a shot this weekend and will post some pictures of the installation results.


Sent from my iPhone using Tapatalk
 
There seems to be some conflicting information concerning the removal of the actual mirror (the glass). Some say it doesn’t need to be removed, others say it does. Also, even after reading the write-ups, I’m still scratching my head about how the painted portion of the cover is to be removed. What makes me a bit nervous about the install is many have reported that they’ve broken small pieces and parts during the install.

In light of the above, can anyone offer some advice on the disassembly and installation of the lights?


Sent from my iPhone using Tapatalk


Installed mine a few weekends ago. followed the below video to disassemble the mirror and it worked perfectly.


thanks for the review. i'll be installing mine this weekend and appreciate having this feedback beforehand.

i plan to use the install instructions found here to take apart the mirror:

YouTube
 
[MENTION=148968]Bill_Sanderson[/MENTION], I have had my side mirrors apart many times, and have yet to break a clip or part. The key is to go slow and not blindly yank on parts.

Once you remove the glass and have access to the clip on the painted mirror cap, release it. Then start along the top outermost edge/corner of the cap and slowly separate it from the side mirror assembly and work your way towards the edge closest to the cab.

The write up's you found are pretty good. Just follow those and you should be fine. :thumb:

Yes, very good advice. As with so many other clipped-in pieces inside and outside the 4R, if you know where to grab and pull, and you go slow and deliberately you will be OK. But the first time attempt is kind of nerve wracking, with all the noise of clips releasing.
What I found daunting was the idea of pulling off the mirror. I didn’t trust myself to not break something. I was more comfortable with the painted cover removal method. I’ve used this method four times with no problems. (The main grab point to start is the pointy section toward the window). It gets easier each time. See post 20 below for more info.
2014 Side Mirror Bulb Access
Either way, you will be successful.
 

Attachments

  • 237E74D4-8153-456C-B2FC-5F6723822D08.jpeg
    237E74D4-8153-456C-B2FC-5F6723822D08.jpeg
    59 KB · Views: 831

Members online

Forum statistics

Threads
278,310
Messages
3,554,079
Members
248,016
Latest member
Advally Service

Trending content

Back
Top