Sp8Ball’s Mod Thread (Stealing Other Poster’s Ideas Since Mid-2010)

bumpity bump bump

Antman, please tell us that the 4Runner and motorcycle weren't traded in for a mini van!
 
I spent 3 days reading this thread. Awesome read. I totally relate too your cause. Mrs. Grimace is a hard negotiator too.
 
thanks to all the thread contributors

Last week, before I even started searching the site for a thread like this, I bought a complete set of matte black handles to swap out on the SR5. This will save me a ton of time.
 
[MENTION=48991]sp8ball[/MENTION] [MENTION=65614]Antman[/MENTION], killer write up on the door handle swap you guys made it easy for me!
Little before and after action
 

Attachments

  • IMG_1854[1].jpg
    IMG_1854[1].jpg
    125.4 KB · Views: 1,540
  • IMG_1924[1].jpg
    IMG_1924[1].jpg
    136.2 KB · Views: 1,551
Is the story over?

How does the story end?? Did he ever get to have his new exhaust?? I hate when movies end like this, leaving me hanging......
 
Thanks for a great write up Sp8ball! This was invaluable today while I worked my way through my install. Thanks again!

Modification: Toytec Top Plate Spacer Lift (cont.)

Here’s a picture of the installed spacer.

View attachment 42383

It started raining on Thursday night, so I haven’t had a chance to take an “after” picture for a before and after comparison. All measurements are from the ground to the bottom of the fender.

Before:

Front Driver Side: 34-3/4 inches ** Front Passenger Side: 35-1/4 inches
Rear Driver Side: 36-1/2 inches ** Rear Passenger Side: 36-1/2 inches

View attachment 42384


After:

Front Driver Side: 36 inches ** Front Passenger Side: 36 inches
Rear Driver Side: 36-1/2 inches ** Rear Passenger Side: 36-1/2 inches

View attachment 42417
 
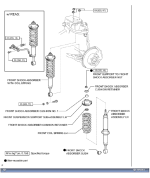
Step twenty-five: Secure rubber shock absorber cushion, retainer, and nut to top of shock absorber at 18 ft-lbs

Just want to confirm 18 ft lbs is correct for coilover top nut torque? I'm using this write up to do 5100 install without spring compressor. Since I'm doing 5100s I won't have to remove the 3 top nuts Right?
 
Just want to confirm 18 ft lbs is correct for coilover top nut torque? I'm using this write up to do 5100 install without spring compressor. Since I'm doing 5100s I won't have to remove the 3 top nuts Right?

18 is correct, and also yes you will not have to remove the "front suspension support sub-assembly" as they call it below to install 5100s

also... thanks for the writeup [MENTION=48991]sp8ball[/MENTION] !!! it gave me great confidence doing my first suspension work

i guess i'll note 2 minor things i noticed in the writeup:
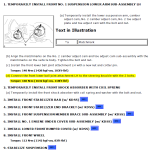
1) on step #26 on post #85: the manual say to "temporarily" install the lower shock bolt, then after finishing the remaining install to "stabilize the suspension" (lower vehicle, bounce vehicle up and down several times to stabilize), then torque the lower shock bolt to spec at 70ft-lbf. (not sure how much that matters - I went ahead checked the torques on everything after it was back on the ground anyway tho)
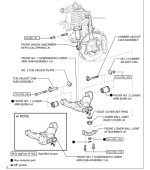
2) on step #28 on post #85: Sp8ball references the torque for the LCA bolts at 165 ft-lbf. the manual indicates this torque spec is actually 160N*m or 118 ft-lbf
 

Attachments

  • 2010 4Runner Repair Manual 2943.PNG
    2010 4Runner Repair Manual 2943.PNG
    94.3 KB · Views: 1,928
Last edited:
2) on step #28 on post #85: Sp8ball references the torque for the LCA bolts at 165 ft-lbf. the manual indicates this torque spec is actually 160N*m or 118 ft-lbf

Thank you for the reply. That is a big difference on the LCA bolt torque. I'm guessing most have torqued to 165? Wonder if anyone has seen issues from overtorqing? Does the FSM mention anything about using red loctite?
 
Thank you for the reply. That is a big difference on the LCA bolt torque. I'm guessing most have torqued to 165? Wonder if anyone has seen issues from overtorqing? Does the FSM mention anything about using red loctite?

it actually does not mention to reapply red loctite when installing the lower ball joint attachment to the steering knuckle, however, when disassembling you will notice red loctite was previously applied on these 2 bolts when it was built. interesting that the manual doesn't state to do so, but i would definitely apply it.
 

Attachments

  • 2010 4Runner Repair Manual 2930.jpg
    2010 4Runner Repair Manual 2930.jpg
    65.6 KB · Views: 1,775
  • 2010 4Runner Repair Manual 2939.PNG
    2010 4Runner Repair Manual 2939.PNG
    96.6 KB · Views: 1,651
Last edited:
Anyone mod the dashboard clock to something that's actually visible? The '16 SR5's clock is so dim I can't ever see it except at night.
 
Question on alignment after lifting

I just installed my 5100s and Daystar spacer on the rear of my 2014 TE for 2.5/1.5 inch lift. The install went smoothly except for some difficulty getting the top nuts loosened from the rear stock shocks. There was not enough room to put a crescent wrench onto the threaded portion of the shock and also put a 17mm wrench on the nut at the same time. I had to buy a pipe wrench with a rubber belt to wrap around the shock body to keep it from rotating while loosening the nut. Other than that, everything was pretty easy.

A question on the alignment - Is the camber the only thing that goes out of alignment? My truck drives straight except for a little bit of positive camber now. Is this all that is adjusted? I can't tell if the caster is off with the naked eye either.

 
Last edited:
Modification: Door Handle Changeout

Body-color Front Door Handles
Main Handle (both sides): P/N 69211-60070-D1 $55.96 for both
Handle Cover, Right Side: P/N 69250-60030-D1 $17.22 for one
Handle Cover, Left Side: P/N 69217-60150-D1 $9.28 for one
Body-color Rear Door Handles
Main Handle (both sides): P/N 69211-60090-D1 $55.96 for both
Handle Cover (both sides): P/N 69250-60010-D1 $29.68 for both

View attachment 43997

Great write up thanks. Where did you order your door handles from? I bought some from CarID that said they fit but the side of the actual handle that sits against the vehicle isnt hollowed out so the clips can reach as far as they need to. I'm going to try drilling for the room I need but in the event that it doesnt work, Id like to know where I can get the correct part.

Thanks a lot
 

Members online

Forum statistics

Threads
278,315
Messages
3,554,102
Members
248,016
Latest member
Advally Service

Trending content

Back
Top