Spiker Engineering ULTIMATE Lift Hood Struts

Looks good, nice to see one more "prop-rod-less" 4Runner out there!

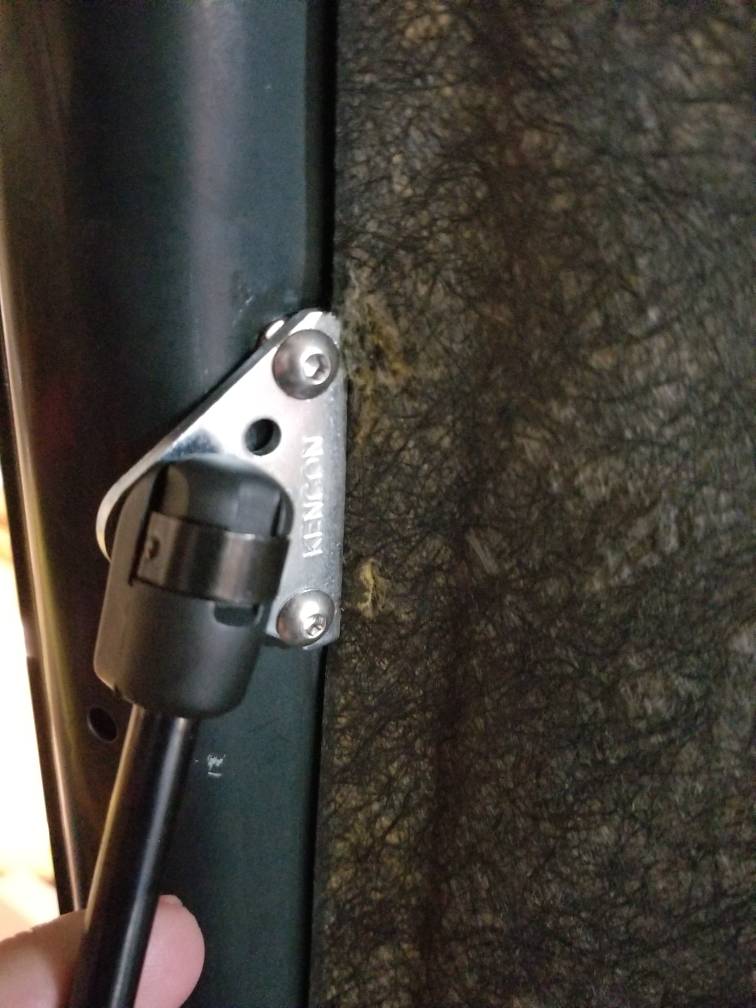
Just out of curiosity, was the door lock buzzer a factory installation in that location? I haven't come across those before, so I'm curious how common they are.

Thanks, AFAIK it looks factory installed. I was surprised to see it there and took a pic right before removal. Found an older thread where it's discussed:

That thing that beeps

YfpKbUG.jpg
 
Last edited:
Very interesting! From the way it appears to be mounted (attached to a flat bracket), could you have removed the mounting bolt and put the ball stud in its place? Not that it matters, sounds like you found a working solution regardless!
 
I'm now offering discounts for multiple kits shipped to same address, for referrals of other customers who purchase the kit, and for group buys - please PM or email me for details.

[MENTION=28464]eimkeith[/MENTION], [MENTION=120071]mtbtim[/MENTION], you both qualify for the discounts, so I PayPal-ed some money back to you - Late Merry Christmas :D.

If I forgot anyone who qualifies for the above criteria, please let me know!
 
Last edited:
Just out of curiosity, was the door lock buzzer a factory installation in that location? I haven't come across those before, so I'm curious how common they are.

Lock buzzer is factory location on later models my 01 has it there. My 96 with controller under driver seat had cheap buzzer near battery RS system.
 
I'm now offering discounts for multiple kits shipped to same address, for referrals of other customers who purchase the kit, and for group buys - please PM or email me for details.

[MENTION=28464]eimkeith[/MENTION], [MENTION=120071]mtbtim[/MENTION], you both qualify for the discounts, so I PayPal-ed some money back to you - Late Merry Christmas :D.

If I forgot anyone who qualifies for the above criteria, please let me know!

Totally unnecessary, but appreciated! I'm just happy to support great new stuff. :)
 
Can I get some feedback from those who installed this kit:

- Did you like having the printed instructions sent with the kit, or would you have preferred to have the instructions e-mailed to you? (I'm old school and prefer to stare at paper instructions, but I also would be happy to save some trees by not sending out 9 sheets of paper with each kit);

- Did you set the opening height at near-stock position, fully open, or somewhere in between?
 
- Did you like having the printed instructions sent with the kit, or would you have preferred to have the instructions e-mailed to you? (I'm old school and prefer to stare at paper instructions, but I also would be happy to save some trees by not sending out 9 sheets of paper with each kit);

I'd consider a downloadable .pdf so folks can print it on their own if they like?
 
[MENTION=198376]4Runner4Leon[/MENTION], Have question for you about strut force.
Would you say the strut force is appropriate for hood structure?
What's the chance of bending hood when you close it what I'm getting at.
I've played around with straighting one of these hoods, front to hinge.
It doesn't take much to bend the web sub structure, less if adhesive is broke
loose in a place or two.
 
[MENTION=198376]4Runner4Leon[/MENTION], Have question for you about strut force.
Would you say the strut force is appropriate for hood structure?
What's the chance of bending hood when you close it what I'm getting at.
I've played around with straighting one of these hoods, front to hinge.
It doesn't take much to bend the web sub structure, less if adhesive is broke
loose in a place or two.

Excellent question, and indeed these hoods are EXTREMELY flimsy and easy to bend, so extra caution is required when adding struts to them. I've scoured junkyards to see how manufacturers utilize hood struts, I saw probably a dozen different approaches - dual struts, single struts, front to back struts, back to front struts, criss-cross struts, long struts, short struts, etc. What works on a Bimmer may be a dismal failure on the 4Runner, because the Bimmer had a much stronger reinforcement between the hinges and the hood.

But trial and error, math, geometry, and physics, prevailed in the end. This kit that I put together provides a good balance between tactile feel, opening force, opening height, and ability to stay opened until you close it, all without jeopardizing the hood integrity.
 
Last edited:
Can I get some feedback from those who installed this kit:

- Did you like having the printed instructions sent with the kit, or would you have preferred to have the instructions e-mailed to you? (I'm old school and prefer to stare at paper instructions, but I also would be happy to save some trees by not sending out 9 sheets of paper with each kit);

- Did you set the opening height at near-stock position, fully open, or somewhere in between?

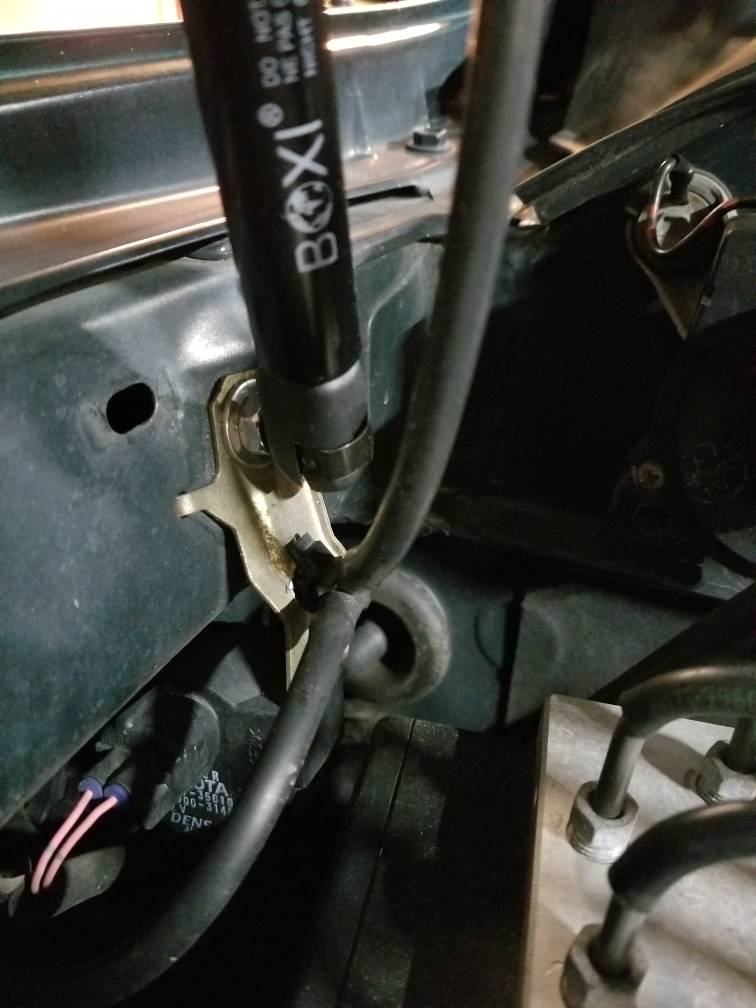
I set mine about an inch before I got resistance, used my hood prop tool to hold it open,,,the upper hoses hose clamp made for a great center point to the hood latch so both sides open at the same time,,I used stainless rivnuts and allen head bolts in 5mm instead of the pop rivets for the hood mounts,,,sits flush and tight.,,the relay on the passenger side I kept in place with the pivot supplied and drilled a hole in it's bracket to hold the washer hose...looks perfect...I also drilled a small hole next to the prop rod spot in the hood and hooked a lanyard to it so I have something to grab when I close the hood.,,it's just a standard key ring. Really like this kit and appreciate leon for putting this together,,,,works great.,,thanks for all your help getting my account setup....oh and I didn't realize there was directions in the box...forgot to look.,,didn't need them as it's an easy install.

a11cdb7d5d90d18e4778458bacb48975.jpg
6bca8753414aec5d4c913e1ae095f056.jpg
5d9911540806c3b9ad4653ca79f30c8c.jpg
 
Last edited:
I set mine about an inch before I got resistance, used my hood prop tool to hold it open,,,the upper hoses hose clamp made for a great center point to the hood latch so both sides open at the same time,,I used stainless rivnuts and allen head bolts in 5mm instead of the pop rivets for the hood mounts,,,sits flush and tight.,,the relay on the passenger side I kept in place with the pivot supplied and drilled a hole in it's bracket to hold the washer hose...looks perfect...I also drilled a small hole next to the prop rod spot in the hood and hooked a lanyard to it so I have something to grab when I close the hood.,,it's just a standard key ring type....I'd post pics of it but I don't know how yet!! Really like this kit and appreciate leon for putting this together,,,,works great.,,thanks for all your help getting my account setup....oh and I didn't realize there was directions in the box...forgot to look.,,didn't need them as it's an easy install.

Rich, thanks for the feedback, and glad that we got your access resolved, I look forward to your contributions to the forum!

Your customizing sounds very clever, please do share pictures if you figure out how to do it (or email to me, I can upload them). I debated using rivnuts vs rivets, but went with rivets in the end because they have way more than enough strength for this application, and because more people have access to a rivet gun than a rivnut tool. But I did use rivnuts when installing my prototype, because the bracket had large mounting holes in it.

Too bad you didn't see the instructions, I think I'll zip-tie them to the struts in the future, so they don't accidentally stay stuck inside the box. Glad you figured it out though, and that it all worked out.
 
[MENTION=161842]Mtns_Yo[/MENTION] and [MENTION=95183]octanejunkie[/MENTION], your tracking info has been sent to you and your kits are going out tonight!
 
Looks great. Definitely interested! Waiting to hear from another T4R enthusiast in town to see he he wants one too.
 
Installed the kit today. Great instructions, easy to follow. I really like the pictures. I installed mine so the hood still has about a inch to go before hitting the maximum height.
 
Can I get some feedback from those who installed this kit:

- Did you like having the printed instructions sent with the kit, or would you have preferred to have the instructions e-mailed to you? (I'm old school and prefer to stare at paper instructions, but I also would be happy to save some trees by not sending out 9 sheets of paper with each kit);

- Did you set the opening height at near-stock position, fully open, or somewhere in between?

Emailed instructions are fine, I set the height to fully open position and it never stretched the hose, maybe mine was a bit longer? :bounce: I was also able to reuse the same hole the hose clamp was attached to without the strut putting pressure on the hose and finally, I did re-attach the buzzer to it's original hole using the new strut bolt as you suggested and it worked like a charm. Great product! My only complaint is I now have to get on my tippy toes to be able to grab and close the hood (kidding). The difference is night and day! Now my other half wants one for her 2011 RAV4 LTD, I told her I'd pass that on and see what you have to say about it. I know Redlinetuning makes one for 06-12 RAV4 but I'd rather get it from you if you have a set.
 
Last edited:
Installed the kit today. Great instructions, easy to follow. I really like the pictures. I installed mine so the hood still has about a inch to go before hitting the maximum height.

Thanks for the feedback! I spent a ton of time on the instructions and pictures, so it's good to hear that they came in handy :thumb:.

Emailed instructions are fine, I set the height to fully open position and it never stretched the hose, maybe mine was a bit longer? :bounce: I was also able to reuse the same hole the hose clamp was attached to without the strut putting pressure on the hose and finally, I did re-attach the buzzer to it's original hole using the new strut bolt as you suggested and it worked like a charm. Great product! My only complaint is I now have to get on my tippy toes to be able to grab and close the hood (kidding). The difference is night and day!

Great feedback, thanks! I think I'll update the instructions to suggest using the passenger side bracket as an attachment place for the washer hose, for those that have it. I'm also pondering adding a bracket to the kit to hold the washer hose, for those of us with the pre-99 models, without the bracket.

Now my other half wants one for her 2011 RAV4 LTD, I told her I'd pass that on and see what you have to say about it. I know Redlinetuning makes one for 06-12 RAV4 but I'd rather get it from you if you have a set.

Thanks, that's a great vote of confidence :). I'm not ready to leave my swim lane yet (3rd Gens), though I'm currently working on a strut design for a Taco, seeing how similar they are to our Runners.. One step at a time :).
 

Members online

Forum statistics

Threads
278,312
Messages
3,554,085
Members
248,016
Latest member
Advally Service

Trending content

Back
Top