Tips for overhead console wire routing?

GrantK

New member
Any tips, warnings or suggestions for routing wires from the overhead console to under the dash via the driver side A pillar? I need to route the wires for the ScanGauge, rear-view video signal and a new after-market microphone (for Bluetooth) to my replacement Alpine head unit.
 
Register to hide this ad
Sorry, I don't have any specific advice, but it's all very straightforward. In order to remove the A pillar you simply remove the grab handle and then pull firmly like any other panel. The air bags are very tight and neat, so you shouldn't worry about damaging them. The headliner will come down a bit once you unscrew the overhead console. To remove the overhead console remove the screws in the sunglass holder then pull firmly down, but not too hard or far because you need to remove wiring harnesses in order to get the entire overhead console out. The most difficult part of the process will be getting the wires behind the dash. If you want to be lazy (like me!), simply use a wedge to run the wires behind the dash instead of removing the dash panel.
 
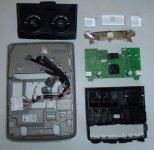
I already have the console down (and in parts) doing my variation on Antman's console lighting mod. I'm adding 5 LEDs, one for each Homelink switch and two for the moon-roof switches.

I too was planing on wedging/tucking the wires into the side of the knee panel to get from the A pillar to under the dash. Then it will be a comparatively easy matter to route them to the ODB-II connector and new head unit.
 

Attachments

  • console.jpg
    console.jpg
    40.3 KB · Views: 2,990
I already have the console down (and in parts) doing my variation on Antman's console lighting mod. I'm adding 5 LEDs, one for each Homelink switch and two for the moon-roof switches.

I too was planing on wedging/tucking the wires into the side of the knee panel to get from the A pillar to under the dash. Then it will be a comparatively easy matter to route them to the ODB-II connector and new head unit.

Glad I could help! :bravo:
 
Nice explanation Limamike!

Only thing I did differently was to pull the door weatherstripping out a bit and tuck the wires behind it, ultimately into the kick panel area and under the dash. If you want, I could take some blurry pics for you in the AM.

Looking forward to the mods!
 
Nice explanation Limamike!

Only thing I did differently was to pull the door weatherstripping out a bit and tuck the wires behind it, ultimately into the kick panel area and under the dash. If you want, I could take some blurry pics for you in the AM.

Looking forward to the mods!

Pics always help but please don't tear your truck apart just to take pics for me.
 
Wouldn't be the first time...I'll get some tmrw.

Thank you!!!

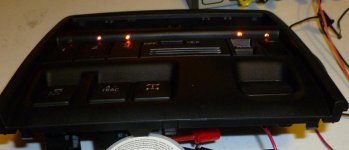
Below is my crappy pic of your console lighting mod I ripped off. The light on the left is as bright as the others but because it's recessed it doesn't look like it. I used 1.8mm orange LEDs, tied them together in parallel and through a 1.6K resistor to the rear diff lock switch's LED power lines (you can almost tell it's illuminated in the pic). That way I can disassemble everything if I need to.


NOTE TO OTHERS:

This mod is not for the faint of heart. While not technical, it requires a very steady hand, fine miniature modeling tools and skills and SMT soldering tools and skills.!!! Because of that, I'm not going into more detail than what's here. If you have the skills and tools, you won't need more than the idea, if you don't have the skills and tools I don't want to encourage anyone and have them trashing their console!!!

 

Attachments

  • ConsoleLights.JPG
    ConsoleLights.JPG
    29.3 KB · Views: 2,208
Thank you!!!

Below is my crappy pic of your console lighting mod I ripped off. The light on the left is as bright as the others but because it's recessed it doesn't look like it. I used 1.8mm orange LEDs, tied them together in parallel and through a 1.6K resistor to the rear diff lock switch's LED power lines (you can almost tell it's illuminated in the pic). That way I can disassemble everything if I need to.


NOTE TO OTHERS:

This mod is not for the faint of heart. While not technical, it requires a very steady hand, fine miniature modeling tools and skills and SMT soldering tools and skills.!!! Because of that, I'm not going into more detail than what's here. If you have the skills and tools, you won't need more than the idea, if you don't have the skills and tools I don't want to encourage anyone and have them trashing their console!!!

Awesome! I am impressed- it is NOT EASY to get those LED's in there, and I only did one. Nice job man. :hatsoff:

Here are the pics I promised-

I pulled the weatherstrip off and tucked the wire behind it. There is plenty of room in there. I stated before that I ran the wire into the kickpanel, but I realized that I actually had room to tuck it in behind the dash. Hope these help.


photo-130.jpg~original


photo-134.jpg~original
 
Last edited:
Awesome! I am impressed- it is NOT EASY to get those LED's in there, and I only did one. Nice job man. :hatsoff:

Here are the pics I promised-

I pulled the weatherstrip off and tucked the wire behind it. There is plenty of room in there. I stated before that I ran the wire into the kickpanel, but I realized that I actually had room to tuck it in behind the dash. Hope these help.

Thanks!!! Now if I can just find my electricians snake.

Yeppers, it was a real PIA and test of my skills getting those LEDs in the little pockets between the switch area and the map light area. Then getting them at the right angle so they would shine through the holes onto the switches and not the rear-view mirror was interesting. It involved several dental probes, mini clamps, third-hands, tooth-picks and a mirror. I used a mirror to see where each was shinning while I positioned it then epoxied it down, wait for it to setup then on to the next one. Then wiring them together and to the existing switch plug required trimming the plug and fine (SMT) soldering so I could tap into the power while still letting the plug clip into place correctly. Took about 4 hrs in between mouthfuls of turkey and stuffing.
 
Ha! I was waiting for you to mention the rearview mirror. I spent a good bit of time "tuning" my LED too. Hows it look at night?

PS- you won't need a snake at all. Tuck the wire into the headliner edge, pull the A-pillar loose and the weatherstripping and run the wire. It literally only takes 2 or 3 minutes. Your hard work is over!
 
Ha! I was waiting for you to mention the rearview mirror. I spent a good bit of time "tuning" my LED too. Hows it look at night?

PS- you won't need a snake at all. Tuck the wire into the headliner edge, pull the A-pillar loose and the weatherstripping and run the wire. It literally only takes 2 or 3 minutes. Your hard work is over!

I haven't reinstalled it yet, just checked on the bench with low light.
My hard work isn't over yet. I still have to tap into the mirror's rear-view camera signals. I'm not sure about tucking three wires (ScanGauge, BT mic and camera signal) into the edge of the head liner but will definitely give it a look. I was planing on going through what looks like an open channel right next to the console and seems to run straight over to the drivers side.

I'm lazy and always look for the easy way to do things. I'm so lazy I also only like to do things once so I plan, plan and re-plan before actually doing anything.
 

Members online

Forum statistics

Threads
278,307
Messages
3,554,056
Members
248,016
Latest member
Advally Service

Trending content

Back
Top