TonyB66's Ownership -> Build Thread (2000 Limited)

My pleasure Tony, glad to finally meet you in person. Although you guys were well on your way to assembled by the time I arrived and it was looking awesome. Throw that lift on and you'll have arrived. The tires and wheels will be a bonus once installed.

Speaking of which... I broke open the King rear shocks and the 891 springs a few hours ago.

in60ri6.jpg


It has been so long that I forgot that I purchased the adjusters... There is a left and right.

k4VMZPg.jpg


I somehow thought the springs would have a left and right too, no?

CaFNrI2.jpg


I was short on time, but I didn't notice any designations or colored marks to indicate driver or passenger side... I'll pull-out the glasses and check again later. If someone knows, please chime-in.

EDIT/ADD: Nevermind. When back down into the garage, and one is clearly taller than the other, and marked A, the other B.
 
Last edited:
Speaking of which... I broke open the King rear shocks and the 891 springs a few hours ago.
I somehow thought the springs would have a left and right too, no?
EDIT/ADD: Nevermind. When back down into the garage, and is clearly taller than the other, and marked A, the other B.

Generally the taller one is supposed to go on the driver side as it compensates for the weight of the fuel tank. I believe that is the reason that is stated.
 
Generally the taller one is supposed to go on the driver side as it compensates for the weight of the fuel tank. I believe that is the reason that is stated.

Yup, makes sense and I found the same here... A side = driver's side, at least here in the US. Compensation for the fuel tank and even the driver too I suppose.

[MENTION=133775]Snowden[/MENTION], I failed to ask when you were here, but where did you go for an alignment around here? Or, who would you recommend with 3rd gen knowledge? I'll have the SPC UCAs, so hopefully someone with such experience... Thanks Ash.
 
Last edited:
It has been a while... Family member surgeries are done. I had bits and pieces of time and did my best to make some progress on the rear springs and shocks.

in60ri6.jpg


I first removed the factory springs. As noted earlier, I previously installed the extended rear brake line and also the extension bracket for the parking brake. With the 4Runner up high on jack stands, I lowered the rear end.

XFvChPQ.jpg


1asNzkZ.jpg


The springs came-out with ease. Here they are next to the replacements (891s).

6VTrdzi.jpg


Measurements noted, springs only (conical bumps removed).

wp67QxY.jpg


Speaking of which, I decided to reuse the cone bumps, so I cleaned them up. I share this next photo as this became a fun, teachable physics moment for the little ones. When lowered into the bucket of water, they make a cool whistling sound!

sboXk1R.jpg


There was some light rust on the top, so I cleaned and painted those parts. On the rubber itself I rubbed a fair amount of silicone grease, then wiped them clean.

h6bnwHi.jpg


Thinking that I might have too many photos for one post, I'll start another one...
 
Next up, removal of the stock shocks. This is what I ultimately used to get those out.

v3yXDG4.jpg


The top nut is a 14mm. I had planned to use this flex head ratcheting wrench.

wN121VN.jpg


I found it to be a little too short, not enough leverage and not the best angles. I then remembered that I had this gimmicky ratchet, I believe a Harbor Freight special.

9xnx6Q9.jpg


Worked beautifully. For those who don't know, the top nut for the rear shock is in a rather tough to reach spot, up high, in the bottom of "cup". This ratchet made short work of it...

9PKznJO.jpg


However, the shock spins. That explains the pipe wrench and clamp.

qnoPgas.jpg


With those out, I spent some time cleaning. There was quite a bit of dirt up in those cups where the top of the shocks mount. Once clean, I painted.

uDBTLfi.jpg


Since I'll be installing the rear DuroBumps, I removed the factory ones. Here is everything that I removed in this project.

uLBLBgL.jpg


Speaking of which, here they are, plus other items that I forgot to install before: aftermarket poly rear sway bar bushings and a pair of washers for the PCK. It comes with four washers, and I had only used a pair on the nut side. The bolt head is flanged, but since four were provided, I'll finally make time to remove the panhard bar again...

KDUroAY.jpg


The 891 spring install was next. I had lent my spring compressor to someone years ago, and it was never returned. These are ones I got at Harbor Freight many years back. The box was so old that it pretty much disintegrated. They worked, but it seemed that they were bending as I cranked down. Not a good feeling...

30P75C1.jpg


I got the springs in place. It was a bit of a pain to remove the compressor though.

pR1Llzw.jpg


Finally time for the Kings. I found a 3/4" socket to work well to get the collars and rod end tapped into place.

1YTiuul.jpg


Contrary to the instructions, I found it easier to position the bottom first on that stud, then push downward to full compression, then quickly duck the top of the shock under the frame rail and guide it up to the top mount. Both are installed. Here is one.

Cx6clwU.jpg


I disco'd the panhard bar to add those two washers and that didn't go as fast as I had hoped. It took some creativity and grunt, but I got it back into place. I think these holes will work well with these springs (level). Oh, the scissor jack is from my old Subaru and came in handy a few times to raise one end, which lowers the other...

d8TBMDM.jpg


So, the Kings and 891s are installed. They, like the panhard bar, are not torqued-down yet. Maybe tomorrow. Last will be the installation of the rear sway bar bushings then the DuroBumps...

 
Last edited:
If you are going to reuse the shock, you need an offset box-end wrench and a allen socket, like this:

A8yBcyjh.jpg


That ratchet looks like it would be faster for a destructive removal though!

-Charlie

Good note Charlie, and helpful for others who might use my approach and want to reuse the shocks. That said, they are scratched for sure, and have two dents each, it's nothing that can't be "corrected" for those who wish to reuse...

Also of note, on the ones that I removed, the tops:

MFI2nqb.jpg


Got the panhard bar snugged up to 64 ft-lbs, with blue thread locker. Currently cleaning-up the lower shock bolts and washers, then will paint those...
 
Got the rear DuroBumps in place with blue thread locker.

BMAHyYy.jpg


With the paint dry on the lower shock bolts and washer, I torqued those down to 47 ft-lbs.

I also ordered this, set to come on Friday.

713pMQ%2BY8SL._SL1000_.jpg


https://smile.amazon.com/gp/product/B00T3T7IJU/ref=ppx_yo_dt_b_asin_title_o00_s00?ie=UTF8&psc=1

Oh, I sold my OEM roof rack cross member for 50 bucks. Getting closer to 1,000 bucks is sold items...

$400 - Leather Front Seats

$50 - Factory Stereo & Amp

$75 - Cargo Privacy Cover

$50 - Skid Plates (2)

$150 - Rear Bumper

$25 - Spare Tire Crank

$200 - Front Bumper

$50 - Roof rack cross members
 
Last edited:
Oh, I sold my OEM roof rack cross member for 50 bucks. Getting closer to 1,000 bucks is sold items...

Anyone here on T4R??? To wife: I'm selling a few hundred dollars stuff in parts from the truck, it'll totally pay for most* of these Kings and a bumper I'm going to order.....
:)
 
Anyone here on T4R??? To wife: I'm selling a few hundred dollars stuff in parts from the truck, it'll totally pay for most* of these Kings and a bumper I'm going to order.....
:)

Nope, he's aware of the forum though, and Timmy the Toolman! He has a '97 and bought it brand new actually. He's restoring it and had bent the front and rear cross members at one point...

You got it Brian. To wife: Selling old parts to buy new and better ones to make "Jack" more capable, reliable and safer too, for our family! By the way, sliders around here are known as side bumpers :-)

Looks like I can use longer rear sway bar end links. Anyone know if member pearlj10 is still selling his? I PMd him a day or two ago, but haven't heard back yet.

https://www.toyota-4runner.org/1208746-post1.html

The price is appealing and they looks plenty strong...
 
I built myself some links about two weeks ago using the Energy Suspension bolt and bushings from Advance Auto and some military spec 1/2" heims. Took a couple minutes and they seem like a pretty fail-proof design.

I'm sure PearlJ10's are great and I think there are 1 or 2 other forum members who build them. However, I only spent ~$20 on mine on they are sufficiently overbuild in my opinion. Just an idea to build them yourself.

If you want any pictures or measurements of mine let me know.
 
I built myself some links about two weeks ago using the Energy Suspension bolt and bushings from Advance Auto and some military spec 1/2" heims. Took a couple minutes and they seem like a pretty fail-proof design.

I'm sure PearlJ10's are great and I think there are 1 or 2 other forum members who build them. However, I only spent ~$20 on mine on they are sufficiently overbuild in my opinion. Just an idea to build them yourself.

If you want any pictures or measurements of mine let me know.

Yes, please! Here is fine. I found a thread or two here describing pretty much what you did, I believe, but they used an eye bolt. Wasn't so keen on such usage though.

I have what should be about a 3" lift in the back, so please let me know what yours is too. Again, thank you.
 
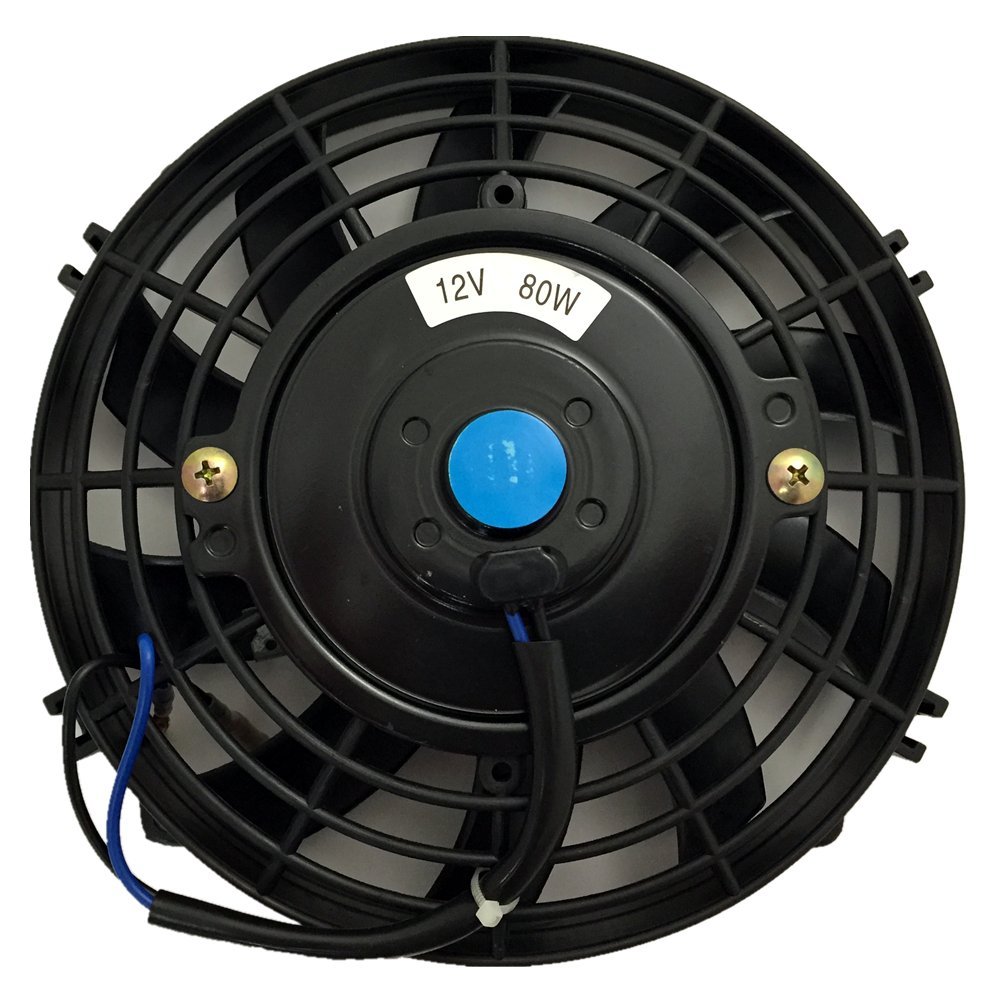
LOL. That's the fan.

I don't recall the depth but it does fit. Here's the only shot I took while I was doing the install.

7aHgHbe.jpg


If you go with the same fan there's one thing you need to do. You have to convert it from a pull fan to a push fan. From the factory it's set to pull air from the rear and pass it to the front. You'll want it set to push air from the front to the rear. It takes less then 5 minutes to do.

Undo the nut that holds the fan to the shaft. Pull the fan off. Flip the fan over. Put the fan back on. Re-install the nut. When you wire it wire it in reverse. Positive to neg and neg to pos. That will spin the motor backwards, which causes no harm to electric motors, and just like that you now have a push fan.

Matt, you still around? If so, did you mount your fan with just two small bolts through the provided holes? I see one on the top, but I imagine you might have one or more on the bottom, blocked by the light. I'll be pondering an install, maybe as soon as this weekend...

For power, since I have manual seats, I'm thinking I might use that circuit. I believe it's overkill at 30 amps though as I believe it also works the sunroof, which I don't use and want to eliminate anyways...
 
OK, so. I only have 1 decent picture on my phone and will not be back to my car during daylight I don't anticipate but I can try to get more pictures later.

I have ~2" of lift using 99 tall coils with 1.5" daystar spacer.

Parts List:
x2: 1/2" heim/rod end with ~3-4" of thread. I used 4130 alloy steel milspec ones but this is definitely overkill.
x1: Energy Suspension sway bar end link kit from parts store. I got the 4-1/4" option but then cut approximately 1-1/4 inches off. The exposed thread portion was perfect for me.
x1: tube of grease so the poly bushings don't squeak!

Process:
1) Test-assemble heim into the bolt-head end of rod set-up and hold up next to current end link.
2) Estimate where the sway bar needs to be to sit level.
3) Cut off excess steel from the long bushing spacer
4) Cut out old end links with sawzall
5) Use drill to clean up the hole in swaybar by ~1mm
6) Assemble - should be very simple

I will try to get a measurement of my assembled length and better pics but no guarantees.
 

Attachments

  • IMG_20190222_130624.jpg
    IMG_20190222_130624.jpg
    122.3 KB · Views: 268
OK, so. I only have 1 decent picture on my phone and will not be back to my car during daylight I don't anticipate but I can try to get more pictures later.

I have ~2" of lift using 99 tall coils with 1.5" daystar spacer.

Parts List:
x2: 1/2" heim/rod end with ~3-4" of thread. I used 4130 alloy steel milspec ones but this is definitely overkill.
x1: Energy Suspension sway bar end link kit from parts store. I got the 4-1/4" option but then cut approximately 1-1/4 inches off. The exposed thread portion was perfect for me.
x1: tube of grease so the poly bushings don't squeak!

Process:
1) Test-assemble heim into the bolt-head end of rod set-up and hold up next to current end link.
2) Estimate where the sway bar needs to be to sit level.
3) Cut off excess steel from the long bushing spacer
4) Cut out old end links with sawzall
5) Use drill to clean up the hole in swaybar by ~1mm
6) Assemble - should be very simple

I will try to get a measurement of my assembled length and better pics but no guarantees.

Nice! Much appreciated. I'll give it a try. As for the ES kit, might it be the 9.8121? These are the ones in black that I still have in my Amazon cart.

https://smile.amazon.com/Energy-Sus...coding=UTF8&psc=1&refRID=JZYP4N6H8ZKK6VJQ1VPN

Ah, I just saw that those are the 4 1/2" sleeve length. Yours are 4 1/4"....

Ok, found this on the ES website:

energysuspension.com | Sway Bar End Links & Set Sizing Charts

The 4 1/4" looks to be the 9.8149.

Also, might you have a part # on the heim?

You should consider a dedicated thread on this topic. Thanks again!
 
Last edited:
Nice! Much appreciated. I'll give it a try. As for the ES kit, might it be the 9.8121? These are the ones in black that I still have in my Amazon cart.

https://smile.amazon.com/Energy-Sus...coding=UTF8&psc=1&refRID=JZYP4N6H8ZKK6VJQ1VPN

Ah, I just saw that those are the 4 1/2" sleeve length. Yours are 4 1/4"....

Ok, found this on the ES website:

energysuspension.com | Sway Bar End Links & Set Sizing Charts

The 4 1/4" looks to be the 9.8149.

Also, might you have a part # on the heim?

You should consider a dedicated thread on this topic. Thanks again!

I think you would be fine with either the 4-1/4 or 4-1/2. If desired you could buy just the bushings from them and then buy the bolt and steel sleeve to the size you desire at a local hardware store.

For heims, I am in college and participate in automotive design competitions so I snagged some mil. spec rod ends from our shop because we had some in the wrong size. These are worth a good deal of money so they aren't recommended unless you need an end link that is literally bomb proof.

McMaster Carr has an awesome selection of rod ends if you want to find exactly what you want for material and design.

McMaster-Carr

One like part # 60645K16 would be sufficient or you could run to a specialty hardware store or off road shop and pick some off the shelf there.

I will consider doing a better write up with part #s etc when I have time because these are an easy and fun DIY project for all the people who are lifted but have not adjusted their other components to accommodate added height. My stock link snapped while wheeling and otherwise I would have never upgraded!
 
You have me thinking about just building them... Grade 8 bolts would be great. Looks like the ES ones are 3/8" grade 5. Might make a trip to the hardware store soon...
 
Last edited:
Matt, you still around? If so, did you mount your fan with just two small bolts through the provided holes? I see one on the top, but I imagine you might have one or more on the bottom, blocked by the light. I'll be pondering an install, maybe as soon as this weekend...

For power, since I have manual seats, I'm thinking I might use that circuit. I believe it's overkill at 30 amps though as I believe it also works the sunroof, which I don't use and want to eliminate anyways...


I'm still around but only occasionally. Since, the whole hack and nobody owning up to what actually occurred I've been spending most of my time elsewhere on the web.

My fan has 4 mount points. If you blow up the photo you quoted you can see the one up top that goes through the cooler. There's another one on the bottom that does the same thing. You have to carefully drill those since there close to the fins. If you look in the photo you quoted you'll also see a mount point on the fan to the left. There's another hidden on the right. The fan comes with the tabs and I used the stop ties provided with my cooler. This is as good a photo I can get of those mount points.

xeWJEMI.jpg


Hope that helps a bit. Your rigs really starting to get in wheeling shape pretty quickly. The work looks damn good so the fan thing should go pretty easily for you. If you ever find yourself over this way and want to hit some trails let me know.
 
I'm still around but only occasionally. Since, the whole hack and nobody owning up to what actually occurred I've been spending most of my time elsewhere on the web.

My fan has 4 mount points. If you blow up the photo you quoted you can see the one up top that goes through the cooler. There's another one on the bottom that does the same thing. You have to carefully drill those since there close to the fins. If you look in the photo you quoted you'll also see a mount point on the fan to the left. There's another hidden on the right. The fan comes with the tabs and I used the stop ties provided with my cooler. This is as good a photo I can get of those mount points.

xeWJEMI.jpg


Hope that helps a bit. Your rigs really starting to get in wheeling shape pretty quickly. The work looks damn good so the fan thing should go pretty easily for you. If you ever find yourself over this way and want to hit some trails let me know.

Yes, that helps Matt. I get it tomorrow, so I'm sure it will be even more clear... With all of the bouncing you do, it seems like it's secured quite well.

You've been missed around here, but I understand. Indeed, if in your area, I'll give you a heads-up for sure. Fond memories of the 395. Having not been wheeling since my 20s in an FJ-40, I will be the limiting factor, not my 3rd gen's capabilities. That's fine, and I look-forward re-learning so much, and hopefully it will come-back fast.

Be well Matt and thanks again.
 
The manual radiator and auto radiator are basically identical externally except the manual one doesn't have the tranny cooler line fittings. The plastic just goes across.

I also have a champion I havent installed yet. Not sure which runner to put it in.
 

Members online

No members online now.

Forum statistics

Threads
278,316
Messages
3,554,120
Members
248,016
Latest member
Advally Service

Trending content

Back
Top