Toyota as a second language - Would you kindly interpret factory repair manual text

Status
Not open for further replies.
Holy crap, this is most typing in 1 day I have ever seen.

You seriously couldn't find any DIY's on this? There are TONS, with TONS of good information (I found plenty to help me do this with little problem). Honestly, if you need a single fully comprehensive DIY with all options for ways to do the install, then you really shouldn't be doing this kind of work on your own. You have put so much text into this one thread (that isn't even the right thread for it) that it's usefulness is gone; no one wants to wade through 3000 words of recycled crap to find what they need. This is mostly just a re-hash of the FSM (which is readily available online) and the chiltons/haynes (available everywhere). There is nothing new here.

You have made a couple nice write-ups, but this isn't just beating a dead horse, it is pulverizing it into a fine powder.

What might be useful is a conglomeration of all the various suspension replacement threads into 1 place and maybe organized more coherently, like the basic step by step (very brief) with the links in their right places.
 
I think one of the problems here is that different suspensions require different levels of effort to get them in, so there is a lot of variability in the approach needed. For me, changing stockers to Tokkico Trekmasters on '99 tall springs, no 'stabilization' was required. Just pop in the strut, adjust slightly with a 2' prybar, and done. I only had the FSM write-up, and it was all I needed. Piece of cake, other than the spring compression, which I gave up on (I had cheapie NAPA compressors) and took to a mech with a wall machine.

I'm glad I never saw any of this other stuff--it probably would have scared me off doing the job.
 
Last edited:
And to a degree one must be intuitive enough to understand how the suspension is taken apart and put back together. Plus any car work done the first time doesn't need to be a rush job, just do it correct devoid of any time restraints.

I wonder if BigFishAllDay has done his yet? He could do a write up that would make mom envious.
 

Attachments

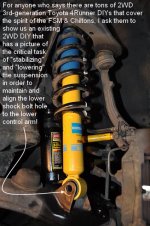
  • stabilize_the_suspension.jpg
    stabilize_the_suspension.jpg
    57.1 KB · Views: 1,447
Last edited:
no 'stabilization' was required. Just pop in the strut, adjust slightly with a 2' prybar, and done.

My first time, since I didn't know what stabilization meant, I skipped that step.

Then I found out why I shouldn't have skipped that step! :)

The control arm popped up, after the shock was removed (because I didn't 'stabilize' it).

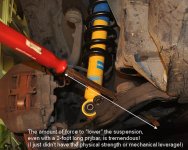
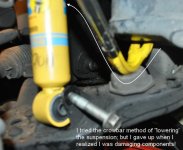
To "lower the suspension", (translation: lower the control arm hole to meet up with the shock bushing hole), I practically stood on a 2-foot prybar & also a very long crowbar (see photo below).

I failed. Miserably. You must have the strength of an ox! I don't. :(

Piece of cake, other than the spring compression, which I gave up on (I had cheapie NAPA compressors) and took to a mech with a wall machine.

I agree, the job is a piece of cake, once you get past the 'stabilizing' and 'lowering' of the suspension.
Code:
[I]Translation:[/I] [B]Stabilizing[/B] ==> I infer that means to keep the control arm where it was, both before & after you remove the strut!
[B]Translation:[/B] [B]Lowering[/B] ==> If you don't stabilize well enough, the control arm moves up when you remove the shock ... so you now need to mechanically lower the control arm to meet up again with the shock bushing. 

Note: Most people "lower" but I found if you properly "stabilize", there is little need to lower! <=== that's the trick!
It's just one 19mm bolt on the bottom and three 14mm bolts on top. Nothing to it. While the first took hours, my third one took about 20 minutes even with snapping of pictures (I had to re-do the first one because I accidentally left a washer out).

Spring compression was way way way easier than everyone intimated it could be. (People said they bend, and break but these were solid as a rock.) Three times the compressed the springs and three times it worked just fine with no drama.

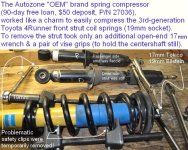
I highly recommend that Autozone free loaner tool ($50 deposit, 90 day loan):

  • OEM brand, MacPherson Strut Spring Compressor #27036
  • OEM Customer Service: 866-458-2472 (Mineola, NY)
one must be intuitive enough to understand how the suspension is taken apart and put back together.

I disagree, in part.

A DIY is supposed to provide you with all the knowledge you need to do a simple job such as this one.

If the DIY skips the 'stabilization' stage, then you're stuck with a more difficult 'lowering' stage.
However, if the DIY shows you how to stabilize - you entirely don't need to lower! <=== that's the trick!

Once you know the 'trick', this front strut R&R is almost trivial (I give it a 3 out of 10, simply because of the danger of the spring); otherwise, it would be a 1 out of ten (it's just 5 nuts, in total!).

There should be no reason for a DIY to say "stabilize" the suspension, when a person who has never done the task wouldn't have a clue what that means or why you are 'stabilizing' it.

Also, when the FSM says "lower the suspension", again, they could have mentioned why you're doing this and what suspension part you're actually lowering.

I wonder if BigFishAllDay has done his yet? He could do a write up that would make mom envious.

If I could have found a decent 2WD strut-only DIY that used the factory method, I would have followed it!

But, most DIYs don't (apparently) 'understand' how to stabilize. If you stabilize well, you have no need to lower - and most DIYs use all sorts of methods to lower but they don't have to! <=== that's the trick!
 

Attachments

  • prybar.jpg
    prybar.jpg
    58.8 KB · Views: 1,247
Last edited:
Wow, ok, that is alot of work to figure out some common sense language.

2WD is the same as 4WD. Even if they are slightly different, it is basically the same thing for 4runner, tacoma, tundra, LC, etc etc... Hell, it is practically the same for many many different vehicles from all manufacturers. If you can't understand how other vehicles are similar enough to help you, then you shouldn't be doing it. You don't have to have someone walking you through EXACTLY what you have. This is what I mean by not having to BLINDLY follow a walkthrough. Stabilize and lower? Put your foot on the LCA. Grab the shock with your hand and lower it, as in don't let it drop out onto your toe. It's common sense, not complicated.

As far as walkthrough's, here's one that took about 13 seconds to find.
Suspension install on 3rd gen 4Runner (96-02) - 4x4Wire.com

The reason you don't find additional details is because they aren't necessary. If you can;t figure out how to remove 1 bolt and keep the shock from falling on your toe, then like others have said, you shouldn't be doing this yourself.

And the DIY's do it wrong? No they don't. The fact that you say this is evidence that you don't understand what is going on. The reason they say to unbolt the sway bars and LBJ's is because it releases tension on the LCA, which allows you to move the LCA up and down as necessary without having to use as much force (this is really only necessary for lifts, which have longer shock assemblies). If you can't understand why this is, then take 10 seconds to look at your 4runner and figure it out, and review if you are capable of this on your own. I question your understanding of the INTENT of the FSM.

As far as the bottle jack method, here are some walkthrough's. First, not even a suspension walkthrough, but a CV replacement page. If you understood what you are doing, you would know that this is applicable to the suspension install.
Toyota Maintenance: CV Axle Replacement on 3rd Generation 4Runners and Tacomas

And just to be even more fair, here is a suspension thread with that picture.
OME Lift

There are several others, but I don't have them bookmarked.

Here's one with the crowbar method.
OME Install - no spring compressor - Toyota 120 Platforms Forum

BTW, the bottle jack method doesn't stabilize anything. It simply forces the arm down. The stabilize part is something different.

You are focusing so much on this one little bit that isn't even part of the installation instructions but is a HINT. Take it to mean whatever you want it to. If this was such an important point, and possible of being screwed up, someone else could have mentioned it.

Blah blah blah. I'm bored with trying to explain this crap to you. This is what you do on every other thread you post it. You have made some great walkthroughs that are very clear and well thought out, but then you get all patronizing, telling us we are doing stuff wrong, telling us we don't understand how it works when we have already done it successfully. Step off of it and just give something a try. Or better yet, get someone to help you. Maybe this stuff would be easier to explain to you in person.
 
Not going to lie, but you are wayyyyyyyy over complicating things. All you need to do is to simply remove the shock ( this assumes you already have the truck on jack stands and the tires off). then put the new one on. there are inbetween steps that you figure out as you go and also as needed. Its a big game of how can i make this easier on my self and what do i need to do to get it back on. Do you have to remove the sway bar, do you just use a bottle jack, a pry bar or do you remove the lower ball joint? I tried all these methods before removing the ball joint then at that point you just gotta make it work. There is no "right way" to do this and there is no "wrong way" to do this. Keep in mind everyone on this site does this for run, because we enjoy working on our trucks. the only thing that you must do it make sure everything gets installed back where it belongs and is torqued down correctly. how you go about getting it installed is for you to figure out.

I understand you dont like to leave every last detail out but its all a matter of personal preference and common mechanical sense and if you cant figure it out from all those write ups you have posted and others have posted you really should not be doing this by yourself ( as others have also suggested). Out of curiosity, what is your general personal back ground?
 
Last edited:
Wow mom, YOU have missed the point. And you have wasted alot of your own time rehashing the same crap over and over again.

I have not missed the point. I was a total newbie when I bought this vehicle. I had to dive into some serious work when I got it, like replacing the entire rear axle assembly. BTW, the FSM doesn't tell you how to remove and replace the rear axle assembly, you have to piece it together from 20 different pages in the FSM. Chiltons and haynes don't touch it at all.

I understand that the FSM isn't worded that well. My point is that there is AMPLE information in walkthroughs here, on yotatech, and elsewhere to explain how to do all this. That doesn't excuse the reader from needing to use their own intuition and creativity to get the job done. If they lack those qualities as they apply to mechanical work, then they should leave it to a shop.

I met lots of people in college that were very intelligent, but lacked the creativity and intuition to become successful engineers. I have met lots of others lack that the intelligence to be an engineer, but have the creativity and intuition to tackle a project like suspension replacement without reading a single word from a manual or walkthrough. Nothing wrong with either as long as they understand and accept where they fall in that spectrum.

Anyway, if you got this done through just getting into it and figuring it out for yourself, then good and congratulations.

I'm not here to win a point though ... all I want is a simple DIY for replacing 2WD front struts that actually understands and shows why we 'stabilize' and 'lower' the suspension.

See, this is you missing the point. How do you raise your hand? How do you walk? How do you breath? There is nothing magical about "lowering" the shock. And "stabilizing" may be bad wording, but you have the intuition to understand what they are trying to get you to do in order to end up with a properly installed and torqued bolt. Use that intuition. You are looking for WAY more meaning in these words than is really there.

Anyway. As you get more experienced in working on your vehicle, I am sure you will get better at not over-complicating this stuff, but for now, just tone it down a little bit.
 
Wow, ok, that is alot of work to figure out some common sense language.

2WD is the same as 4WD. Even if they are slightly different, it is basically the same thing for 4runner, tacoma, tundra, LC, etc etc...

I have to correct you bro.

The 2wd Taco has totally different set up then the 4wd version. Now the Prerunner Tacos use the same suspension set up as the 4wd version. The regular 2wd taco sits lower then a Prerunner thus the different set up.

The 2wd 4Runners sit taller then the 2wd Tacos (not inc. Prerunner) thus the would share the same suspension components as the 4wd versions.


:hatsoff:
 
As an elder 4runner owner (34) in comparison to most here, back in the early 90s when I began wrenching on autos, the World Wide Web was only accessible to a handful of people and not to the mass market. So I had to learn through trial and error as well as with the guidance (or lack thereof) from the infamous Chilton and Hayes manuals to fix my cars and trucks. I broke stuff, more than I care to remember, but I learned from it and did not throw in the towel.

I consider all DIYs kind of like icing on a cake. They help me, some much more than others (BigFishAllDay's DIYs are gravy) but I use them nothing more than a guidance tool. There is no one correct way or method followed when writing or posting DIYs. I appreciate everyone who takes the time to post their DIYs repairs, whether they are applicable to me or not.

Still at the airport, waiting for my friend's lost luggage (it is on a later arriving plane).
 
I have to correct you bro.

The 2wd Taco has totally different set up then the 4wd version. Now the Prerunner Tacos use the same suspension set up as the 4wd version. The regular 2wd taco sits lower then a Prerunner thus the different set up.

The 2wd 4Runners sit taller then the 2wd Tacos (not inc. Prerunner) thus the would share the same suspension components as the 4wd versions.


:hatsoff:

Is it just different lengths, or is it different design? Still uses top hat like 4WD, eye and bolt on the bottom? Those are the only real relevant factors here, though I stand corrected that they aren't the SAME.
 
I'm ok with the personal attacks; I, for one, will remain on technical topic.

Key points:

1. While many people have trouble with the spring-compression step, it was the suspension-immobilization that took me a while to figure out.
2. The manuals tell you a key step is "stabilizing" the suspension BEFORE removing the strut.
Most DIYs apparently skip that step (perhaps out of misunderstanding); but (I learned) it was THE key step in my strut replacement!
3. The manuals also suggest "lowering" the suspension BEFORE re-installing the strut.
Most people are forced to perform this step! (I learned I could skip this step if I performed the stabilization well!)
5. Most DIYs, therefore, end up adding additional removal steps so that you 'can' raise the lower control arm to meet the shock bushing hole!
6. I searched extensively (and Nelson searched too!) and none of us can find a 2WD Toyota 4Runner DIY that shows those both steps.
7. Those who 'say' 2WD is the same as 4WD (or that all cars are the same) still have trouble finding even a 4WD DIY that doesn't skip the key step!
8. Those who say 2WD is the same as (Chevy, Ford, Mazda, etc.) don't come from it from the standpoint of a newbie.

My main lessons summarized:

  1. With a strong spring compression tool, the strut was easily disassembled sans drama (see photo below).
  2. When I stabilized (read "immobilized") the lower control arm before removing the strut, such that the LCA remained in position after the strut was removed ... it was quite easy to put the new strut back in ... since all the bolt holes lined up by default (i.e., there was absolutely no need to further lower the suspension LCA).
  3. Had there been a need to further lower the suspension lower control arm, this technique also allows for minute adjustments so that the lower control arm may be adjusted down (or up, if needed) to fit variously sized shocks (mine were 1:1 replacements).
 

Attachments

  • spring_compressor_tool.jpg
    spring_compressor_tool.jpg
    84.5 KB · Views: 11,250
Last edited:
As an elder 4runner owner (34) in comparison to most here, back in the early 90s when I began wrenching on autos, the World Wide Web was only accessible to a handful of people and not to the mass market. So I had to learn through trial and error as well as with the guidance (or lack thereof) from the infamous Chilton and Hayes manuals to fix my cars and trucks. I broke stuff, more than I care to remember, but I learned from it and did not throw in the towel.

Oh Lord. Does that mean I'm an ELDER too??! :eek:
I had to laugh about your reference to the WWW. You forgot to mention that we had to get the Chiltons and Haynes from the library!
 
Is it just different lengths, or is it different design? Still uses top hat like 4WD, eye and bolt on the bottom? Those are the only real relevant factors here, though I stand corrected that they aren't the SAME.
No top hat, no strut. Similar set up to chevy 2wd truck.

2wdsuspen.png~original
 
I met lots of people in college that were very intelligent, but lacked the creativity and intuition to become successful engineers. I have met lots of others lack that the intelligence to be an engineer, but have the creativity and intuition to tackle a project like suspension replacement without reading a single word from a manual or walkthrough. Nothing wrong with either as long as they understand and accept where they fall in that spectrum.

YEP

I think the big thing that irked Nelson is that the DIY are out there but the forum has perceived you didn't look very hard or at least hard enough. Most engineers, are forced from year 1 to start looking things up on their own and figuring out the pieces, how does it work ect because text books are often not the best source for solving for example, specific computer science problems. It is pretty standard to go out there and look elsewhere for additional material. I had originally considered business major but decided against it because none of the programs were technical enough. I am very glad I didn't go that way. Your profile says you work at Apple. If thats the case then you are surrounded by engineers all day, time to befriend some of them enough to come over and help with your truck.

I do think this forum can be kind of rough on newbs but usually only if they have thin skin, this is the internet after all and you would get roasted far worse on YotaTech or any of the other truck forums. Plus all of the internet is like this. Have you never been to a forum, this community is actually very patient and polite for the internet.


For example OP,
Your 3rd question is:
Code:
QUESTION 3: Is the "suspension support" the same as the strut?
Which prompted several people to tell you that this task is out of your league if for no other reason than you do not seem very mechanically inclined and the fact that "suspension support" is a pretty APT name for the plate. Also, taking apart the strut can actually be quite dangerous. I wouldn't want to be nearby when someone who doesn't know how basic mechanics starts compressing the spring.


Here is a diagram I found on page 2 of google images. It was a very simple search.
All i did was type the following into google:
Code:
suspension support toyota
The diagram is from a Camry but it is close enough and labeled properly for you to understand. Note that clearly shows what the "front suspension support" (plate) looks like.


.
.
.
.
.
.
I hope that you take this criticism well and don't let it get under your skin. Everyone here is glad to help but after a while people start to yell WTF when a newb is not listening.
.
.
.
.
Lastly here is a tip to speed up your IE browser, hit ALT-F4
.
.
 

Attachments

  • XcpvXmSmJqg6v0bwpMJ1j2Lro1_400.jpg
    XcpvXmSmJqg6v0bwpMJ1j2Lro1_400.jpg
    30.8 KB · Views: 528
  • picard_wtf.jpg
    picard_wtf.jpg
    18.3 KB · Views: 483
Last edited:
Earlier today I replaced all four shocks and springs on my '97 with Bilstein HD's and a set of 99 tall coils. I also installed a set of 3/4" top plate spacers w/new studs up front and 1.5" daystar spacers in the rear for a small lift.

Doing that entire job took me less time than it would have to read this entire thread. I went cross eyed somewhere on the first page.

LittleCeasar, thanks for the props on the writeups man, but I would never have thought to do one on this subject, because like everyone else has said, it's so well covered.

I liked Nelson's post... beating a horse to death? No... this thread is beating it into a fine powder. LMAO. :lmao:
 
I do think this forum can be kind of rough on newbs but usually only if they have thin skin, this is the internet after all and you would get roasted far worse on YotaTech or any of the other truck forums. Plus all of the internet is like this. Have you never been to a forum, this community is actually very patient and polite for the internet.

Seriously. Go over to Pirate or IH8MUD and tell those guys that "cleary rotors don't warp" or that you need to understand "Stabilize and lower" in the FSM in gruesome detail. You will hear insults you have never heard of, and then probably get banned.

I hope that you take this criticism well and don't let it get under your skin. Everyone here is glad to help but after a while people start to yell WTF when a newb is not listening.

Arrogance is magnified on the internet because you can't communicate tone. So when a newbie comes in telling us that they don't know much, but then proceeds to tell us how it is and should be (like you have done in most of your threads, some of which got deleted), that looks extremely arrogant. A newbie not listening to those that are experienced is even more frustrating. There are ways to listen and acknowledge people's input without actually heeding it. If you don't understand how to do that, then I hope you aren't in customer service at Apple.
 
Status
Not open for further replies.

Members online

No members online now.

Forum statistics

Threads
278,315
Messages
3,554,125
Members
248,016
Latest member
Advally Service

Trending content

Back
Top