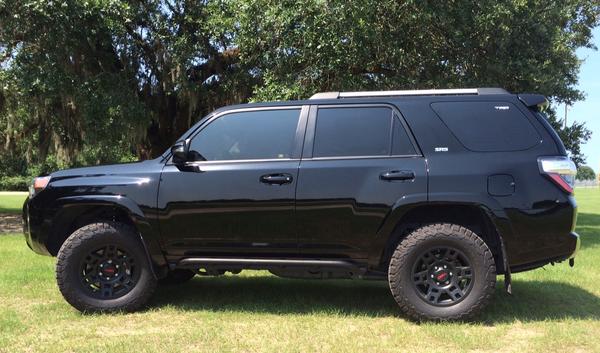
weeeee's build thread

I'm riding on the 4th notch also.

They aligned ok. Caster was a little off because I tried to push it as high as possible (OEM is zero, I was shooting for roughly 2 degrees), but my toe and camber were spot on OEM specs. I think if I played with it a little more (or had caster set to 0) it would've been fine.

With a lift at 2.5", I'd recommend getting UCAs if you want to get better steering feedback because the increased caster will give you better straight line tracking and stability especially at highway speeds. I'm planning on getting UCAs soon.

Do you happen to have any more side profile pics you can post up?

I just received my Light Racing UCA's and am getting ready to install my lift. I'm debating between the 4th or 5th clip in the front.

I'll be running Bilstein 6112 in front with the 5160's in the rear along with the Toytec superflex springs. I've got the TRD wheels with the BFG KO2's 275/70/17 sizing. I'd like about a 1/2 to 3/4 inch rake in the rear but not quite sure where it will end up running in the 5th notch.

Have you thought about going to the 5th notch up front?
 
Do you happen to have any more side profile pics you can post up?

I just received my Light Racing UCA's and am getting ready to install my lift. I'm debating between the 4th or 5th clip in the front.

I'll be running Bilstein 6112 in front with the 5160's in the rear along with the Toytec superflex springs. I've got the TRD wheels with the BFG KO2's 275/70/17 sizing. I'd like about a 1/2 to 3/4 inch rake in the rear but not quite sure where it will end up running in the 5th notch.

Have you thought about going to the 5th notch up front?

You should be fine with either one. Honestly if you're sticking with 275 I'd keep it on the 3rd or 4th notch- just my personal preference because of the wheel gap. I think [MENTION=103267]Saker[/MENTION] is running this setup and it looks awesome.

I haven't thought about cranking it all the way up yet. I get pretty good clearance with my 34s and the CV angles are pretty good so I'll probably leave it alone.

I'll post up some side profile pics when I get a chance.

[MENTION=44305]weeeee[/MENTION] Good meeting you today and thanks for the cubby swap! Nice Pro man!

Thanks man! Glad I could help you out (you probably helped me save some time too, lol). I'll catch you on the TW forums. Good luck with buyers for everything else!
 
Do you happen to have any more side profile pics you can post up?

I just received my Light Racing UCA's and am getting ready to install my lift. I'm debating between the 4th or 5th clip in the front.

I'll be running Bilstein 6112 in front with the 5160's in the rear along with the Toytec superflex springs. I've got the TRD wheels with the BFG KO2's 275/70/17 sizing. I'd like about a 1/2 to 3/4 inch rake in the rear but not quite sure where it will end up running in the 5th notch.

Have you thought about going to the 5th notch up front?

You should be fine with either one. Honestly if you're sticking with 275 I'd keep it on the 3rd or 4th notch- just my personal preference because of the wheel gap. I think [MENTION=103267]Saker[/MENTION] is running this setup and it looks awesome.

I haven't thought about cranking it all the way up yet. I get pretty good clearance with my 34s and the CV angles are pretty good so I'll probably leave it alone.

I'll post up some side profile pics when I get a chance.


Thanks man! Glad I could help you out (you probably helped me save some time too, lol). I'll catch you on the TW forums. Good luck with buyers for everything else!

[MENTION=133084]esa31.8t[/MENTION] & [MENTION=44305]weeeee[/MENTION],

I am running my 6112's on the middle circlip groove 5160's rear with stock springs and 265-70-17 KO2's for shoes.
That leveled my T4R.

saker-albums-saker-s+midnight-picture35243-6112s-5160s-2-lift-bfg-ta-ko2s-%40-park.jpg


hope this helps!
 
Electrical/Solar Setup

I've been lagging pretty bad on updating this with some recent additions on account of getting this all ready quickly between work and a big camping trip that we took. I just finished up a big electrical project to keep up with my solar setup, fridge, and just to keep things clean for upcoming electrical mods.

First, I purchased a new Odyssey Group 31M to replace my regular starting battery. I opted to go with a single battery setup vs. a dual battery setup specifically to keep things simple. I also plan on supplementing this with a solar panel to keep juice flowing to the Indel-B fridge I just picked up.


Odyssey Group 31 Battery Install (in factory tray)

I started out by disconnecting the factory battery cables and removing the OEM battery

25365840864_fd869e4119_c.jpg


Since the new Odyssey is a bit larger, I needed to trim a portion from the OEM battery tray

25365979624_79d77e2850_c.jpg


Muscle the new Odyssey in- looks a little like this

25972625436_b748906316_c.jpg


Needed to purchase some Mil-Spec terminals and mated them to the factory terminals. Buttoned everything up.

25972628536_dbbe42f95d_c.jpg


DISCLAIMER:
When performing this mod, it is important to note that the OEM alternator is not rated high enough to charge the Odyssey to 100% charge. Battery lifespan may suffer if you do not fully charge the Odyssey on a Battery Tender or something similar every so often.
 
Electrical/Solar Setup

I've been lagging pretty bad on updating this with some recent additions on account of getting this all ready quickly between work and a big camping trip that we took. I just finished up a big electrical project to keep up with my solar setup, fridge, and just to keep things clean for upcoming electrical mods.

First, I purchased a new Odyssey Group 31M to replace my regular starting battery. I opted to go with a single battery setup vs. a dual battery setup specifically to keep things simple. I also plan on supplementing this with a solar panel to keep juice flowing to the Indel-B fridge I just picked up.


Odyssey Group 31 Battery Install (in factory tray)

I started out by disconnecting the factory battery cables and removing the OEM battery

25365840864_fd869e4119_c.jpg


Since the new Odyssey is a bit larger, I needed to trim a portion from the OEM battery tray

25365979624_79d77e2850_c.jpg


Muscle the new Odyssey in- looks a little like this

25972625436_b748906316_c.jpg


Needed to purchase some Mil-Spec terminals and mated them to the factory terminals. Buttoned everything up.

25972628536_dbbe42f95d_c.jpg


DISCLAIMER:
When performing this mod, it is important to note that the OEM alternator is not rated high enough to charge the Odyssey to 100% charge. Battery lifespan may suffer if you do not fully charge the Odyssey on a Battery Tender or something similar every so often.

I recommend installing a NoCo 10 amp charger under the hood...pretty cheap, does a great job..
NOCO Genius GEN1 10 Amp 1-Bank Waterproof Smart On-Board Battery Charger https://www.amazon.com/dp/B003JSHQW0/ref=cm_sw_r_other_awd_CoG8wbFM1F45H
 
Electrical/Solar Setup (continued)

Bussman Fuse Box install

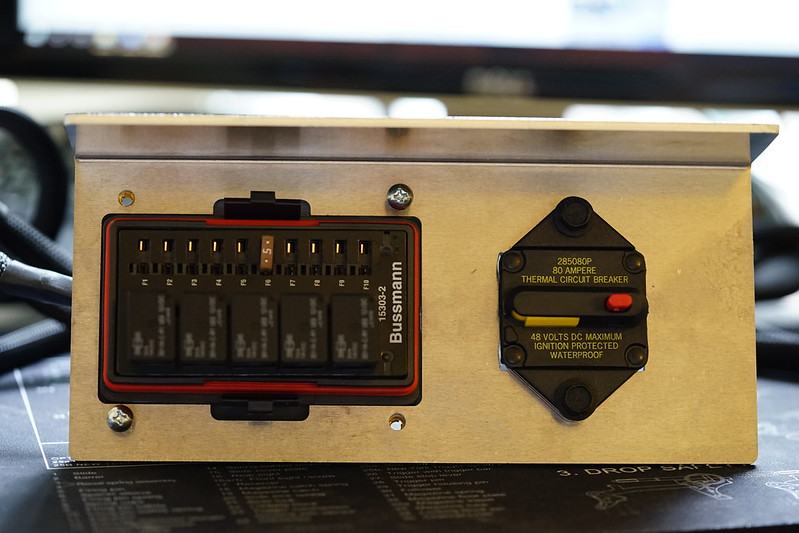
I opted to go with a Bussman Fuse Box setup instead of a Blue Sea fusebox because of the weather sealing and the additional relays. I ordered a pre-made kit from Tacomapros, complete with a Bussman 90A relay, switchbacks (to make wiring in the OTRATTW switches a little easier), and an aluminum plate to hold it all down.

23657786850_e2b10d3792_c.jpg


23657781780_248e392604_c.jpg


Mounting it all up and drilling holes

25972651746_5d763e6642_c.jpg


Running the cabin harness (which contains the switchback harness to the OTRATTW switches) through the main harness firewall pass-through

25365866454_f8101e058d_c.jpg


Back side of the main harness pass-through- this is where it exits into the interior

25369824973_5578a27e7f_c.jpg


Tie it all back into the mil-spec battery terminals on the Odyssey and you're done!

25365870604_a6b8e63b52_c.jpg


Plugged into the OTRATTW switches

25698561290_ae950029cb_c.jpg
 
Last edited:
Electrical/Solar Setup (continued)

National Luna Battery Monitor

Since I have everything running off a single battery, I wanted to make sure that I wasn't left stranded should my battery drop below starting voltage. Even though the Indel-B fridges come with a settable low voltage cutoff, this was just some added insurance to prevent coming back to a dead battery. The National Luna Single Battery Monitor comes with a low voltage alarm and a voltmeter that shows battery charge.

I decided to mount this in the panel next to the factory jack in the trunk.

25972632966_0f7313ed83_c.jpg


25365850504_5f85401dbd_c.jpg


25365851864_f033a87000_c.jpg


Adventure Trailers Solar Plug

Also, in preparation for my solar setup, I sourced a solar plug from Adventure Trailers to tie in to the Odyssey battery. Since the panel I'm running has a solar charge controller mounted directly to the panel itself, I can plug it straight into the AT Solar Plug. Also, since it has SAE connectors, I can use it to plug a Battery Tender directly to the battery. I mounted this in the plastic trim on the drivers side windshield.

Started by drilling a hole in the panel

25365871224_e2d599063b_c.jpg


Squeezed some marine sealant on it for added waterproofing

25698019240_fd314cd582_c.jpg


Stainless self tapping hardware

25365872504_5379497941_c.jpg


Mounted

25903608181_0104e71e6c_c.jpg


25903608741_678d88906d_c.jpg


When needed, I can simply plug in the solar panel to the AT Solar Plug

25371290623_35e820babe_c.jpg


26000040945_0b64f1a971_c.jpg
 
Last edited:
I recommend installing a NoCo 10 amp charger under the hood...pretty cheap, does a great job..
NOCO Genius GEN1 10 Amp 1-Bank Waterproof Smart On-Board Battery Charger https://www.amazon.com/dp/B003JSHQW0/ref=cm_sw_r_other_awd_CoG8wbFM1F45H

Thanks for the link- that looks a lot slimmer than the Battery Tender. I might have to try it out.

Looking good Victor! Glad to see things out of boxes and on your rig :bounce:

Yep, it feels good to finally get everything on the rig. See you around!
 
No Loss Valve Stem Caps

Ended up installing the easiest mod ever. If you air up/down frequently or hit the trails, these things are genius.

25365846284_dc3575b4d4_c.jpg


25365846644_60638bb35e_c.jpg


25903582261_e4d914a6af_c.jpg
 
Indel-B Hinge Flip Mod

I wasn't satisfied with how the Indel-B fridges open up, since it's really difficult to open inside of the car on account of the lid opening. By doing this mod, I flipped the hinges so the lid opens up sideways vs. lengthwise. Now you can open the fridge from the passenger seats, and it will allow you to open the fridge with less clearance between the top of the fridge and the headliner. You should be able to do this mod with any of the fridges (ARB, National Luna, Edgestar, etc.).

You start by removing the handle. Take a screwdriver and move the spring loaded rod to the left.

25369812603_7ac74f617e_c.jpg


Closer view of the spring loaded rod to see what you need to push against.

25998560895_325d344a92_c.jpg


Next, on the left side of the hinge, take a small paperclip or something similar and push against the hole in the hinge to release it. It will need to be somewhat solid, so a smaller paperclip might not work but a larger one will. I used a gun cleaning pick.

25972638776_1cb2e64dea_c.jpg


Hinge should come off now

25698004740_59d0d94d52_c.jpg


Marking and drilling to mount the new hinge hardware

25972641906_06361140d1_c.jpg

25698007100_7b927bcdf6_c.jpg

25877782472_de3d561733_c.jpg


Dremel out a small section of the handle to prevent the handle from locking the lid

25877784152_4f58243d5a_c.jpg


Fridge now opens sideways! Don't forget to relocate the limiting strap.

25369819953_610ff26381_c.jpg
 
Electrical/Solar Setup (continued)

Renogy 100W Solar Setup

So I wanted to add that I'm running a Renogy 100W solar suitcase to power my single battery setup, which in turn runs my Indel-B fridge and charges other small electronics (i.e my iPad, camera batteries, etc.). I'm getting about 6+ amps per charge in direct sunlight, which equates to about 60-70 watts. I tested this setup over the weekend on my recent Joshua Tree trip, and my battery never dipped below 12.5V the entire weekend.

Here's a link to the panel I have:
http://www.amazon.com/Renogy-Watts-Monocrystalline-Foldable-Suitcase/dp/B00HR8YNK6/

The nice thing about the Renogy Solar Suitcase is that it packs down nicely into a soft protective cover which makes packing it easy. Also since the charge controller is already mounted inside the solar panel, it negates the need for additional controller. You could run a MPPT solar charge controller for better charging, but the included one works just fine for me.

25989110266_3cbe2b770c_c.jpg

25920091381_7ef9fa4b8a_c.jpg

25382305104_f74230bf53_c.jpg


Solar panel in action

25345842074_b3a61071c9_c.jpg
 
Last edited:
A few friends and I took a camping trip out to Joshua Tree NP to link up with another group from Socal that was there the same weekend. We ended up getting a nice primitive site about 30-45 minutes from the gates, and avoided most of the crowds that were there over the weekend.

Leaving San Jose.

25678017800_689cd6b4c6_c.jpg

25883617471_60c370e56b_c.jpg

25345866654_7e2aca748d_c.jpg


Ran across this sweet Unimog that had literally been all over the globe. Spotted at the local Walmart.

25883598121_e3233d3b1b_c.jpg


Set up camp. I had a couple friends with me who used the ARB awning + room as their sleeping quarters, which ended up being pretty useful. Got to use the solar setup.

25349764323_0dc9006145_c.jpg

25345842074_b3a61071c9_c.jpg

25857698912_065e7f6098_c.jpg


Night shots

25952570206_51b1e632b6_c.jpg

25978449025_130bbc9f2e_c.jpg


Linked up with the rest of the "small" group the next morning

25343464384_16375806e0_c.jpg

25677873560_660a7843eb_c.jpg

25857542212_e51fef3358_c.jpg

25677746150_28e0583d4a_c.jpg

25883315101_1c8937385e_c.jpg
 
Last edited:
Did a few trail runs

25978378255_f1e8660db2_c.jpg

25883422881_3dbfb95b3b_c.jpg

25345711514_64c422331d_c.jpg

25883442111_fa2bc80878_c.jpg

25677857290_d9820a4450_c.jpg


Someone busted a tie rod.
25978311945_31cf656225_c.jpg


Went shooting on some BLM land and found some cool classic cars to shoot at.
25857520442_14aaec378f_c.jpg

25883356411_6aa74eaf75_c.jpg

25978297455_e72756ac5d_c.jpg


Some shots of Alex's cool expo Tacoma build.
25677725500_e3ea6cfce6_c.jpg

25952390986_741cc8d270_c.jpg

25349563473_5e4e903d0d_c.jpg


Group photo of the crew
25349512473_0c224da836_c.jpg
 
Last edited:

Members online

No members online now.

Forum statistics

Threads
278,306
Messages
3,554,045
Members
248,016
Latest member
Advally Service

Trending content

Back
Top