What about a Daystar 1" front and 1.5" Rear?

From reading this I think I will get my shop to do the rear spacers.
However, I am actually fine with how it sits w/o the rear spacers now.
Is there a way to adjust the headlights down? I think I am blinding everyone after the front spacers went in

i had that same problem untill i raised the back... LOL
 
Back-up Light Mod Complete

Well, the back-up light mod is done. We ended up putting the switch and relay in the read upper corner of the storage compartment. The relay was $18 at Outozone, seemed high but had to get moving. We took the 12V from the lighter accessory in the back. I'll have to run a wire from the battery if I want to go to 100w bulbs. I figured this wasn't a bad place for the switch. If I am unhooking my camper at night, I'll just reach in and flip the extra lights on while disconnecting.
I had help from my buddy, I think we did more BSing than working lol

I got the rig down off the jack stands for the first time. The lift is perfect, just what I was after.
I'll get final dimensions tomorrow and finish my write up. Have to go clean up all the tools in the garage.
Best regards, Doug
 
Newbie Notes with Pics

Rear Daystar 1.5” Install – Newbie Notes
2008 SR5, V-6, 4x4, no Xreas
Sorry, I am not sure how to get pics in between paragraphs.
These were the instructions I was working with

REAR: very easy! Much easier with 2 people and the supplied Daystar instructions are suffice
1, Jack up rear end, jackstands in front of rear wheels on frame, wheels off. Place jack under center of rear axle
2, Disconnect lower shock bolts, pry off shock, don't be scared
3, Disconnect pan-hard bar (not sure why its called that), I only disconnected the bolt attached to the axle
4, Drop rear axle, take out springs and inverted cone bump stop thing, put rear spacer on spring, pry back in, tighten everything back up.
DONE!

Newbie Notes My Experience: Apply rust convertor and spray paint along the way.
1. 2 People or wife to help at one point just to hold bottle jack from falling.
2. Remove spare tire.
Place jack under differential and jack up vehicle to relieve weight from wheels, break lug bolts loose and finish jacking until wheels are about 2” off the ground. Remove wheels.
3. Place jack stands on each side of frame in front of rear wheels.
4. Let jack down until jack stands are engaged well, car should be very stable, check each jack stand for stability.
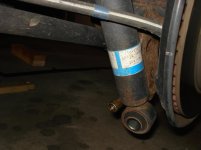
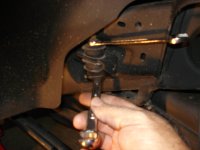
5. Disconnect shock and link arms both sides. Pics 1-2

Lower jack to let the axel droop, keep jack under diff just to support at lowest point.

At this point I did not disconnect Pan Hard Bar.

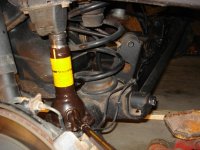
Place 2nd bottle jack on Driver side between bump stop and axel. Start turning jack by hand pushing the axel down. pic 3
Keep an eye on flex brake lines attached to axel. I pushed axel down until those were tight. This is where 2 people help, one jacking, one watching all lines.

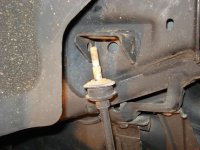
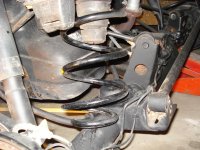
When you are down enough, your link arm bolt will be out of the bracket as seen in picture #4 and the coil spring should be easy to move and pull out.

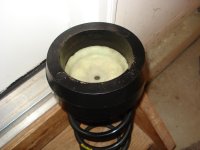
Assemble coil spring with bump on top of spring 1st, then spacer goes on top of that. pic 5

Now comes the fun part. Slip spring assemble into place while other person holds bottle jack. Squeezing it in there will flex the axel down more and you will likely loose pressure on jack. If someone else is not holding bottle jack it will likely fall. Try to get close like in picture #6. This is the position at which prying will take place to get the assembly in.
If you need to, move jack from under differential to under axel closer to opposite side.

At this point, put pry bar between axel and 2nd coil of spring and compress the spring onto the mount stay. It doesn’t take an enormous amount of force to get it up and over the hump. You may take bottle jack out of the way for this procedure. Spin spring around so that the end of last coil is against the recess stop on the bottom axel mount.
If you just can’t get it in, you may have to disconnect Pan hard Bar, it will be a pain to get aligned back up to replace bolt. The Pan Hard Bar is disconnected in this picture at the axel. You can see you get a little flex out of that, but others have done it without disconnecting.
After you pry spring into position, I put bottle jack under this side and jacked it up. Watch the link arm to make sure it goes into hole on bracket as your raising axel. Once aligned with shock, I tapped on shock with a mallet and installed shock bolt. Guide link arm into bracket, attach nut and tighten. The passenger side will be easier and there is more room to work.

Repeat procedure on passenger side. I was able to get passenger side out by myself and put it back in by myself. I used bottle jack to push axel down, but I could then remove jack and push down axel and pry spring assembly with spacer in with jack removed.

Remember to spin coil until end of last coil is against stop in lower mount. Jack everything up and connect shock and link arm.

Pan Hard Bar:
If you disconnected the pan hard bar, it will likely not be aligned to put bolt back in.
You need to push or pull axel towards passenger side to align pan hard bolt. Strap connected to frame on passenger side and axel near bolt location got me close, but I was still about 1/8” off.
I measured from garage base foundation to center of spindle (between lug bolts) on driver side. Measure the length of bottle jack. I cut a piece of 2x4 to this length.
Place 2x4 against solid wall, place bottle jack between 2x4 and spindle. Turn jack by hand until everything will hold itself.
I now would turn the bottle jack 1 turn and check alignment. Continue 1 turn at a time until bolt goes in, Bingo! Your now ready to tightened everything up and torque.

This procedure can probably be done several ways, but this is how I did it.
Doing the lift and painting as I went, eating, corresponding with forum members for advice took me about 10 hours.
Final before and after pics coming today.
As always, allow plenty of time, patience, confir with forum if you get stuck.
Best regards, Doug

 

Attachments

  • Shock Dosconnect.jpg
    Shock Dosconnect.jpg
    123.5 KB · Views: 335
  • Link Arm Disconnect.jpg
    Link Arm Disconnect.jpg
    112.1 KB · Views: 332
  • Push Down Axel.jpg
    Push Down Axel.jpg
    131.2 KB · Views: 331
  • Link with Axel Down.jpg
    Link with Axel Down.jpg
    135.5 KB · Views: 334
  • Bump Spacer Correct.jpg
    Bump Spacer Correct.jpg
    117.5 KB · Views: 336
  • Spacer Ready To Pry.jpg
    Spacer Ready To Pry.jpg
    139.1 KB · Views: 332
Last edited:
Lift Final Pics Dimensions

Ok, final results.
Dimensions front before lift = 18.75 After = 21.0
Dimensions rear before lift = 21.50 After = 23.0

Dimensions are same from side to side :jump:

Alignment today at 1:30 and I am all finished!

Pictures before and after lift.

Best regards, Doug
 

Attachments

  • Before Lift Front Side.jpg
    Before Lift Front Side.jpg
    132.6 KB · Views: 324
  • Lift Final.jpg
    Lift Final.jpg
    137 KB · Views: 326
Glad you got her all done. Looks great! Congrats! I think it looks so much better than that before picture! :bravo:
 
Zero Camber at Alignment

I just came back from the alignment at the dealer. There was a note on the invoice that said "Alignment 2.00 performed an alignment note that caster adjustment is at maximum and vehicle has 0 camber due to lift may affect high speed stability on turns"

Is this normal cya stuff? Seems like some people talked like their alignment only changed 0.5 degrees? Just wondering.

Thanks Doug
 
Last edited:
Next time you get it done go to firestone. They have a lifetime allignment for $165. I've had two done in the last two months. Sounds like dealer is covering ther a**. Firestone got mine in spec and I'm an inch taller than yours with the fj springs and shocks. I'm sure it will be fine. Did they print out the before and after numbers for you ?
 
Next time you get it done go to firestone. They have a lifetime allignment for $165. I've had two done in the last two months. Sounds like dealer is covering ther a**. Firestone got mine in spec and I'm an inch taller than yours with the fj springs and shocks. I'm sure it will be fine. Did they print out the before and after numbers for you ?

No, I wasn't able to get any numbers. I stopped in to talk with the service manager, when he called for the tech that did the alignment he was already gone. The dealer was only $79, I didn't think that was bad. I don't expect to do multiple lift changes. Thanks, Doug
 
80 x 2 _160 just saying. You may hit a curb or rock or change tires. Oh bye the way the rig looks good. It's a good feeling to do it yourself. And you learn a lot
 
Last edited:
Alignment Verified in Spec

FYI,
Just got back with the tech that did my alignment Saturday. Evidently he was able to get my alignment back to specifications, just wasn't much adjustment left. Everything seems to be working fine, handles well on the expressway etc. Best regards, Doug
 
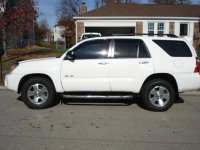
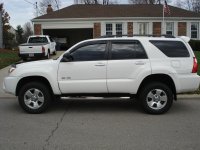
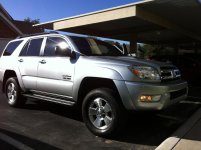
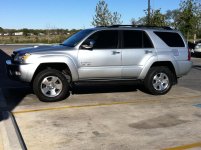
Finished the work today, added FJ coils on the front and rear, the Daystar spacers on the front only, and the firestone bags for towing. Also added the front FJ Bilsteins. It sits almost level, it is about .25 to .5" higher in the rear.

Got it aligned this afternoon.

WOW, what an improvement over the stock 4runner coils. I have always enjoyed the ride, it's been a smooth drive so far... but the added stiffness, especially on the highway or in turns, is fantastic. Still super smooth but the coils are a huge difference!!

Now I just need tires.
 

Attachments

  • 4Runner Lift.jpg
    4Runner Lift.jpg
    131 KB · Views: 285
  • 4Runner Lift 2.jpg
    4Runner Lift 2.jpg
    135.7 KB · Views: 289
Last edited:
Finished the work today, added FJ coils on the front and rear, the Daystar spacers on the front only, and the firestone bags for towing. Also added the front FJ Bilsteins.

Got it aligned this afternoon.

WOW, what an improvement over the stock 4runner coils. I have always enjoyed the ride, it's been a smooth drive so far... but the added stiffness, especially on the highway or in turns, is fantastic. Still super smooth but the coils are a huge difference!! Pics to follow.

Great, sounds like you're very satisfied. Looking forward to the pics. So the ride is smmoth and not bumpy? What specer did you put on the front? Can you get some dimensions of your resulting lift change? Thanks, Best regards, Doug
 
Doug,

Ride is still very smooth. I don't know how to explain the difference, but it didn't really change the smoothness of the ride, but the ride feels more firm. It got rid of the lean and flex so it doesn't feel like it's floating down highway when going over dips, etc. Feels much better now. I'm sure the FJ Bilsteins help as well, they soak up the road noise.

I didn't take measurements before starting... totally forgot to. I will get some measurements tomorrow of where it is now.

Eventually I'd still like to add the superflex to the rear, and I think that'll give it the perfect look. We're on a pretty tight budget, so for the cost, I couldn't have done any better for now.
 
Flynn,
It looks really good. How difficult was the coils to get it? I am thinking not much different than getting stock with 1 1/2" spacer. I think A_S_R's pictures show them about 2" taller.
Did you get a set of FJ coils used from someone changing their FJ?
I understand the budget thing :-). I'll have to keep my eye out for some FJ's and try them out.
Thanks again for the update. Doug
 
Doug, pic doesn't show for me, but I'll take a stab at it. The fj coils are only slightly taller than stock, hardly noticeable. The pics I've posted on here where the coil its about 2" taller is comparing fj coils to my current ome 885s.
 

Members online

Forum statistics

Threads
278,315
Messages
3,554,125
Members
248,016
Latest member
Advally Service

Trending content

Back
Top