What did you do to/in your 5th Gen today?!

Can you pm me how you made the brackets ???

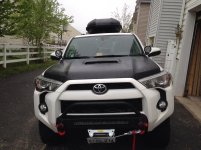
I have a pair of TRED's that I want to mount....


Looking at your thread you have the Gobi rack so I am not sure how my method would work on your rack. TRED does make a mounting system for them I believe.

I jused the following:

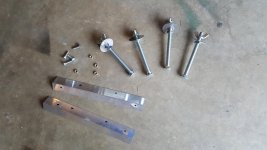
1-1/4" aluminum angle, cut to TRED width. One for the front holes and one for the rear holes.
4x 1/2 x 6 carrier bolts
4x 1/2 nuts
4x 1/4 carrier bolts
4x 1/4 washers
4x 1/4 nuts
4x SS 1/2 washers
4x 1/2 wingnuts

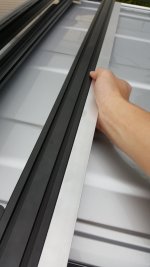
I put the aluminum angle against the crossbar slot, measure and mark. Drill my two holes. Do this for both angle pieces.

The 1/4 carriers bolts slide perfectly through the crossbar slots. Put my freshly drilled angle piece onto the two bolts per bar. Screw the nuts on to secure the brackets then place TRED on top, mark the holes. Then take 1/2" drill to make your holes. Slide your 1/2x6 bolt and tighten nut and put it back onto the bar. Put washer, nut, tighten and repeat for the other bar.

If you have everything measured right the TRED holes will line up perfectly.
 
Looking at your thread you have the Gobi rack so I am not sure how my method would work on your rack. TRED does make a mounting system for them I believe.

I jused the following:

1-1/4" aluminum angle, cut to TRED width. One for the front holes and one for the rear holes.
4x 1/2 x 6 carrier bolts
4x 1/2 nuts
4x 1/4 carrier bolts
4x 1/4 washers
4x 1/4 nuts
4x SS 1/2 washers
4x 1/2 wingnuts

I put the aluminum angle against the crossbar slot, measure and mark. Drill my two holes. Do this for both angle pieces.

The 1/4 carriers bolts slide perfectly through the crossbar slots. Put my freshly drilled angle piece onto the two bolts per bar. Screw the nuts on to secure the brackets then place TRED on top, mark the holes. Then take 1/2" drill to make your holes. Slide your 1/2x6 bolt and tighten nut and put it back onto the bar. Put washer, nut, tighten and repeat for the other bar.

If you have everything measured right the TRED holes will line up perfectly.
I did not know if they had a mounting bracket for a GOBI; I'll check it out.

I wanted to mount these on the side of my rack; on the passenger side. That until; I get my rear bumper. Then I'll move them there permenantly...

If I can't find a mounting bracket for these... I'll copy your mounting solution & modify it so I'll mount it on the side of my rack.
 
I did not know if they had a mounting bracket for a GOBI; I'll check it out.

I wanted to mount these on the side of my rack; on the passenger side. That until; I get my rear bumper. Then I'll move them there permenantly...

If I can't find a mounting bracket for these... I'll copy your mounting solution & modify it so I'll mount it on the side of my rack.

I haven't seen a Gobi personally but I'm sure you can build something. Maybe some type of U bracket that can hang off the side of the rack tube then attach a modified version of my bracket.
 

Attachments

  • 20160428_171718.jpg
    20160428_171718.jpg
    137 KB · Views: 731
  • 20160427_181148.jpg
    20160427_181148.jpg
    116.7 KB · Views: 741
Installed CBI A-pillar brackets and VisionX Light Cannons. Simple install and looks great.
 

Attachments

  • image.jpg
    image.jpg
    135.3 KB · Views: 892
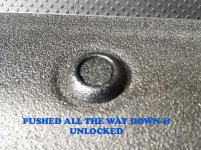
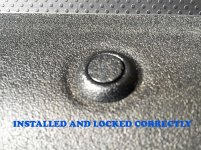
Repositioned my Hella horns for more volume and, at the same time, figured out how to remove these clips in the cowl panel above the radiator without using a sharp pointy object and how to make sure they're locked in snug instead of rattling around loosely in the trim.:thumb:

Though this is probably common knowledge, if you press them down so they are recessed like the first picture, the cowl panel and clips will lift off. Of course, you have to later press the nail portion back up into the clip for reinstall. Then as you put them back in, only push the nail down until the first click, flush with the top of the clip like in the second picture. This puts maximum expansion on the clip to hold everything in place.

I hope you all are as amazed as I was. :lmao:
 

Attachments

  • IMG_6593.jpg
    IMG_6593.jpg
    135.5 KB · Views: 716
  • IMG_6592.jpg
    IMG_6592.jpg
    134.6 KB · Views: 731
Image1461969507.898410.jpgAdded this to my truck today.


Sent from my iPhone using Tapatalk
 

Attachments

  • Image1461969507.898410.jpg
    Image1461969507.898410.jpg
    94.3 KB · Views: 822
What's taking you so long? It didn't take me very long to knock it out and I suck at electrical.

Btw, runner looks great.

I've had some things that have kept me from having the time to do it. We're going to do it next week, mounting the ARB wiring kit into the left "box tray" that goes above the wheel well in the rear. Drivers side to avoid extra routing of wires.
 
I've had some things that have kept me from having the time to do it. We're going to do it next week, mounting the ARB wiring kit into the left "box tray" that goes above the wheel well in the rear. Drivers side to avoid extra routing of wires.

Just in case you didn't know, you do need to take the bottom B pillar panel off. There are some fragile areas under that panel and I wouldn't suggest just trying to push through under. Otherwise it's easy, and as stated above, I suck at electrical!
 
Just in case you didn't know, you do need to take the bottom B pillar panel off. There are some fragile areas under that panel and I wouldn't suggest just trying to push through under. Otherwise it's easy, and as stated above, I suck at electrical!

B-Pillar being where the driver's seatbelt anchors? is removing that pillar cover tough?
 
Where in the rear are you looking to place a constant hot 12V?

You know those useless trays that sit above the wheel wells in the rear? I'm going to put it on the driver's side tray. Since that pops out with a trim tool, we can route it down through the kick panels, B-Pillar, and out through the firewall.
 
Got my T4R.ORG sign!

My T4R.ORG sign arrived in the mail today, so I put it on the rear window. I ordered two of them, one in silver and one in white, so I could decide which would look best. I picked the silver:

IMG_0249.jpg


IMG_0250.jpg


I also added a RiffTrax sticker to the rear hatch. :) I put the sticker on flexible magnetic sheet and trimmed it to shape. This way the sticker won't mess up the paint, and I can move it or replace it when needed:

IMG_0251.jpg
 

Members online

No members online now.

Forum statistics

Threads
278,317
Messages
3,554,129
Members
248,016
Latest member
Advally Service

Trending content

Back
Top