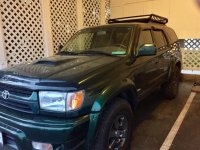
What Did You Do To Your 3rd Gen Today?

Status
Not open for further replies.
I changed the timing belt, water pump, thermostat and drive belts on my 97 today. Overall was about an 9 hour job start to finish. First time ive dine it and it went very well
 
Since I just bought it 2 days ago, I've been wrenching on it every night after work when I get home. Today I soaked all the bolts I'll be removing in the near future in PB Blaster again, and I removed the rusty/broken rear hatch handle/bracket, and pulled some dents out of the rear hatch.
 
Since I just bought it 2 days ago, I've been wrenching on it every night after work when I get home. Today I soaked all the bolts I'll be removing in the near future in PB Blaster again, and I removed the rusty/broken rear hatch handle/bracket, and pulled some dents out of the rear hatch.

How did you pull the rear hatch handle? The brackets for mine are rusty and I want to clean them up but I'm going to have to take the whole license plate bezel off to get at them and based on searches here that looks like a pretty involved process.

How did you pull the dents? I've seen some amazing Youtube videos of guys banging them out from the inside.
 
It is a little bit involved but nothing that you can't tackle, or should pay someone to do.
1.Remove the inner trim panel on the hatch. (Has 10mm bolt for strap under cover, and red clips to hold in the rest of the piece.)
2.Then remove center black metal cover. (10mm bolts again, and 4 white clips). I let it hang with a bungee cord taking the weight of the metal cover so I didnt put stress on the wire harness.
3.If you look just past the white plastic dust shield on the hatch window regulator (you'll see it when you take off that black panel), you can see the 2 10mm nuts holding on the handle bracket. I was able to reach them with a long extension, and socket. Remove those nuts, and the bracket will slide off inside the door.
4.The handle piece will stay with the plastic license plate surround, and plate lamps assembly, and that has 4 clips that just pop off.
5.Remove handle from plate trim. Then install in reverse order.
I am planning on taking some more pictures for illustration purposes, or doing videos for all of my upgrades, and repairs on this thing so maybe that will help.

As far as the dents. It's cold where I am in the midwest. So, I used a heat gun to lightly warm the area of the dent so I didn't crack the paint when I was massaging the metal back into place. An important tip is to start from the outside of your dent, and work your way in. I used a combination of body hammers, and a generic glue gun style dent popper so it would not mess up my paint. If you search youtube there are tons of good videos out there on paintless dent removal!
Good luck with yours!
 
I changed the timing belt, water pump, thermostat and drive belts on my 97 today. Overall was about an 9 hour job start to finish. First time ive dine it and it went very well

Did you use factory Toyota parts? If so where did you purchase? I need to do mine, and found a kit on Amazon for $300. Or did you go aftermarket from auto parts store? Just curious if the aftermarket stuff from dayco and the like are worth saving the $ or not. Thanks.
 
Did you use factory Toyota parts? If so where did you purchase? I need to do mine, and found a kit on Amazon for $300. Or did you go aftermarket from auto parts store? Just curious if the aftermarket stuff from dayco and the like are worth saving the $ or not. Thanks.


I went with all factory Toyota parts. I got them from my local dealer, who I get wholesale pricing from. TB, WP, Therm, 3 drive belts, Tensioner, Tensioner Pulley, Coolant.
I would fully recommend going w/ Toyota parts on these items.
 
I went with all factory Toyota parts. I got them from my local dealer, who I get wholesale pricing from. TB, WP, Therm, 3 drive belts, Tensioner, Tensioner Pulley, Coolant.
I would fully recommend going w/ Toyota parts on these items.

Cool, I thought so. Thanks for the info. I'll go with this then.

https://www.amazon.com/Genuine-Toyota-Timing-Aisin-Engines/dp/B00I0Z14AW

Pricing seems legit. My local dealer wanted $500 just for timing components, and that was with my commercial discount.
 
:hail: Your wish is my command

I measured 2 inches down from the bumper until it begins to curve around the front and used my trusty Harbor Freight body saw. Cuts like butter
Electric Body Saw

I cannot explain why, and it makes me feel weird... but your valance is kinda getting me hot.

If its just cut off like that, then there's just that plastic/rubber front edge and open below/behind? My OCD is going "No, it needs to fold under like it used to, even if it looks way better!" But I also can't think of a reason it really should.

Damn, I may have to try that. Mine's cracked in the middle and I want to replace it anyway, may as well experiment, because that looks awesome.
 
Replaced upper and lower BJ's, Inner and outer Tie Rods, and replaced/adjusted the steering rack guide.

Man does it ride nice now and boy does it suck doing all that in freezing weather.
 
Just got a call from Relentless. My bumper is done. I'll be picking it up sometime this coming week. Pretty stoked.

I decided to not have turn signals cut in to the bumper. My plan was to add some led light bars under the headlights where the filler panel is then wire them to the drl and turn circuits. So my question to anyone who's done the same is what brand did you go with and how was the fit?
 
Just got a call from Relentless. My bumper is done. I'll be picking it up sometime this coming week. Pretty stoked.

I decided to not have turn signals cut in to the bumper. My plan was to add some led light bars under the headlights where the filler panel is then wire them to the drl and turn circuits. So my question to anyone who's done the same is what brand did you go with and how was the fit?

https://www.srqfabrications.com/product-page/filler-light-bar

You could always wait for those, since I believe they said they're pretty close to done. There's a thread for them somewhere in this section.
 
https://www.srqfabrications.com/product-page/filler-light-bar

You could always wait for those, since I believe they said they're pretty close to done. There's a thread for them somewhere in this section.

Thanks for the heads up. That could work if they get them ready for production in the next week or so. Lol. Basically exactly what I'm planning on doing with a small led light bar. I'll give then a call when I get back from vacation Monday.
 
I cannot explain why, and it makes me feel weird... but your valance is kinda getting me hot.

For some reason this makes me hot

6047_bb57.gif
 
Added a cheap Rola rack today and 99 tail springs in the rear to level out the stance.
 

Attachments

  • File_004.jpg
    File_004.jpg
    137.4 KB · Views: 410
Bilstein does not provide the needed grommets and washers for their fronts. They actually expect you to use your old worn out crap. WTF???? TOTAL BULL CRAP!!! No one else does that and they charge top dollar for their stuff. Knowing what I know now....for my situation...if I was doing it over...I would have gone Rancho or KYB.

I had a totally different experience. I ordered the Tundra 5100s and it came with everything, even the zip ties for the boots. All grommets, washers, nuts, etc. This might be because I ordered the 24-261425, not the 24-188265. Maybe the difference in part number is why it comes with the extra stuff, I don't know. I ordered mine from Amazon, but found out a couple days after the they are priced about $15 cheaper from Summit Racing. They have the best price I've seen by far, plus free shipping. YMMV
 
Status
Not open for further replies.

Members online

No members online now.

Forum statistics

Threads
278,316
Messages
3,554,120
Members
248,016
Latest member
Advally Service

Trending content

Back
Top