What Did You Do To Your 3rd Gen Today?

Status
Not open for further replies.
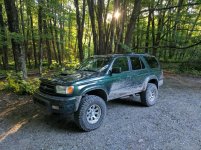
Did some painting this weekend and got my satoshi grille mod on. I painted the grile the same color as the rear license plate bezel but might go green to match the car.

Rear license plate bezel finish was damaged so I removed and repainted the outer section and re glued the gasket.


What did you use to repaint the bezel? Is it matched to the old bezel colour? Mine could use some sanding and a re spray.
 
Welded 3" seat bracket extensions with a skilled buddy's help. I'm 6'4" and this made a HUGE difference in comfort on a recent long road trip.

Front bracket
H3qZ1AM.jpg


Rear bracket
vj2doP0.jpg


Painted, trim installed, scooted all the way back (can barely reach the clutch pedal from here!!)
89s0Iox.jpg
 
Custom plate bumper, cali raised pods with cbi ditch light brackets, cali rasied spots in bumper, custom adjustable panhard bar, 8 wraps and bent rear brake like bracket. Need to stop being lazy and install toytec extended ss brake line and extend the bumpstops!

Next on the list: TBU and rebuild rear brakes with [MENTION=120071]mtbtim[/MENTION] and [MENTION=102606]infamousRNR[/MENTION]!

Looks great! Hope you like the pods.. Let us know if you need anything else.
 
What did you use to repaint the bezel? Is it matched to the old bezel colour? Mine could use some sanding and a re spray.

I used the PerfectMatch parts store paint and clear coat; it's pretty close in color but not perfect. I think the Toyota color is called Graphite Metallic.

There is a Chevy color that is pretty close too, not as warm tho.

IIRC, the grille, rear licence plate bezel and hood scoop are all this color on the SR5 Sport, which is what mine is.
 
Accepted some shiny new parts from RockAuto!! I'm super excited! This kits has probably got to be the best price for all new (remanned) TBU parts.

Handling the rotor and caliber in person and these parts feel HUGE! Can't wait to get my brakes changed out.

I'm a little skeptical about the cross drilled and slotted rotors... I understand their value in racing applications but have heard they will develop heat cracks and whatnot between the cross drilled holes over time.

XURk58Bh.jpg
 
Last edited:
Welded 3" seat bracket extensions with a skilled buddy's help. I'm 6'4" and this made a HUGE difference in comfort on a recent long road trip.

Front bracket
H3qZ1AM.jpg


Rear bracket
vj2doP0.jpg


Painted, trim installed, scooted all the way back (can barely reach the clutch pedal from here!!)
89s0Iox.jpg

Why not just drive from the back seat, Hightower Style? Probably would've been easier.
 
When I had the front seat out it definitely occurred to me.

Funny Story: I have a troop that is 6'7. When we convoy he sits in the back of the Humvee with the front passenger seat out and his feet on the dash. Good navigator, and he clears my right and can reach the cooler easy as well!
 
Finally painted my center caps....looks so much better!

<a data-flickr-embed="true" href="https://www.flickr.com/photos/150426074@N06/35990340012/in/dateposted-public/" title="Busted"><img src="https://farm5.staticflickr.com/4293/35990340012_cc709267ce_c.jpg" width="450" height="800" alt="Busted"></a><script async src="//embedr.flickr.com/assets/client-code.js" charset="utf-8"></script>

And then had this happen when a semi passed drove by in the opposing lane this morning...must have been cracked but I had never noticed... Looks like it will be coming off and I will finally address my oxidized hood paint.

<a data-flickr-embed="true" href="https://www.flickr.com/photos/150426074@N06/36025381101/in/dateposted-public/" title="Busted"><img src="https://farm5.staticflickr.com/4319/36025381101_2da29a7ecf_c.jpg" width="800" height="450" alt="Busted"></a><script async src="//embedr.flickr.com/assets/client-code.js" charset="utf-8"></script>
 
First Entry

Hi all,

First entry in this thread, though I've had my 4Runner now for about a month. I've done some stuff to it so far, though nothing crazy:

-Inside LED conversion
-High stop light and reverse light LEDs
-New double DIN head unit with bluetooth (need my podcasts!)
-Fashioned new rear driver's seat brackets to put the back of the driver's seat on the floor, practically (much more comfortable now!)
-Replaced rear hatch struts
-Of course, a thorough cleaning
-And today, I wired up the secondary antenna and put a switch on the dash for the electric, obnoxious one

I have almost everything I need for a complete fluid change: differential, transfer cases, transmission, engine oil. After that I'll feel much more comfortable driving it around all the time.

EDIT: Just realized this is my second post, so apparently I just suck at keeping up!
 

Attachments

  • IMG_20170626_192831.jpg
    IMG_20170626_192831.jpg
    139.9 KB · Views: 451
Last edited:
Trusty rusty got some new shiny bits installed.

gzWyDs2h.jpg


Don't need to worry about trimming the dust shields... hah Passenger side had fallen off long ago.

Bj5XtVJh.jpg


Flushed and bled the brake system with a suction pump and replaced with DOT4. Flushed and bled the clutch as well. Boy that was some dirty fluid.

Went for a nice hour long drive to properly bed them. Not a big different in pedal feel (a good thing lol), perhaps a tiny bit more travel but they seem to grab really well!
 
I think this qualifies, since this was on my 4Runner when it got broke. Anyway, always wanted to learn to "weld" plastic and had needed to many times in the past so finally ordered one. Basic $18 kit on Amazon:

20170725_171128 by psraff, on Flickr

This crack was formed somehow, someway on the back of my Lightforce 170s. It filled full of water but never burned out. Too bad the housing weren't as strong as the lens covers (videos of them shooting them with a shotgun).

20170725_170751 by psraff, on Flickr

Anyway, watched a few videos... Welded the two sides of the crack together towards each other:

20170725_171831 by psraff, on Flickr

Now, I messed up. I used the filler sticks that came with the kit. Those are soft and don't harden up so when you sand them they turn to a booger. So I had to clean that up and find a hard plastic to use as a filler:

20170725_181651 by psraff, on Flickr

If I would've used hard plastic right off the bat for a filler it would have came out much better. But not that bad for my very first time (pics do make it look worse then what it really is). Plus, these aren't going back on my 4Runner. I was going to put on my daughters Jeep, so.... :naughty::naughty:

Once you get this down, this is faster then waiting for JB Weld to dry and if done right I would bet it's stronger since you're making the crack disappear not just covering it up. (Though I have no scientific or voodoo magic evidence to back that statement up, just my gut feeling).
 
I think this qualifies, since this was on my 4Runner when it got broke. Anyway, always wanted to learn to "weld" plastic and had needed to many times in the past so finally ordered one. Basic $18 kit on Amazon:.

I didnt even know that was a thing – a plastic welder. Now I want one.
 
I didnt even know that was a thing – a plastic welder. Now I want one.

It's kind of fun to do. I was going to do another layer of filler and sand it again to smooth it out more but I was waiting for a txt msg to go look at a drill press I found on FB for sale. May do more tomorrow though.
 
yeah, its actually a old thing believe it or not. A lot of body shop guys fix bumpers like this, by welding plastic back together

And that was exactly the video I was watching to teach myself how to get the basics. He was doing the plastic bumper. Which is where I got the idea for scrap hard plastic for filler instead of the sticks that came with the kit. Guess those are for pliable plastic.
 
Cool [MENTION=28808]psraff[/MENTION]!! That looks like a handy item and skill to have in the old toolbox. Looks like a good fix to me.
 
Haven't done it yet, but I'm picking up a used set of tires & wheels tonight.

I bought my rig with 285/75R16 Treadwright Retreads (BFG KM cores) on factory Limited 16" wheels and 1" All-Pro spacer/adapters. I absolutely love the stance and look, but honestly, it's a little "much" for the light duty I put my 4runner through.

So I came across these on Kijiji and am snagging them up for 600$.

They're ETS TrailMaster M/T Remolds in 265/75R16 on factory Limited 16" wheels. I'll be giving the wheels a quick wirewheel and paint to give them a face lift as well as getting them balanced. I'll try running them on my adapters at first, so if that works out I can at least keep a bit of that stance, but the main goal is/was to have the option of ditching the spacers, which I am not currently able to do with my tire/wheel combo. I also just want the 4runner to be a little bit more daily driver friendly, even though I'm sticking with an aggressive M/T.

Anywho, I'm stoked to get these home. And the best part is that I can still keep my 285's for trail days if need be.
 

Attachments

  • IMG_9139[1].JPG
    IMG_9139[1].JPG
    53.6 KB · Views: 457
  • IMG_9140[1].JPG
    IMG_9140[1].JPG
    76.5 KB · Views: 467
  • IMG_9141[1].JPG
    IMG_9141[1].JPG
    84.9 KB · Views: 460
Status
Not open for further replies.

Members online

Forum statistics

Threads
278,316
Messages
3,554,120
Members
248,016
Latest member
Advally Service

Trending content

Back
Top