What Did You Do To Your 3rd Gen Today?

Status
Not open for further replies.
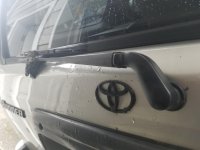
I replaced my rear wiper motor so I can actually have a rear wiper now. My life has come full circle as I can now use my rear wiper.
 

Attachments

  • 20180216_112123.jpg
    20180216_112123.jpg
    108.8 KB · Views: 374
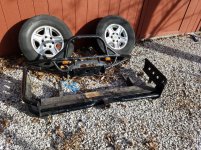
So I didn't get the Sport hood like I was hoping. That's ok though. I found something WAAAAY better. Not a S/C, but almost as good. I'll put up pics tomorrow after I get the other half of it, but let me say this.... it's the score of my life.

Addicted Off-road front and rear bumpers. 33 bucks for the front, 29 for the rear. Couldn't believe it. Need some paint but that be easy.
 

Attachments

  • 20180216_153852.jpg
    20180216_153852.jpg
    142.8 KB · Views: 473
Addicted Off-road front and rear bumpers. 33 bucks for the front, 29 for the rear. Couldn't believe it. Need some paint but that be easy.

Nice find! I thought I got a killer deal when I got my Addicted Offroad front bumper used for $350 or so
 
Got to change my fuel pump today. It wasn't as bad as everyone made it out to be. Took like 2 hours start to finish, alone, and my neighbor walked over and chatted for a few minutes.

R0zRwbmh.jpg


n2nw0GOh.jpg
 
Got started on valve cover gaskets and radiator last night. IMG_20180215_180009340.jpg

Bella was home from school today (teacher work day) Decided to do some herself. Managed to remove the intake manifold. Not to many 15 year girls or boys will mess with this stuff these days. We got the covers off when I got home.

For the bad part. Gaskets have been done before, no evidence of RVT or FIPC where they were supposed to be. And i almost didnt need a ratchet to remove the bolts, very loose. makes me wonder who was working on it. I think while I have the radiator off I should check the timing belt. Supposedly recently done.
 

Attachments

  • IMG_20180215_180009340.jpg
    IMG_20180215_180009340.jpg
    124.4 KB · Views: 476
And i almost didnt need a ratchet to remove the bolts, very loose.

Keep this in mind when you are putting them back on. These need very little torque. Too much and you will crack the cover. The spec is surprisingly low on these.

Just FYI.
 
Keep this in mind when you are putting them back on. These need very little torque. Too much and you will crack the cover. The spec is surprisingly low on these.

Just FYI.
53 inch pounds I believe. On new crush washers. I learned the hard way on old cork gaskets many moons ago. There were some of these I could have taken out with my fingers.
 
Holy Hell man, that is the deal of a lifetime. Nice find.

I pooped a little when I walked up to it in the yard and saw those on there. They try to charge me 110 for the rear bumper because they thought it was a subframe. I convinced them it was just a beefy hitch and that knocked it down to 27 plus tax. I'm pretty sure I couldn't even buy the material for $63.
 
Replaced the bubbling PRNDL indicator plate with a new one:


Replaced the sound deadening thingie around the 4WD shifter:


Replaced the sway bar links with Moog items:


And the highlight of my day, added HID Hella foglights under the bumper:


Nice work. What did you use to apply it?

Thanks! For the inside of the bumper, I just brushed it on and then spread it with a foam brush. For the frame rails, I wasn't happy with that finish, so I sprayed it with the Chassis Black Top Coat.

Did you get that from a part out 4runner or is that some other type of insulation cut to shape?

I found an intact piece at the junkyard, so I used that. Looks a lot like just carpet padding, I'm sure that would work too.
 
Got the new sunroof put in and also found where my rear windshield sprayer line was leaking while I had the interior gutted. I love when I kill 2 birds with 1 stone. It's also amazing to finally have a working sunroof and much more satisfying when you rebuild said sunroof yourself!
 
Thanks! For the inside of the bumper, I just brushed it on and then spread it with a foam brush. For the frame rails, I wasn't happy with that finish, so I sprayed it with the Chassis Black Top Coat.

Did you spray the top coat directly over the brushed on por15 or did you do any sanding/prep work before spraying on the top coat?
 
Did you spray the top coat directly over the brushed on por15 or did you do any sanding/prep work before spraying on the top coat?

POR15 wants you to apply the primer or top coat while the rust preventative paint is still tacky, so that's what I did. Otherwise you do have to sand/scuff the rust preventative paint, which doesn't sound like fun at all.
 
Status
Not open for further replies.

Members online

Forum statistics

Threads
278,316
Messages
3,554,120
Members
248,016
Latest member
Advally Service

Trending content

Back
Top