What Did You Do To Your 3rd Gen Today?

Status
Not open for further replies.
Finally got my retrofits and color matched grill on. Built with ACME projectors/Apollo 3.0 shrouds and new housings. Easily the best $200 upgrade you can do.

Well, those are the least obnoxious retrofits I've seen. $200 DIY or did you hire it out for that price?
 
Well, those are the least obnoxious retrofits I've seen. $200 DIY or did you hire it out for that price?

$200 DIY ($130 for projectors/bulbs/wiring, $70 for new housings) You can easily resuse your housings, one of mine was just cracked.

Bi-Xenon: ACME H1 Standard Projector System Retrofit Kit

I've never done them before, but I'd recommend trying yourself. It's as easy pulling the glass off the housings after they are warmed up, screwing the projector in the housing, and putting the glass back on. Here is a video that shows it all. I wanted the most OEM look and wasn't a fan of the halo's. I spent more time cleaning up the glue I got all over the lenses than mounting them.

https://www.youtube.com/watch?v=YQLEdNrEbfg
 
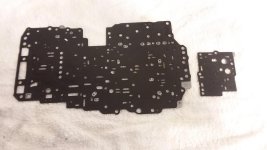
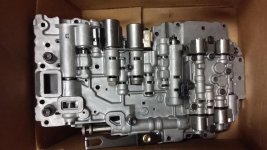
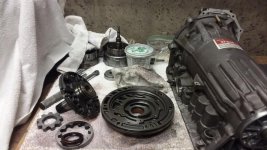
Drilled out the VB separator plate, went through the VB and did a few mods, cleaned, and checked the solenoids. Inspected the trans and started to resemble after having to remove and shorten the 2wd output shaft to adapt to a tcase.

20210129_080006.jpg

20210212_161824.jpg

20210212_161715.jpg
 

Attachments

  • 20210129_080006.jpg
    20210129_080006.jpg
    124.5 KB · Views: 321
  • 20210212_161824.jpg
    20210212_161824.jpg
    132.5 KB · Views: 332
  • 20210212_161715.jpg
    20210212_161715.jpg
    138.5 KB · Views: 318
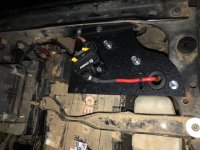
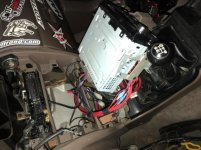
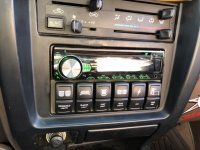
Finally made a bracket for the breaker going to my fuse/relay box, Mounted up my paranoid fabrications switch bracket, and put my power antenna on a switch
 

Attachments

  • 4463A35D-A897-43D4-B0A7-6FE6B2A7AF8B.jpeg
    4463A35D-A897-43D4-B0A7-6FE6B2A7AF8B.jpeg
    125.6 KB · Views: 451
  • AB599B3A-650C-4AFB-98E6-EE29BFCF0C33.jpg
    AB599B3A-650C-4AFB-98E6-EE29BFCF0C33.jpg
    50.7 KB · Views: 440
  • C23490A5-44D1-4D0A-B322-6949C042A3F0.jpeg
    C23490A5-44D1-4D0A-B322-6949C042A3F0.jpeg
    101.1 KB · Views: 437
ddd32a8e73ae2b2b8ef834da2343351b.jpg

0ca82e0996f1bd5d6fec863756b24159.jpg

bd97f02d483d139bc102691a4cfca372.jpg

cb408255193891f99a15d00b113f121f.jpg


Showed the 96 some love today with new valve covers, spark plugs, tie rods, alignment, and new cup holders! Also removed the runner boards.

Timing belt and tires are up next


Sent from my iPhone using Tapatalk
 
What's up folks! Anyone having issues uploading and using Photobucket??

When’s the last time you tried using Photobucket? There was a change in terms of service in 2017 and only paid accounts have a reasonable amount of storage while free accounts were limited to a minuscule amount of photos/ GB storage before you were forced to upgrade to a paid membership. That’s why you’ll see a lot of broken Photobucket links on most forums. Everyone switched to Flickr or Google Photos for the most part. You can resize and upload directly to the forum here of you keep the image size small enough. The image rotation when uploading on T4R drives me crazy though!
 
When’s the last time you tried using Photobucket? There was a change in terms of service in 2017 and only paid accounts have a reasonable amount of storage while free accounts were limited to a minuscule amount of photos/ GB storage before you were forced to upgrade to a paid membership. That’s why you’ll see a lot of broken Photobucket links on most forums. Everyone switched to Flickr or Google Photos for the most part. You can resize and upload directly to the forum here of you keep the image size small enough. The image rotation when uploading on T4R drives me crazy though!

It's been a few years, easily. I tried to upgrade my account, but when I clicked to submit my payment... it would not go passed the processing phase.

I'll have to check out Google photos.... thanks man!
 
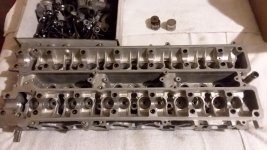
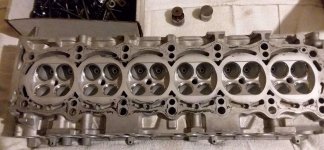
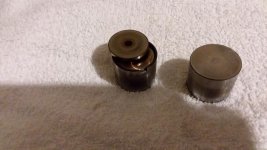
My low mile JDM engine needed a valve job. Decided to run with shimless buckets being that I have to do all the clearance work regardless and their lighter by a fair amount which adds up with 12... worked out some of the measurements and math for said.

20210214_180348.jpg

jzheadpic.jpg

20210214_180416.jpg
 

Attachments

  • jzheadpic.jpg
    jzheadpic.jpg
    144.7 KB · Views: 379
  • 20210214_180348.jpg
    20210214_180348.jpg
    133.6 KB · Views: 373
  • 20210214_180416.jpg
    20210214_180416.jpg
    131 KB · Views: 390
Hello everyone,

Picked up a '99 SR5 from an old friend. I used to get rides in this thing in high school. Pretty low miles (126k), but needs a decent amount of work. I was a Toyota tech for ~8 years so should be able to make quick work of this on weekends.

I'd post pics but I don't have the patience to deal with forum attachments.

Today I changed the fluid in both diffs, transfer case, and manual trans. These likely haven't been changed in a looong time. Planning to do valve cover gaskets, TB/WP, steering rack (leaking), LBJs, and Tundra brake upgrade in the next couple weekends.
 
Hello and Welcome ABlockOfCheese and Congrats.

You must post a pic or six of your T4R3G.


Eddie


Hello everyone,

Picked up a '99 SR5 from an old friend. I used to get rides in this thing in high school. Pretty low miles (126k), but needs a decent amount of work. I was a Toyota tech for ~8 years so should be able to make quick work of this on weekends.

I'd post pics but I don't have the patience to deal with forum attachments.

Today I changed the fluid in both diffs, transfer case, and manual trans. These likely haven't been changed in a looong time. Planning to do valve cover gaskets, TB/WP, steering rack (leaking), LBJs, and Tundra brake upgrade in the next couple weekends.
 
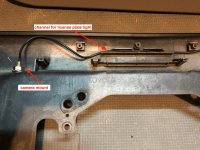
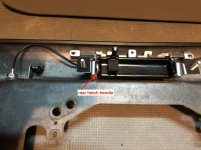
I also added a backup camera...

Thanks for this write up https://www.toyota-4runner.org/3589450-post31732.html [MENTION=631596]shawnathan9[/MENTION] it was helpful! FYI for those of you who also want to do this, if you take the extra time to remove the license plate bezel, there is no need to drill through the door (I removed my bezel because I also wanted to replace my rusty rear hatch handle and the gasket around the bezel while I was in there).

There is a channel behind the rear hatch door handle through which the wires for the passenger side license plate light runs. It will accommodate the camera wire too and you can run that along the path of the license plate light wires through the existing opening into the hatch where the key cylinder and license plate wires pass through.
 

Attachments

  • IMG_1027.jpg
    IMG_1027.jpg
    133.2 KB · Views: 253
  • IMG_1028.jpg
    IMG_1028.jpg
    133 KB · Views: 247
Last edited:
Started prepping to install my BAMF rock sliders

I picked up my rock slider order from Bay Area Metal Fabrications in Benecia yesterday morning. Turns out that they forgot about the powder coat request on my work order but they didn't know until I arrived after my 1.5 hr drive from the Peninsula.

On the spot, I had to decide to wait another two days or just take a refund on the powder coat and take them. Well, being a DIY kinda guy, I decided to take them and paint them myself.


BAMF sliders have a nice design to them. - I'm really liking their logo; BAD ASS Mother F@#$3R :)
<a href="https://ibb.co/4Kq1kxR"><img src="https://i.ibb.co/KbPKnHx/20210215-102012.jpg" alt="20210215-102012" border="0"></a>
<a href="https://ibb.co/b5Xw7KG"><img src="https://i.ibb.co/Xxt0VCG/20210215-102024.jpg" alt="20210215-102024" border="0"></a>

Did a quick test fit to determine where the mounting plates should be welded onto the sliders and to determine where they'll fit for good clearance of the wheel wells:
<a href="https://ibb.co/tDdFGyj"><img src="https://i.ibb.co/7K9Lf7M/20210216-083816.jpg" alt="20210216-083816" border="0"></a>

<a href="https://ibb.co/K5NjTLw"><img src="https://i.ibb.co/10sfFd6/20210216-083826.jpg" alt="20210216-083826" border="0"></a>

Just recently, I bought a welder and had been practicing how to weld various gauges of metal. So far, I still need to dial in my settings to optimize my welds and reduce bb's but I've learned to slow down and allow the puddles to penetrate the host metals to build a good weld. As far as aesthetics go, I still have a long way before any of my welds look like some instagram rainbow dime stacks:
<a href="https://ibb.co/nnffTJN"><img src="https://i.ibb.co/LJ66M7X/20210216-092155.jpg" alt="20210216-092155" border="0"></a>

<a href="https://ibb.co/GJbfPmY"><img src="https://i.ibb.co/0XdpJ54/20210216-102756.jpg" alt="20210216-102756" border="0"></a>

I started the weld job yesterday during my lunch break and then earlier this morning before I headed out to work. I packed it back in the Runner so I could do some clean up during my lunch break:
<a href="https://ibb.co/f1FF3fq"><img src="https://i.ibb.co/Wx55rZG/20210216-103124.jpg" alt="20210216-103124" border="0"></a>

*I'm debating on what kind of paint and color I should use for my rock sliders. I really like the bare steel look but rust is obviously an issue.

I'll be prepping the sliders by roughing them up, cleaning them and cleaning them again with a detergent and then isopropyl, and then some automotive primer.

I feel like a matte black is pretty much a standard.

I also have been thinking about a matching silver with my Limited trim; I'll use some skateboard paper for some additional grip on certain areas.

Not sure which way I'll go with it but I'll post an update once they're painted and on the Runner.

 
Status
Not open for further replies.

Members online

Forum statistics

Threads
278,316
Messages
3,554,120
Members
248,016
Latest member
Advally Service

Trending content

Back
Top