

You are using an out of date browser. It may not display this or other websites correctly.
You should upgrade or use an alternative browser.
You should upgrade or use an alternative browser.
What Did You Do To Your 3rd Gen Today?
- Thread starter pin8246
- Start date
- Status
- Not open for further replies.
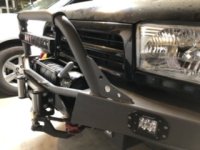
Ordered a couple of Lil' Skip's gas tank skids. One for my '99, one for my wife's '96. She smushed up her tank pretty well last year, replaced wit with a junkyard tank and skid, and lightly smashed the skid on this summer's trip. And I lightly bent my skid (and possibly the tank) as well this year.
It's time for some more protection there. Both trucks already have bumpers, sliders, belly skids.
Ordered the gas tank skid from him too. Very fast communications and shipping. I got it LINE-X, just need to get it installed
Ordered the gas tank skid from him too. Very fast communications and shipping. I got it LINE-X, just need to get it installed
Got them on the doorstep yesterday. Will paint and install over the weekend.
Just going to rattle-can them, they're going to get scraped up and it's easier to just rattlecan over any scrapes.

cl4Rk
Member
Before the body is put back on the frame (hopefully this weekend!), I replaced the transfer case j-shifter seat with the Marlin Crawler MCTM-523 Heavy Duty Shifter Seat (Blue) along with Gasket PN 3634535050 and Oil Deflector PN 3610835060.
The original bushing was completely disintegrated. There was nothing left but chunky bits of plastic mixed with old gear oil. Before replacing, the shifter was really clunky and rough. Now, it’s smooth as butter


You can see that extended breather valve hose as well (on the left).
The original bushing was completely disintegrated. There was nothing left but chunky bits of plastic mixed with old gear oil. Before replacing, the shifter was really clunky and rough. Now, it’s smooth as butter
You can see that extended breather valve hose as well (on the left).
dannance34
New member
Replaced the rear dome light bulb. Got her out of paint 6/15. Things have been crazy at work and home, but finally got a chance to give the ol' girl a good detail.
Hagatha - Album on Imgur
Hagatha - Album on Imgur
Last edited:
dannance34
New member

Last edited:
cl4Rk
Member
Replaced the rear dome light bulb. Got her out of paint 6/15. Things have been crazy at work and home, but finally got a chance to give the ol' girl a good detail.
Hagatha - Album on Imgur
Such a great color

RodrickHeffley
Member

added some trd stickers for the true trd off road class
Sent from my iPhone using Tapatalk
Replaced a leaking radiator on my 2002 Limited Edition...
Noticed some coolant on the garage floor, then saw my temp gauge get near "H". Pulled over, crawled back home a couple miles and towed to the shop. Hood had steam, and coolant reached 261 degrees. Shop said it passed the combustion test, and the new radiator with coolant flush should be good to go now. Hopefully I don't discover damage later on.
Noticed some coolant on the garage floor, then saw my temp gauge get near "H". Pulled over, crawled back home a couple miles and towed to the shop. Hood had steam, and coolant reached 261 degrees. Shop said it passed the combustion test, and the new radiator with coolant flush should be good to go now. Hopefully I don't discover damage later on.
Installed the Lil Skip's gas tank skid.
After removing the stock skid it was apparent I had a few modest dents in the bottom of the tank, probably down a cup or two of gas capacity, but since it'snot causing any issues with the gauge or pump, I just left it alone.
TRIGGER WARNING: I live in the salt belt, this gets driven in the winter, the salt has taken its toll on the underside of my 4Runner. Dry state residents may want to avert their eyes!
I have some bolt on sliders, so I had to notch out a bit of the skid where it bolts to the outer frame rail:

I've certainly had plenty of issues with the driveshaft rubbing the stock skid. Get in a good flex and POP POP POP POP!!!! as the driveshaft balancing weight catches on the sheetmetal. A horrible sound, I really thought something was HORRIBLY WRONG the first time I heard it. After a while, just learned to grit my teeth and ignore it. And bash it back in with a hammer later on.
This looks like it has better clearance - it's very snugly up against the gas tank. Of course, if the driveshaft does reach over, this sturdy skid will probably pop the driveshaft balance weight off, it's not flimsy sheetmetal.

I have the axle centered in the body at normal ride height, but I sometimes wonder if I should adjust it to scoot it over to the passenger side a bit more. Maybe 1/4 inch or so?
After removing the stock skid it was apparent I had a few modest dents in the bottom of the tank, probably down a cup or two of gas capacity, but since it'snot causing any issues with the gauge or pump, I just left it alone.
TRIGGER WARNING: I live in the salt belt, this gets driven in the winter, the salt has taken its toll on the underside of my 4Runner. Dry state residents may want to avert their eyes!
I have some bolt on sliders, so I had to notch out a bit of the skid where it bolts to the outer frame rail:
I've certainly had plenty of issues with the driveshaft rubbing the stock skid. Get in a good flex and POP POP POP POP!!!! as the driveshaft balancing weight catches on the sheetmetal. A horrible sound, I really thought something was HORRIBLY WRONG the first time I heard it. After a while, just learned to grit my teeth and ignore it. And bash it back in with a hammer later on.
This looks like it has better clearance - it's very snugly up against the gas tank. Of course, if the driveshaft does reach over, this sturdy skid will probably pop the driveshaft balance weight off, it's not flimsy sheetmetal.
I have the axle centered in the body at normal ride height, but I sometimes wonder if I should adjust it to scoot it over to the passenger side a bit more. Maybe 1/4 inch or so?

Unner
New member
Installed the Lil Skip's gas tank skid.
After removing the stock skid it was apparent I had a few modest dents in the bottom of the tank, probably down a cup or two of gas capacity, but since it'snot causing any issues with the gauge or pump, I just left it alone.
TRIGGER WARNING: I live in the salt belt, this gets driven in the winter, the salt has taken its toll on the underside of my 4Runner. Dry state residents may want to avert their eyes!
I have some bolt on sliders, so I had to notch out a bit of the skid where it bolts to the outer frame rail:
I've certainly had plenty of issues with the driveshaft rubbing the stock skid. Get in a good flex and POP POP POP POP!!!! as the driveshaft balancing weight catches on the sheetmetal. A horrible sound, I really thought something was HORRIBLY WRONG the first time I heard it. After a while, just learned to grit my teeth and ignore it. And bash it back in with a hammer later on.
This looks like it has better clearance - it's very snugly up against the gas tank. Of course, if the driveshaft does reach over, this sturdy skid will probably pop the driveshaft balance weight off, it's not flimsy sheetmetal.
I have the axle centered in the body at normal ride height, but I sometimes wonder if I should adjust it to scoot it over to the passenger side a bit more. Maybe 1/4 inch or so?
Looks good. I would go flex the suspension, if you stuff the driver side tire until it hits the bump stop or the shock bottoms out that pulls the driveshaft as close as possible to the gas tank skid. If you have no contact then you shouldn't have to adjust the panhard. If you get contact you may want to adjust it a little bit, but I wouldn't get too crazy with moving the axle and changing suspension geometry.
Before and after
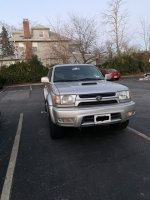
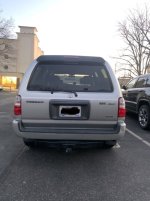
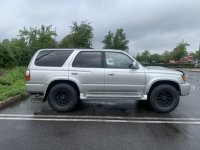
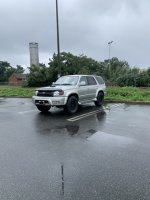
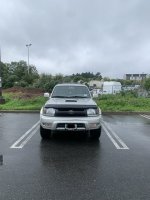
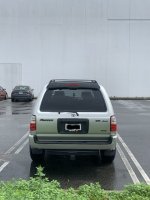
Added the bug deflector, some new headlight housings , black grille, license plate frame , plasti dipped plastic trim pieces on the tailgate black because they were faded pretty bad, and just recently added 265/75/r16 falcon wildpeaks with 16x8 pro comps. A tad of rubbing , may take the running boards off next .
Added the bug deflector, some new headlight housings , black grille, license plate frame , plasti dipped plastic trim pieces on the tailgate black because they were faded pretty bad, and just recently added 265/75/r16 falcon wildpeaks with 16x8 pro comps. A tad of rubbing , may take the running boards off next .
Attachments
-
 F57A775E-FEEB-40E9-8EAE-0FE2A443BECB.jpeg110.4 KB · Views: 384
 -
 1B2BD135-1EA7-4E4A-8E37-F5F25DB0A69B.jpeg122.6 KB · Views: 385
 -
 8E1D0E9F-4255-4A9D-99FE-4DF3575F327D.jpeg92.8 KB · Views: 374
 -
 DD523FFE-0774-4BE1-B3BD-30061CCAF57F.jpeg101.1 KB · Views: 385
 -
 E36247E9-6E30-43E8-B500-1EBB9351E5D0.jpeg101.2 KB · Views: 378
 -
 45D43553-2C9A-4246-84E1-F05BF7F685AF.jpeg92.8 KB · Views: 370
 -
 A9759443-354E-440B-B0BD-5F45873A8C78.jpeg80 KB · Views: 377

Endlessblockades
Senior Member
[MENTION=71960]JohnMc[/MENTION]
Nice - did it pop in pretty easily? The man @ Lil Skip's said he'd pre-notch one for me at no charge (for Shrockworks bolt-on sliders).
Interested to hear about any driveshaft contact.
Nice - did it pop in pretty easily? The man @ Lil Skip's said he'd pre-notch one for me at no charge (for Shrockworks bolt-on sliders).
Interested to hear about any driveshaft contact.
Last edited:
2001 Limited 285K
Member
Installed the Oznium switch to disable the auto-up antenna signal that sends the mast up every time I turn on my after-market Pioneer head unit. What I didn't realize [:facepalm:] until after I had it all back together is that the blue and white wire from the head unit was also sending power to the Kenwood sub that I had someone install a few years ago under the driver's seat.
It's an easy fix though. The hardest part of this job is removing the trim and putting it back together. So this is a good mod for beginners. A trim removal tool makes it easy to take the trim off without scratching it up. The only tool you really need besides the trim removal tool is a stripper / crimper.
For parts, I picked up the female spade connectors and butt connectors at AutoZone. "Dorman" brand; made in Taiwan. I may use Posi-Twist connectors when I redo this. I think those might be easier to work with and faster.
It's an easy fix though. The hardest part of this job is removing the trim and putting it back together. So this is a good mod for beginners. A trim removal tool makes it easy to take the trim off without scratching it up. The only tool you really need besides the trim removal tool is a stripper / crimper.
For parts, I picked up the female spade connectors and butt connectors at AutoZone. "Dorman" brand; made in Taiwan. I may use Posi-Twist connectors when I redo this. I think those might be easier to work with and faster.

fatherohenry
Member
Replaced Rear Shocks and Springs
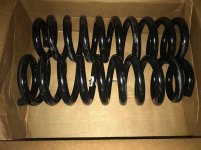
The front and rear AC/DELCO coils finally showed up from RockAuto today. KYB shocks/struts have been here for a week. I'd planned on doing the fronts first since I assumed the rears will be a bigger improvement but I'm still working up the courage to deal with spring compressors.
Had a hell of a time getting the driver's side rear shock out. Was very glad I bought flex head ratchets and wrenches last week (just in case). It would've been nice if KYBs had the allen head to stabilize it. I made do with a pipe wrench.
Got everything back together and double checked all my notes to make sure I hadn't forgotten anything and went for a test drive. I was enjoying the new ride, feeling quite proud of myself but began to worry when I started to hear a rattling metal sound coming from the back when I hit the brakes, sometimes when I punched the gas, too. I thought for sure something hadn't gotten tightened properly. It didn't sound like the metal folding chairs I had in the back but I slowly drove home to take them out and see if that was the culprit.
Turns out I'd forgotten that I'd put the box with the front coils in the back. Dumbass.
One more job completed that I never thought I'd do myself. Thanks T4R.ORG (and Timmy)!
The front and rear AC/DELCO coils finally showed up from RockAuto today. KYB shocks/struts have been here for a week. I'd planned on doing the fronts first since I assumed the rears will be a bigger improvement but I'm still working up the courage to deal with spring compressors.
Had a hell of a time getting the driver's side rear shock out. Was very glad I bought flex head ratchets and wrenches last week (just in case). It would've been nice if KYBs had the allen head to stabilize it. I made do with a pipe wrench.
Got everything back together and double checked all my notes to make sure I hadn't forgotten anything and went for a test drive. I was enjoying the new ride, feeling quite proud of myself but began to worry when I started to hear a rattling metal sound coming from the back when I hit the brakes, sometimes when I punched the gas, too. I thought for sure something hadn't gotten tightened properly. It didn't sound like the metal folding chairs I had in the back but I slowly drove home to take them out and see if that was the culprit.
Turns out I'd forgotten that I'd put the box with the front coils in the back. Dumbass.
One more job completed that I never thought I'd do myself. Thanks T4R.ORG (and Timmy)!
Attachments

infamousRNR
Senior Member
[MENTION=71960]JohnMc[/MENTION]
Nice - did it pop in pretty easily? The man @ Lil Skip's said he'd pre-notch one for me at no charge (for Shrockworks bolt-on sliders).
Interested to hear about any driveshaft contact.
bro, I didn't see you at the SICMODS BBQ we had 2 weekends ago! what happened???
- Sean
[MENTION=71960]JohnMc[/MENTION]
Nice - did it pop in pretty easily? The man @ Lil Skip's said he'd pre-notch one for me at no charge (for Shrockworks bolt-on sliders).
Interested to hear about any driveshaft contact.
Went in as easy as can be. I'd measured and cut off the horizontal part of the frame rail mount side. It was only when I put it up into place that I realized that I'd need to remove a bit of the vertical part as well, so another minute of angle-grinder action and a quick spritz of paint. Lifted it up, loosely bolted it into place, nudged it driver side as far as it wanted to go (away from the driveshaft) and snugged it up.
I'll try getting a full stuff on the rear wheel to see how clearance looks, it's just hard doing it in the driveway since my floor jack doesn't really lift it far enough to fully seat it against the bump stop.
Endlessblockades
Senior Member
bro, I didn't see you at the SICMODS BBQ we had 2 weekends ago! what happened???
- Sean
Aw man, my son had a baseball camp/showcase up at Stanford at the same time and the logistics got all screwed up! I had my SICMODS T-shirt ready to go, too.....NEXT TIME!!!
02ForestRunner
New member
Last night installed a new drivers side OEM LBJ and puled the 555 the prior owner installed. It had only 15,000 miles on it I just wanted a OEM installed to match the other side before my upcoming hunting trip. Its a good thing I replaced it to the 555 was completely junk. Also installed the lower OptOffroad control arms. I still have the uppers to install. But I will install the Upper link braces first. More to come tonight!

Twan
Senior Member
Just got my 4Runner back from RSG Offroad for a new steering rack, but I also had a panhard bar correction kit welded on. Holy ****, that PCK might be the single biggest improvement I've made to the vehicle. After the lift, if I hit a bump or pothole the back end would jump and dance around due to the angle of the panhard bar. Sometimes, if I was going fast enough it felt like the back end was going skip sideways and cause me to lose control, especially on one expansion joint on a bridge on my way home from work. On my drive home from the shop with my panhard bar now parallel to the ground, this thing just floated over bumps and potholes on I-70 and I-25 at 75mph. Back end felt planted again and I didn't feel like I was going to die from the back end kicking out. If you have a 4Runner that's lifted, I cannot stress enough that you should add one of these to your rear suspension.
Panhard Correction Kits – eimkeith.com [MENTION=28464]eimkeith[/MENTION]
Panhard Correction Kits – eimkeith.com [MENTION=28464]eimkeith[/MENTION]
- Status
- Not open for further replies.
Similar threads
- Replies
- 9
- Views
- 26K


- Replies
- 0
- Views
- 2K
- Replies
- 5
- Views
- 1K

- Replies
- 13
- Views
- 3K


- Replies
- 11
- Views
- 21K


