What Did You Do To Your 3rd Gen Today?

Status
Not open for further replies.
Can’t believe I didn’t do this mod sooner. Only took about 20 minutes. Used a leftover switch from another vehicle I was working on last year. Soldered in the three wires at the window module and flushed the switch into the panel. Definitely going to make my solo camping trips more enjoyable!

I dont know if im posting correctly or not but this is sweet how exsactly did you do this?
 
Still need to work on my photography skills :(.

What? Your photos are excellent! You sure have a lot of clearance between your extended bump stops and your axle.....I think I might need some more lift out back to compensate...and up front....and... I installed some Duro Bumps 5.25" (?) that were supposed to be for 2" lift and up. I think I'm at about 2.5" in the rear. Mine seem to ride pretty close to the axle compared to your shots (unless your rear axle is unweighted). Gonna use the GoPro down there to see what's going on under flex this weekend - got a cheap magnetic swivel mount and a waterproof case for the old Session 5. Going to camp for 3 days in the Mojave and hit up Pismo/Oceana Dunes on the way back to the bay via Highway 1.....
 
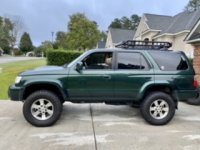
New tires (265/75r16), put up the roof basket, now figuring out the best way to mount the rotopax.

b7f827625ae71cb5ed3d223e6546c3f8.jpg

5752a093dd0d33b54aeb757517dd81e2.jpg

c8f1bd49ad2787d6ab87c888730a8062.jpg
 
Cosmetic stuff for the wife.. she was sick of looking at the grimy sun-visors (never-mind they were sticky from the old stickers that peeled off while trying to clean them):

MoHDeOe.jpeg


67tXxa5.jpeg


You can do it too.... :) Fabric is from an old wool blanket (this was a Remanent), fabric glue to tack the majority in place and hot-glue for the edges. Oh, and a pair of Good fabric shears. Mirror-light combo is held in with 2 screws under the light diffuser and 3 tabs at the far end that just slide out when the screws are out.

We have black BMW seats and floor mats (and a black and grey blanket over the Back seats), so it's all coordinated.
 
What? Your photos are excellent!

Thanks! I feel like half the time my cell phone camera focuses on something in the background, but glad you find the photos acceptable :thumb:.

You sure have a lot of clearance between your extended bump stops and your axle.....I think I might need some more lift out back to compensate...and up front....and... I installed some Duro Bumps 5.25" (?) that were supposed to be for 2" lift and up. I think I'm at about 2.5" in the rear. Mine seem to ride pretty close to the axle compared to your shots (unless your rear axle is unweighted).

That photo I posted was with the full weight of the truck on the axle :). There's definitely lots of clearance with the bumpstop, but I keep reading here that "travel is your friend", so I didn't want the bumpstop to restrict the up-travel any more than needed to prevent shock bottom-out. That's why I chose the 3.5" instead of the 5.25" version.

The "for 2" lift" description for the bumpstop is just a guideline - the right way to size the bumpstop is to prevent shock bottom out, or (for folks with the monster truck tires) to prevent the tire from hitting the body :). Those are not really functions of lift, but of compressed shock length and tire size.
 
The "for 2" lift" description for the bumpstop is just a guideline - the right way to size the bumpstop is to prevent shock bottom out, or (for folks with the monster truck tires) to prevent the tire from hitting the body :). Those are not really functions of lift, but of compressed shock length and tire size.

Perfect description of how bumpstops are supposed to function as part of the big picture that is the rear suspension. :trophy::bravo:
 
A Bunch Of Stuff ~ Rough Country Lift ~ New Rims And Tires ~~ Tint Windows ~~ It Is Looking Way Sweet And Drives Amazing ! A 1995 Toyota 4 Runner V-6 Auto.
 
Wheels and tires

Went from 16’s to 17’s but thinking now I like 16’s better….love the Ridge Graps though!
 

Attachments

  • B3F47552-C646-475E-AEEF-4388CC54C994.jpeg
    B3F47552-C646-475E-AEEF-4388CC54C994.jpeg
    29.6 KB · Views: 307
Last edited:
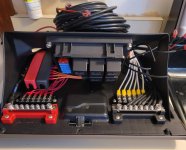
Fabricated a Glovebox Aux Electrical System

Thinking about doing another and selling. Package would consist of everything pictured completely wired fused and relayed circuits including: (6) prewired 2 pin sealed connectors for hooking up lights and other loads, (6) 3 pin sealed connectors for switches, 6 prewired 10' switch leads and quick disconnects for battery leads.

Would anyone be interested in this? What would you be willing to pay?

The idea is to be able to completely disconnect everything at the glovebox and remove if needed.

Pic for reference.

Thanks.

If anyone is interested PM for details. I'll need a couple weeks to source another glovebox to start the whole 'core' process. That way, if do DO want it, you'll get it 3-5 days after paying and just return your glovebox as a core.

I'll update with links to install video and demonstration.
 

Attachments

  • 20210924_110051.jpg
    20210924_110051.jpg
    127.2 KB · Views: 297
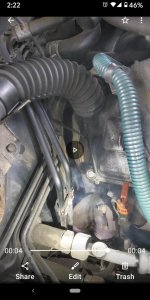
Smoke from engine near firewall passenger side, 1998 T4R.

I am at a loss here, got white smoke when cold start in the morning. Recently replaced valve cover gasket. Smell something burning but little smoke when driving, coolant/oil level all good, looks like droppings accumulated thru the night thus seeing smoke 20 seconds after cold start. Can someone point me to the right direction.
 

Attachments

  • smoke.jpg
    smoke.jpg
    134.9 KB · Views: 283
I am at a loss here, got white smoke when cold start in the morning. Recently replaced valve cover gasket. Smell something burning but little smoke when driving, coolant/oil level all good, looks like droppings accumulated thru the night thus seeing smoke 20 seconds after cold start. Can someone point me to the right direction.


Cam plugs?
 
not sure, probably not, because smoke from passenger side near firewall, cam plug kind of middle ish


This guy circled in green:
c33551b6f30acbe9e052b556e532eaa8.jpg


Mine were leaking after a valve cover job (on both sides). Passenger side oil leak would roll down near the starter, but some would hit the header and smoke.

Photo is from after they were both replaced.

YMMV of course. Best of luck
 
Last edited:
Cosmetic stuff for the wife.. she was sick of looking at the grimy sun-visors (never-mind they were sticky from the old stickers that peeled off while trying to clean them):

MoHDeOe.jpeg


67tXxa5.jpeg


You can do it too.... :) Fabric is from an old wool blanket (this was a Remanent), fabric glue to tack the majority in place and hot-glue for the edges. Oh, and a pair of Good fabric shears. Mirror-light combo is held in with 2 screws under the light diffuser and 3 tabs at the far end that just slide out when the screws are out.

We have black BMW seats and floor mats (and a black and grey blanket over the Back seats), so it's all coordinated.

so cute ! i need this
 
Finished up more loose ends after the lift.

First, had the PCK welded in by a local shop. The gentleman is actually selling his shop of many years, it's sad to see these old-school folks move on. Anyway, here's the requisite action shot:

ox08OXeh.jpg
[/url]

And the results:

ButGOTKh.jpg


VphMTlth.jpg


Primed and painted:

QHKe8jBh.jpg


iD9cDn0h.jpg


My lift requires the middle hole to be used on the frame bracket. As noted by others, there is a step between the original bracket and the PCK at that location:

Awh2UL7h.jpg


So a custom washer is needed. I shamelessly borrowed [MENTION=148218]JZiggy[/MENTION] 's idea:

sVvNsMMh.jpg


Much better:

DvckDszh.jpg


WjyKfmDh.jpg


The bar sits close to level now:

7qc3DYAh.jpg


Also installed this super nifty sway bar relocation kit from Sonoran Steel:

DeuqcUc.jpg


Its primary benefit for lifted trucks is to get the sway bar away from E-locker actuator. After the lift, there were clear signs of rubbing:

EQmW6inh.jpg


Sonoran brackets installed:

2uoYrqnh.jpg


Sway bar bushings and brackets installed:

pb8OAa0h.jpg


And voila, tons of clearance:

wm2mJNNh.jpg


As a side benefit, the kit allows you to use stock length end links after the lift.

On to the front, replaced the OEM bumpstops with DuroBumps:

kdxUN6Ah.jpg


3x8Pm4Eh.jpg


Finally, gave her a wash and treated her to some nice PIAA wipers, prepping for winter (like we'll ever get any rain around here):

IPbjyYph.jpg
 
Last edited:
New lbjs, new suspension, rack bushings, sway bar bushings and new end links, inner and outer tie rods and a quick n dirty alignment to get me by til I can get an alignment. Handles like a new vehicle since everything was still original at 192k.

Sent from my SM-G970U using Tapatalk
 
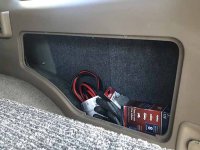
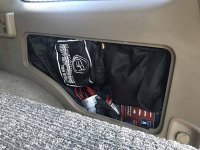
Rear cargo mod. Now I can fit my tow straps and folding solar panel in addition to what was in there originally
 

Attachments

  • half.jpg
    half.jpg
    48.8 KB · Views: 454
  • full.jpg
    full.jpg
    54.8 KB · Views: 459
Status
Not open for further replies.

Members online

Forum statistics

Threads
278,316
Messages
3,554,120
Members
248,016
Latest member
Advally Service

Trending content

Back
Top