What Did You Do To Your 3rd Gen Today?

Status
Not open for further replies.
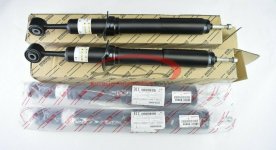
Cool tip!That's odd, the parts diagram shows the shock, cushions, retainer and nut as an assembly
View attachment 395005

Sent from my Pixel 4 XL using Tapatalk

That is odd... Mine did not come with them

Mine was packaged just like the bottom 2 in this pic
 

Attachments

  • shocks.jpg
    shocks.jpg
    136.5 KB · Views: 359
Last edited:
Installed 2020 4runner rear OEM shocks. For anyone that's lifted above 3" and wants a really soft factory ride buy these!! I believe they are the softest shock you can buy and be lifted a good bit. Shocks are 24" extended which is I believe is 4" longer than stock. I have them paired with the LC 7.5 wraps

Previously I was running the 80 series OEM Tokico rears. 2020 4runner shocks are about the same length as the 80 series rear and should be valved a bit softer.
Part # I purchased 48530-80604. Costed me $75 for the pair at the dealer. What a bargain!!!

Any idea what the compressed length is? Wondering if I can use these with a 2" lift, or if they would bottom out before hitting the bumpstops.
 
They were roughly about 15" compressed. If you have a 2" lift most likely your springs will fall out with these unless your sway bars prevent it
 
This last winter I noticed when it got real cold (~25 and below) my car wouldn't start in first gear and had to be manually thrown in to get going... today she let me shut her down with the trans still in drive; started to get out the car, keys in hand and she began rolling back on me. Probably just the NSS, but I'm thinkin it's time I start setting aside a few grand for a new unit regardless :tsk: :tsk:
 
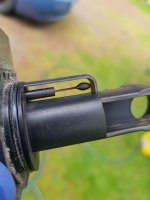
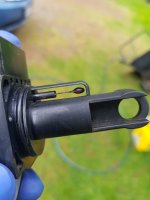
Cleaned the MAF sensor. Can't believe I didn't do it before. Seems to have cleared the P0171 code and low idle at start up. Totally filthy.
 

Attachments

  • Resized_20220415_151131_8017.jpeg
    Resized_20220415_151131_8017.jpeg
    90.1 KB · Views: 300
  • Resized_20220415_152144_8897.jpeg
    Resized_20220415_152144_8897.jpeg
    91.5 KB · Views: 299
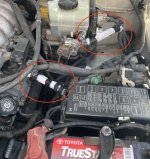
I was at Pick-n-Pull recently and I remembered a post from [MENTION=198376]4Runner4Leon[/MENTION] about making use of empty slots in the fuse box. I was surprised to see a fuse box amongst the remains of a '97 so I grabbed it.

I ended up doing the same as Leon, adding power for 4 empty slots with 2 fused wires, one for my under hood lighting and the other for projectors. I'll have to get back in there if/when I decide to use the other two but the hard work's done.

Thanks for the inspiration, Leon!

jPV4mXp.jpg


yG4mqeb.jpg


73ceN00.jpg


I was pretty excited that I was able to get this done but what really got my motor running was DHL showing up early. 4 days from Dubai was a shocker. Too bad it's supposed to rain this weekend.

nAhPFp9.jpg
 
Added cheap rodent repellent (dryer sheets) to engine bay after replacing the ruptured injector fuel line that was gnawed through by a rodent of some sort.
 

Attachments

  • dryer sheets.jpg
    dryer sheets.jpg
    124.9 KB · Views: 279
‘96 today…

Well I :
1. Replaced the broken tabbed front left headlight bucket so the grill is now fully attached.
2. Removed the previous owner rear license plate frame that had skulls with eyes that lit up red when the lights were on .They were hacked into the license plate light wiring-so neither of those worked. Fixed them, but one lens is missing (added to my list of boneyard parts needed).
3. Decided to remove the rear gate cover and lube the gears and the glides. That was fun.
4. Then because the license plate frame gap was removed I broke the plate screw off while screw it in further and spent 2 hours dealing with that
5. Just noticed why there’s no rear wiper assembly, the bolts snapped off in the center off the gear. Sure that will be fun. Any tips?
6. Main thing was…not everything last 4ever on a 4runner….drivers side seatbelt replaced with new oem Toyota belt….get them while you can!
Tried to post pic of the frayed 265k miles belt, but couldn’t figure out how to resize it on my iPad.
 
Did a fuel pressure test to see why my 3rd Gen SC LTFT is at 19.5%

Fuel pressure with ON position is 40PSI
at Idle with FPR hose off is 44PSI
at Idle with FPR hose on is 38PSI
Holds pressure for 5 Minute Straight

Quite a doosy!
 
Did a fuel pressure test to see why my 3rd Gen SC LTFT is at 19.5%

Fuel pressure with ON position is 40PSI
at Idle with FPR hose off is 44PSI
at Idle with FPR hose on is 38PSI
Holds pressure for 5 Minute Straight

Quite a doosy!
Bound to be throwing a code or two.
 
I replaced the driver side UCA bushing and UBJ and was about to put the knuckle assembly back on and noticed this. I guess wheel bearings are in my future. Everything I do leads to another job. I've been buying tools non-stop for a year and thought I had everything but the rear axle tool. I forgot about the myriad steel plates Tim uses in the front wheel bearing video.


4EOsRNL.jpg
 
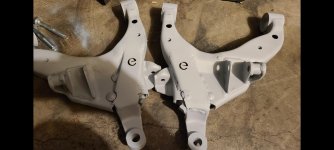
My coworker owed me a favor, and with him having 5+ years as a government contracted welder, I asked if he would put together my LCA reinforcements. Oh boy was that a mistake.
Nearly five hours later, I'm left with these. Pretty rough beads; half of them completely away from the joint, porosity all over, dude welded in the limiting strap bung making it totally useless, completely skipped a weld because the 1/16 gap was "too big to fill" - gave me the whole nine on this one. I would've been better off giving them to a gorilla with some jumper cables :mad2: :mad2:
Guess if you want shit done right you gotta do it yourself, but oh well, at least the legwork is done. Ironically the bottom sides either weren't too bad, or he was able to clean up perfectly, but they look flawless underneath. Just the top looks rough

 

Attachments

  • Screenshot_20220417-204402_Gallery.jpg
    Screenshot_20220417-204402_Gallery.jpg
    139.4 KB · Views: 398
Last edited:
My coworker owed me a favor, and with him having 5+ years as a government contracted welder, I asked if he would put together my LCA reinforcements. Oh boy was that a mistake.
Nearly five hours later, I'm left with these. Pretty rough beads; half of them completely away from the joint, porosity all over, dude welded in the limiting strap bung making it totally useless, completely skipped a weld because the 1/16 gap was "too big to fill" - gave me the whole nine on this one. I would've been better off giving them to a gorilla with some jumper cables :mad2: :mad2:
Guess if you want shit done right you gotta do it yourself, but oh well, at least the legwork is done. Ironically the bottom sides either weren't too bad, or he was able to clean up perfectly, but they look flawless underneath. Just the top looks rough

Meh, good enough for government work right? :D
 
Got back to business and did the passenger side UCA bushings and UBJ.

Both UBJs seemed perfectly fine but the bushings were like stone.

I didn't have a use for the HF press when I found it on CL for $80 but I'm sure glad I bought it when I did.

XelHH3y.jpg
 
Added USB power for the back. Don't mind the empty hole, I originally had two outlets and realized that was more USB ports than I need. Couldn't think of anything else to put in there. Printing one with only 1 hole.

0259482f2e23a20cc0a4edbae2f228da.jpg
 
Status
Not open for further replies.

Members online

Forum statistics

Threads
278,316
Messages
3,554,120
Members
248,016
Latest member
Advally Service

Trending content

Back
Top