What Did You Do To Your 3rd Gen Today?

Status
Not open for further replies.
everything started in the same confines as anyone with a 3rd gen.... but i understand what ur driving at

Your posts brought this mod closer to next appreciate that got me thinking on it again.

Rear 14" straight arm universal kit looks good using OE cross tube for frame mount.
Front 17" offset arms universal frame mount below lower rad hose elbow.

With the extra travel limit straps part of the plan front for sure while I'm at it why not the rear.
 
Added USB power for the back. Don't mind the empty hole, I originally had two outlets and realized that was more USB ports than I need. Couldn't think of anything else to put in there. Printing one with only 1 hole.

0259482f2e23a20cc0a4edbae2f228da.jpg
Do you print those yourself? I could use a blank one...

Sent from my Pixel 4 XL using Tapatalk
 
Tundra springs/coils

Hey guys! So I’m at loss and hope you guys can help. I searched for the right Toyota Tundra coils with the yellow/yellow and yellow/ blue to lift my 3rd gen 4Runner. Well they showed up today and the paint marks are yellow/red and red/blue. Can you guys tell me what I have and if I can use them. They came off a 2004 Tundra crew cab 4x4 off road package. I appreciate your help!
 
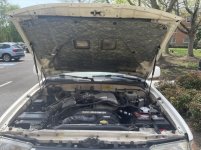
Bolted a small plastic container of naptha mothballs to the fuse box to try to keep the mice out and added hood insulator blanket (Part # 5334135022) to replace insulator lost to massive fuel leak caused by rodent damage. The clips for the hood blanket are part # 9046709006. The insulator blanket is rigid enough that it can be clipped into place with the hood open as shown. So there's no need to take the hood off, which helps a lot.
 

Attachments

  • hoodBlanket.jpg
    hoodBlanket.jpg
    90.6 KB · Views: 291
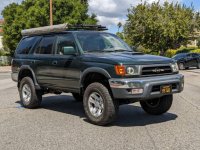
Installed 2020 4runner rear OEM shocks. For anyone that's lifted above 3" and wants a really soft factory ride buy these!! I believe they are the softest shock you can buy and be lifted a good bit. Shocks are 24" extended which is I believe is 4" longer than stock. I have them paired with the LC 7.5 wraps

Previously I was running the 80 series OEM Tokico rears. 2020 4runner shocks are about the same length as the 80 series rear and should be valved a bit softer.
Part # I purchased 48530-80604. Costed me $75 for the pair at the dealer. What a bargain!!!

Anyone able to provide a comparison of these against the 4Runner specific Bilstien 5100’s with the OME 906?
 
Anyone able to provide a comparison of these against the 4Runner specific Bilstien 5100’s with the OME 906?

It is stiff unloaded. I got it for over landing while loaded up. I like it.
 

Attachments

  • Resized_20220423_200049_6818.jpg
    Resized_20220423_200049_6818.jpg
    141.2 KB · Views: 275
are those side marker lights on front fender. do they work as blilnkers too ? Are they toyota

I got a set of front fenders from the wreckers. Someone cut and put those lights in. Not sure which type. I actually just painted up my other Limited fender white to replace this one so it will be coming off soon. Getting tired of driving around looking ridiculous with multiple colours. Then, the bumper, and it will start looking nice.
 
Inspired by other folks doing preventive maintenance, I spent the weekend replacing all the water hoses and clamps, the heater control valve, and the oil cooler gasket and o-ring.

I found myself practically laying on top of the engine compartment trying to reach some of the clamps for the throttle body hoses, but it was not a bad job overall.

Most of the hoses were still in excellent shape, I probably could have waited a lot longer before doing this job. The heater valve looked pretty good too. The oil cooler o-ring is another story, it was hard as a rock, so hopefully that will stop my mystery oil leak that I still can't find.

Here are all the new and old parts (I did not replace the radiator hoses since I replaced them when doing the timing belt and radiator a couple of years ago):

zvcQSOw.jpg


lj00lyL.jpg


zlkcNms.jpg


YCuUKEw.jpg


cEVgsba.jpg


HlZIaHU.jpg


While I was at it, I replaced the gas cap with a new one:

wMliaDY.jpg


And finally, installed new headlight bulb covers:

7o3c9Oj.jpg


JQ2QFmT.jpg
 
Last edited:
Inspired by other folks doing preventive maintenance, I spent the weekend replacing all the water hoses and clamps, the water valve, and the oil cooler gasket and o-ring.

I found myself practically laying on top of the engine compartment trying to reach some of the clamps for the throttle body hoses, but it was not a bad job overall.

Most of the hoses were still in excellent shape, I probably could have waited a lot longer before doing this job. The water valve looked pretty good too. The oil cooler o-ring is another story, it was hard as a rock, so hopefully that will stop my mystery oil leak that I still can't find.

Here are all the new and old parts (I did not replace the radiator hoses since I replaced them when doing the timing belt and radiator a couple of years ago):


How were those heater control valve hoses, specifically the one that goes down to the intake manifold? I had to do my valve recently and bought all the hoses, but that one looked awful to get too and the old ones still looked good so I left them for the time being.

Your heater control valve looked just about like mine too, but mine had developed a very slight leak so better to replace now rather than have the catastrophic failure others have had with that part.
 
Inspired by other folks doing preventive maintenance, I spent the weekend replacing all the water hoses and clamps, the water valve, and the oil cooler gasket and o-ring.

I found myself practically laying on top of the engine compartment trying to reach some of the clamps for the throttle body hoses, but it was not a bad job overall.

Most of the hoses were still in excellent shape, I probably could have waited a lot longer before doing this job. The water valve looked pretty good too. The oil cooler o-ring is another story, it was hard as a rock, so hopefully that will stop my mystery oil leak that I still can't find.

Here are all the new and old parts (I did not replace the radiator hoses since I replaced them when doing the timing belt and radiator a couple of years ago):

zvcQSOw.jpg


lj00lyL.jpg


zlkcNms.jpg


YCuUKEw.jpg


cEVgsba.jpg


HlZIaHU.jpg


While I was at it, I replaced the gas cap with a new one:

wMliaDY.jpg


And finally, installed new headlight bulb covers:

7o3c9Oj.jpg


JQ2QFmT.jpg

i plan to replace all mine as well, this summer while doing a timing belt kit and vc gaskets. Hopefully with all the intake stuff out of the way I will be able to get to some of the hard to reach hoses. I also plan to do my oil cooler hoses and orings...have not seen a good write up on that however.

I also just recently put on a new gas cap and also ordered the headlight boots, as both were missing. New heater valve sitting on shelf

I used this thread for hose reference What other hoses should I replace?
and as stated in that .....check your part #s for your vin as some do change over the years. Mine however checked out to ba all the ones listed in post #12
 
Last edited:
How were those heater control valve hoses, specifically the one that goes down to the intake manifold? I had to do my valve recently and bought all the hoses, but that one looked awful to get too and the old ones still looked good so I left them for the time being.

They were in pretty good shape, like most of the other hoses (old on left, new on right) :

arXNEzY.jpg


They were very difficult to get to, almost as bad as the throttle body hoses. I found the best way to attack this was to just start taking off the hoses one at a time; as one was removed, it made access to the one below a little easier. Like I said, I practically had to lay on top of the engine compartment to reach the bottom clips of these hoses. And then I had to slice the hose with a utility knife to get it off the water outlet.

Here is a shot of one of the hoses, the other is already removed:

QjLaND3.jpg
 
Last edited:
i plan to replace all mine as well, this summer while doing a timing belt kit and vc gaskets. Hopefully with all the intake stuff out of the way I will be able to get to some of the hard to reach hoses. I also plan to do my oil cooler hoses and orings...have not seen a good write up on that however.

I also just recently put on a new gas cap and also ordered the headlight boots, as both were missing. New heater valve sitting on shelf

I used this thread for hose reference What other hoses should I replace?
and as stated in that .....check your part #s for your vin as some do change over the years. Mine however checked out to ba all the ones listed in post #12

It's pretty easy other than getting to the hoses can be awkward. If you search around there's a few videos and short write ups on the oil cooler, but if I remember correctly once you get the hoses off it's a big bolt you take out, a washer/gasket/oring on the bolt, and then a big oring on the cooler just like an oil filter. Replace the two orings and bolt the oil cooler back on and put the new hoses on and you're good to go.
 
I got a set of front fenders from the wreckers. Someone cut and put those lights in. Not sure which type. I actually just painted up my other Limited fender white to replace this one so it will be coming off soon. Getting tired of driving around looking ridiculous with multiple colours. Then, the bumper, and it will start looking nice.

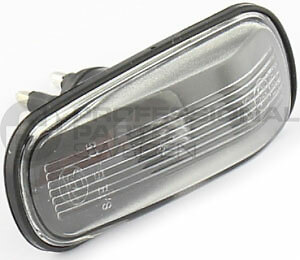
Hard to tell from the pic, but it looks like the Saab side markers I'm using on mine.

s-l500.jpg

They come in clear/yellow bulb or yellow lenses.

If you wire the hot wire to the parking light circuit, and ground it to the hot wire on that side's turn signal bulb, it will do both. When parking lights are on, current will flow through the side marker bulb and on through the larger turn signal bulb, lighting the smaller side marker bulb, but not enough current to light the turn signal.
And when the turn signal bulb goes on, then that circuit 'saturates' (probably not the right word) and no long acts as a ground for the side marker bulb, so it goes off.

Net result, bulb is on when parking lights are on, bulb blinks when turn signals are on.
 
Last edited:
i plan to replace all mine as well, this summer while doing a timing belt kit and vc gaskets. Hopefully with all the intake stuff out of the way I will be able to get to some of the hard to reach hoses. I also plan to do my oil cooler hoses and orings...have not seen a good write up on that however.

I also just recently put on a new gas cap and also ordered the headlight boots, as both were missing. New heater valve sitting on shelf

I used this thread for hose reference What other hoses should I replace?
and as stated in that .....check your part #s for your vin as some do change over the years. Mine however checked out to ba all the ones listed in post #12

The oil cooler ended up giving me the most trouble. I did see a couple of videos on the project, but those folks either had a 2WD, or I'm just dumb, because I could barely see the cooler directly from the bottom, let alone reach it, it was blocked by the axle. I could get to it from the rear bottom, but it was a long reach. So I ended up going through the wheelwell, which wasn't bad after removing the wire harness that was blocking the big mounting bolt:

UkmNiGg.jpg


Here are all the parts involved, you can see my old o-ring was so brittle it broke into pieces:


W15XsFa.jpg


To get to the front clamp of the long hose, I had to remove the oil dipstick and the wire harness tab that's attached to the water pump, then it was pretty accessible:

S9hrdH8.jpg


The new o-ring goes into this groove on the cooler:

xbTr1bR.jpg


I struggled to get the mounting bolt to line up with the threaded hole in the engine block, and when I fired up the engine after the job was done, I was treated to about two quarts of oil on the ground before I was able to shut the engine off. As I suspected, the o-ring slipped as I was fighting the mounting bolt, and got chewed up during installation. Fortunately, someone must have been looking out for me because for some odd reason, I received two of these o-rings in my order, so now I had a spare. I took out the old one (and confirmed that it got obliterated), but then spent no less than 20 minutes trying to get the bolt to engage without letting the o-ring slip out again. I don't know what I was doing wrong, the videos made it look so easy. Perhaps it's because I was being stubborn and did not disconnect the water hoses from the oil cooler, so they were fighting my attempts to properly position the cooler on the block. Regardless, it was a challenge, but eventually I prevailed :).

As for the hoses, all the ones in the linked thread worked out for me, except for two. One was the rear heat hose 87245-3D090, which I was told was not right for my truck, and instead used 87245-35750:

1Nvc2Q5.jpg


Also, one of the throttle body hoses, 99556-10300, was longer than the one I removed, so I cut it to the same length as old.

I can post the list of all the hose and clamp part numbers that I used, if that would be helpful.

 
Status
Not open for further replies.

Members online

Forum statistics

Threads
278,316
Messages
3,554,120
Members
248,016
Latest member
Advally Service

Trending content

Back
Top