What Did You Do To Your 3rd Gen Today?

Status
Not open for further replies.
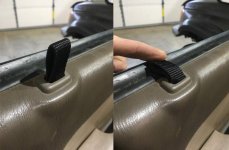
Trying this out as a solution to repeatedly hitting the lock with my arm...

Webbing was cut, punched, & expertly zip-tied around the oem threaded rod.
All manual and power activation still works and the only mod was to shorten
the threads about 1/4" or so. Still plenty of meat left if I have to go back.
 

Attachments

  • Door_Lock.jpg
    Door_Lock.jpg
    41.3 KB · Views: 639
Recently I have been having rough shifts with my 99 5speed. It’s got 300k so it’s to be expected.
I have done frequent fluid changes, but fresh fluid only helped a bit (I have done a great job of upkeep with the vehicle, but I bought it at 228k, so who knows how it was treated before that).
So I added a bottle of XADO EX120 Gearbox Restoration. Thought it may be snake oil, but damn it if I don’t shift with less than half the effort now.
I’ve also added it to my rear diff, and that’s been smoother and quieter too.
 
Trying this out as a solution to repeatedly hitting the lock with my arm...

Webbing was cut, punched, & expertly zip-tied around the oem threaded rod.
All manual and power activation still works and the only mod was to shorten
the threads about 1/4" or so. Still plenty of meat left if I have to go back.

Man that looks great! Solving one of the most annoying problems I have with the door panel!
 
‘96 Added Hi Intensity LED headlites

Found that the rubber boots are a PITA. Don’t fight it just remove the filter box etc. to give yourself room.
Much brighter, but as before I can see no difference between hi/lo beams when driving. Any ideas what that indicates?
 
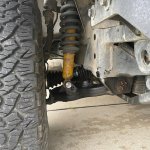
Finally got around to doing poly urethane LCA bushings and Eimkeiths LCA reinforcement. Serviced the aisin hubs while I was at it. Rebooted the CVs too. Waiting for new coilovers with resi’s but their on an 8 week lead time. I’ll figure out if I really need a limit strap or not… I doubt it but didn’t want to pull LCAs again to weld the tabs on so just burned em on now. Oh I also switched out my old rusty wire cable for synthetic line and ultra hook setup.
 

Attachments

  • IMG_2024-03-03-150219.jpg
    IMG_2024-03-03-150219.jpg
    98.2 KB · Views: 428
  • IMG_2024-03-03-150229.jpg
    IMG_2024-03-03-150229.jpg
    82.4 KB · Views: 416
Last edited:
Mine being the 96, some wiring might be in my future. I'll watch for your larger oil filter compatibility report.
Did the oil change yesterday with the "Suzuki" Denso alternator. Not much different than the factory alternator. The control wires are somewhat in the way, but where it matters (grip around the filter), it does not interfere. Seems to be no issue with the larger D3 filter.

-Charlie
 
That's horrible! What's a prop rod? :hiding:
*giggles*

Did the oil change yesterday with the "Suzuki" Denso alternator. Not much different than the factory alternator. The control wires are somewhat in the way, but where it matters (grip around the filter), it does not interfere. Seems to be no issue with the larger D3 filter.

-Charlie
Awesome!

Out of curiosity before sending the core back I pulled the brushes to see how much more life the old alternator had...
tKgW3rdl.jpg
 
20240305_1147277.jpg 20240305_1147366.jpg

20240305_1149255.jpg 20240305_1157488.jpg
 

Attachments

  • 20240305_1147277.jpg
    20240305_1147277.jpg
    58.3 KB · Views: 461
  • 20240305_1147366.jpg
    20240305_1147366.jpg
    52.1 KB · Views: 468
  • 20240305_1149255.jpg
    20240305_1149255.jpg
    55.7 KB · Views: 466
  • 20240305_1157488.jpg
    20240305_1157488.jpg
    45.4 KB · Views: 462
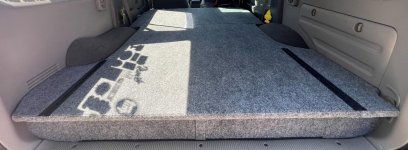
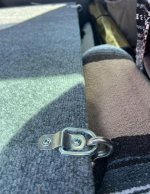
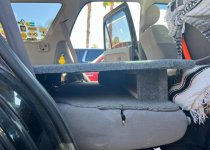
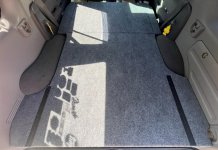
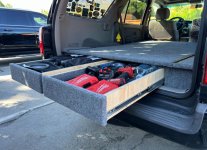
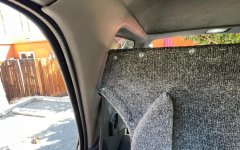
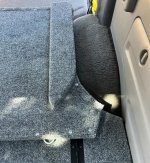
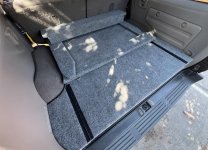
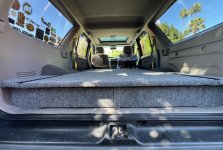
Finished up carpeting and tidying my sleeper platform/drawer build. Really happy with how clean it turned out. The portion toward the front of the cab can flip back (with the little wings on the side flipping to what, in this orientation, is the underside so that the whole thing sits flush on itself) when or if I need to use the back seats. That same portion is held down using two turnbuckles looped in to the rear seat flip up brackets and some d-rings on the platform. It’s supported by a little box I made to match the rear height and keep the platform level. These prefab kits are exorbitantly expensive. I built mine in a couple weekends and for under $300.
 

Attachments

  • IMG_6438.jpg
    IMG_6438.jpg
    105.4 KB · Views: 466
  • IMG_6439.jpg
    IMG_6439.jpg
    138.6 KB · Views: 463
  • IMG_6440.jpg
    IMG_6440.jpg
    136.3 KB · Views: 461
  • IMG_6441.jpg
    IMG_6441.jpg
    131.2 KB · Views: 463
  • IMG_6442.jpg
    IMG_6442.jpg
    137 KB · Views: 459
Finished up carpeting and tidying my sleeper platform/drawer build. Really happy with how clean it turned out. The portion toward the front of the cab can flip back (with the little wings on the side flipping to what, in this orientation, is the underside so that the whole thing sits flush on itself) when or if I need to use the back seats. That same portion is held down using two turnbuckles looped in to the rear seat flip up brackets and some d-rings on the platform. It’s supported by a little box I made to match the rear height and keep the platform level. These prefab kits are exorbitantly expensive. I built mine in a couple weekends and for under $300.

Nice work! I like that it's really low-profile. How do the drawers work?

Can you share a picture of it packed up for backseat occupants?

Thanks for sharing!
 
Nice work! I like that it's really low-profile. How do the drawers work?

Can you share a picture of it packed up for backseat occupants?

Thanks for sharing!


Thanks! I’m 6’2 and didn’t want to lose like 8-12” of head space that a lot of the other systems I’ve seen seem to eat up. I can still sit up with this in and not have to contort my neck a bunch.

The drawers are just on some heavy duty (100lb) Amazon drawer slides. I’ll probably replace them for beefier ones (these are totally adequate but have a little play, they were like $20)

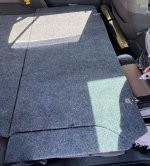
Takes all of 2min to fold it up. Just loosen the turnbuckles and flip everything back. I haven’t had my seat bottoms in the truck for probably two years, so you’d need to bolt them back in real quick or find another attachment point if you decide to use this design and keep the seat bottoms installed. I just flipped the backs up real quick for a photo. Just throw the front spacer in back and good to go
 

Attachments

  • IMG_6464.jpg
    IMG_6464.jpg
    136.3 KB · Views: 432
  • IMG_6467.jpg
    IMG_6467.jpg
    143.9 KB · Views: 432
  • IMG_6471.jpg
    IMG_6471.jpg
    141.2 KB · Views: 444
  • IMG_6466.jpg
    IMG_6466.jpg
    137.2 KB · Views: 427
  • IMG_6468.jpg
    IMG_6468.jpg
    136 KB · Views: 423
Installed Durobumps diff bracket bushings. Only issue I ran into was tightining the bottom 21mm bolt while holding the 22mm nut with a wrench. Not sure if it was becuase im running a diff drop...tried torquing to 101ft lbs but the bottom bolt kept spinning...
 
Installed Durobumps diff bracket bushings. Only issue I ran into was tightining the bottom 21mm bolt while holding the 22mm nut with a wrench. Not sure if it was becuase im running a diff drop...tried torquing to 101ft lbs but the bottom bolt kept spinning...

Pretty common problem. It's been a couple years since I've taken those mounts off but if I remember correctly you can put a good sized wrench on the top nut and it will brace itself against something underneath while you torque from the bottom. Maybe, like I said it's been a while
 
[MENTION=76742]Joshv4runner[/MENTION] Nut or bolt threads stripped in that spot.
Have 1" diff drop and durabump didn't have problem.
 
Last edited:
Spent 3 days out in Sand Hollow Utah. If you are not familiar, its like Moab but everything is closer together and incredibly fun. This is our first day which was pretty chill. Second day is where I think I hit the limits of what my truck can do. Or at least what I am willing to put it through.

Solid axle 4Runner and 72 Bronco explore SAND HOLLOW... West Rim Trail, Maze, Top of the World. - YouTube

Looks like fun! I feel like I know that area from watching Matt's ORR channel
 
picked up a set of 3rd gen taco steel take offs with decent 265/70/16 on them. these are going to replace some too mall for me 18inch impact wheels and badly camber worn tires.
 
Status
Not open for further replies.

Members online

Forum statistics

Threads
278,316
Messages
3,554,120
Members
248,016
Latest member
Advally Service

Trending content

Back
Top