What did you do with your 4runner today?

Removed my stock steps from the 4Runner 2 nights ago then yesteday spent the afternoon trying to put on my Shockworks sliders in by myself. PITA install but i am happy with the turnout. Have to go to Home depot to pick up a longer botl for the rears.
 
Installed a flowmaster super 40 yesterday which sounds great. Also replaced both front wheel bearings. Cleaned up the headlight lenses today. The one on the right is restored.

5989313a03b91475f9eb074ad79665ae.jpg
 
Last edited:
Installed my Icon front and rear suspension today. In addition to the 2hrs last night, it took me another 8hrs today to install it by myself. The rear check valves on the shocks were frozen so I just disconnected the line and caught the fluid. Still need to remove the rest of the lines.

My tires still rub a little bit, but it is a lot better. If the alignment doesn't solve it, I think a little work with a dremel will. I took her around the block and the ride is night and day better! I wish I could have afforded to skip the DS lift and gone straight to this.
7f934f141800a6ce4a6865fd4cf49fd8.jpg
1e48688de2c0bac347ce4f66be25da59.jpg
5b17a9fe26a743def638ba7ec099e596.jpg
 

Attachments

  • 11824926_10204779620275435_339868235459529017_n.jpg
    11824926_10204779620275435_339868235459529017_n.jpg
    80.2 KB · Views: 564
  • 20150809_140624.jpg
    20150809_140624.jpg
    134.4 KB · Views: 569
  • 20150809_104129.jpg
    20150809_104129.jpg
    138.8 KB · Views: 562
  • 11866248_10204779622915501_6322493947522451867_n.jpg
    11866248_10204779622915501_6322493947522451867_n.jpg
    80.7 KB · Views: 551
  • 20150809_130837.jpg
    20150809_130837.jpg
    133.9 KB · Views: 560
  • 11870779_10204779621715471_2647660793627389074_n.jpg
    11870779_10204779621715471_2647660793627389074_n.jpg
    79.3 KB · Views: 556
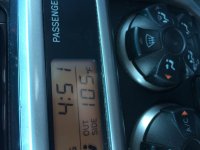
A little warm today

Austin, TX. Not saying it's too hot, but two hobbits did just throw a ring into my back yard....
 

Attachments

  • image.jpg
    image.jpg
    122 KB · Views: 657
Changed the oil at about 3500 miles. (5W30 MB1 Synthetic). I was logging my lift install and realized it had been last changed in January. Used a Toyota factory filter I found on the shelf.

Also stared lovingly at the new lift. Can't wait to get it aligned on Tuesday. Bring back the Castor!!!
 
yesterday, went to ikea and bought a brimnes queen size storage bed along with the matching headboard, filled up my truck pretty nice since i took out my subs, now the subs are back in. today did some swaping, new thermostat, new cluster lens and new limited grill.


so shiny and clean, did miss some stuff from my order with toyotapartsexpress, hopefully i get an email back.
 
I went off-roading yesterday with a couple of guys up to Santiago Peak in SoCal. It was really fun long drive, pretty easy. Except on the way down the lead driver saw a turn off and we just thought the road split so I followed the leader and it ended up being a dead end on a narrow trail, so we all had to back up. Well while backing up I didn't realize how close my tires were to the edge and the ground gave off and I slide off. Keep in mind we are about half way down the mountain, still pretty high up. Luckily there were some shrubs there to catch my trucks fall and scratch the hell out of it. Our first attempted to pull me out made me go down forward. Because of the narrow trail it was hard to get a good side pull. After some thoughts we decided to lower my right side tire pressure down to 10psi and had 4 people stand on my running boards so those wheels could get traction. Then we shortened the tow strap a lot and hooked up to both my front hooks. I put it in 4 low and a friend pulled with his truck and we were able to get it out.

b9e95fbaa04ccf3aaf265cfa37093627.jpg

3e4e090a6abaf2e73a3c7c53e05ab815.jpg

1c2d5caf238262d740aadcc07058b233.jpg

630e5126d1b99bbf37b52106d38c1f06.jpg
 
Hairy situation, glad it worked out. I need to go up there still. Did you guys enter from the Ortega side?


It was pretty sketchy, but the rest of the trail was easy and had a nice view. Yea,we entered from the Ortega side and then went down the Indian truck trail into corona. I'll let you know when we go up there again.

c8562eb94843d70701b0735f5c53754e.jpg


Here is a picture of after we got it out.
 
Last edited:
It was pretty sketchy, but the rest of the trail was easy and had a nice view. Yea,we entered from the Ortega side and then went down the Indian truck trail into corona. I'll let you know when we go up there again.

c8562eb94843d70701b0735f5c53754e.jpg


Here is a picture of after we got it out.


Whoa. Serious pucker factor there. Glad to see you were able to keep that awesome rig right side down!
 
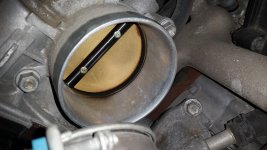
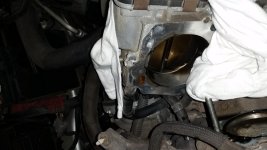
Cleaned the throttle body....uploadfromtaptalk1439255383189.jpguploadfromtaptalk1439255393044.jpg
 

Attachments

  • uploadfromtaptalk1439255383189.jpg
    uploadfromtaptalk1439255383189.jpg
    136.4 KB · Views: 649
  • uploadfromtaptalk1439255393044.jpg
    uploadfromtaptalk1439255393044.jpg
    127.3 KB · Views: 642
tood it to the dealer yesterday to have all of the fluids flushed and replaced and had the transmission fluid drained and filled. It felt like a new car driving it home it was amazing. Luckily the dealer was pretty good and didn't get me much trouble.
 
So, after the body shop decided to give me a brand new stock amp for the JBL system my truck doesn't have, a stock sub, and stock sub enclosure in place of my amp and JL amp and sub that still worked, I decided to pull the stock non-working stuff out and reinstall my JL equipment.

The stock stuff, not hooked up or plugged in to anything :whyme:
20150808_142501_zpsuuqmumds.jpg~original


All brand new at least
20150808_142509_zpsjz1qqkt9.jpg~original


Here's what they did with my wires, thanks dbags!
20150808_142638_zpslrmiysou.jpg~original


So, since they gave me a brand new sub enclosure, I decided to use it. Look how nice and shiny it was before I started destroying it :thumbsup:
20150808_153211_zpsthoxo2cm.jpg~original


Bring on the dremel!
20150808_161451_zpsg56xdo5i.jpg~original


And another upgrade
20150808_173737_zpstwmhwco3.jpg~original


Also did the inside of the exterior panel that they repaired
20150808_182117_zpseocqm5yx.jpg~original


And hit the back of the trim panel as well
20150808_175517_zpsk56jhiga.jpg~original


And, moved the sub to the new enclosure
20150808_173831_zps7y715edp.jpg~original


Bolted up the new enclosure
20150808_183157_zpsxc7spjnx.jpg~original


Now the problems begin, so on the old enclosure it had no top left bracket, so I was able to cut the body and mount the amp like this...
IMAG1290.jpg~original


Well, with the new box, all the mounts are there, so mounting here is impossible for this amp... So the only solution if I didn't want to start hacking up my brand new sub box was to move the amp. This meant, pulling the box out and running new wires...
20150809_170334_zpsiltqolek.jpg~original


Needless to say, I was less than pleased, but wanted to do things right
20150809_170338_zpsajvkvynd.jpg~original


Since I still plan to run my 4-channel highs amp and wires, I plan to mount it (being smaller profile on the box) So the sub amp went under the passenger seat (still trying to be as stealth with the install as I can.
20150809_173049_zpshbi0ylcz.jpg~original


Finding a ground under the seat was not easy, I ended up running the ground up the center pillar behind the seat belt.
20150809_152511_zpsquc36ovh.jpg~original


The other custom task that I had to do, was trying to fit a speaker cover panel in place of the storage compartment door that goes there stock. These covers are impossible to find, so I had 1 shot to do it right.
20150808_183420_zpsbmdtmqbd.jpg~original


It's not made to go on this panel, and did not sit flush, so I began modifying it and trimming down all the fastening points for the other type of panel
20150808_183426_zpss9bfeumy.jpg~original


I did all this before I knew that I was moving the amp, so I also had to smooth out all the ridges to not push against the amp that I thought was going back there.
20150808_184652_zpsubc2plse.jpg~original


Sucker fits almost perfectly after all that trimming
20150808_184803_zpsalwrkbsm.jpg~original


Finished product for now. I intend to plastic weld the cover onto the panel whenever I do the highs amp, 1 of the clips came loose from flexing and I couldn't get it back without taking the panel back off, so it will do for now.
20150809_180511_zps8iultbie.jpg~original


Still looks better than it did before and I'm all setup to install the highs amp for my next weekend project. But overall I'm happy with the way it turned out, even if it took twice as long as it should have. Had I used the old enclosure I could have just bolted everything back in and been done. But like I always say, "If it aint custom, it aint BlackAck"

 

Members online

Forum statistics

Threads
278,316
Messages
3,554,120
Members
248,016
Latest member
Advally Service

Trending content

Back
Top