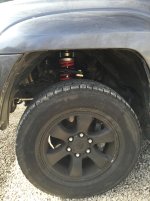
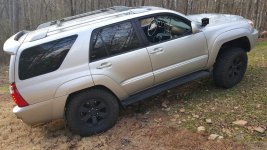
Spent 12 hours removing xreas and installing UCAs and front shocks. Things to remember:
1. I hate ball joints
2. Many things are much easier with two people
3. I hate ball joints
4. The 3 nuts on top of the shock towers are the worst.
5. XREAS removal does NOT spray oil like a fire hose causing a giant spill like I imagined it would.
6. I hate ball joints
When I did my shocks and springs I popped the lower control arm bolts and swung it down and out of the way. After taking the shock bolts out it fell straight down. No ball joints or sway bar was touched.
Spent 12 hours removing xreas and installing UCAs and front shocks. Things to remember:
1. I hate ball joints
2. Many things are much easier with two people
3. I hate ball joints
4. The 3 nuts on top of the shock towers are the worst.
5. XREAS removal does NOT spray oil like a fire hose causing a giant spill like I imagined it would.
6. I hate ball joints
how did it take 12 hours? i took 6 removing my xreas when i went to 5100s with tacoma/fj coils. i event took time to chat so i could have done it in under 5 hours
how did it take 12 hours? i took 6 removing my xreas when i went to 5100s with tacoma/fj coils. i event took time to chat so i could have done it in under 5 hours
It took me about 12 hours as well the first time. Pretty much the first time I had used a wrench on a car, so noob. Part of that was due to not using power tools (college budget :becky: ). I also took disconnected the lower ball joint and it took forever for me to figure out how to connect it again. I also had to deal with a stripped bolt on the strut mount. (Prob. stripped by me using the wrong tool :frusty: w/out realizing it) I also had a stripped swaybar link that took a bit to replace.
I adjusted mine a couple weeks later and it took about 1-2 hours or so.
how did it take 12 hours? i took 6 removing my xreas when i went to 5100s with tacoma/fj coils. i event took time to chat so i could have done it in under 5 hours
I really couldn't tell you ha. It could be that I was in my brothers garage, which I'm still not too familiar with where everything is , or that I was being too cautious... But really it's just because I'm still pretty new to all this and not too fast.
I think my day star spacer lift took me like 4 hours last time, but that was with some help.
It took me about 12 hours as well the first time. Pretty much the first time I had used a wrench on a car, so noob. Part of that was due to not using power tools (college budget :becky: ). I also took disconnected the lower ball joint and it took forever for me to figure out how to connect it again. I also had to deal with a stripped bolt on the strut mount. (Prob. stripped by me using the wrong tool :frusty: w/out realizing it) I also had a stripped swaybar link that took a bit to replace.
I adjusted mine a couple weeks later and it took about 1-2 hours or so.
Haha no judgement. I don't think the beers help, but every mod I do has at least one or two "snag in the plan" like that that slows down the entire process and makes me more frustrated.
For all the nooby mechanics out there, don't feel bad about taking your time. It's more important to do the job correctly, and even more importantly safely, than to meet some arbitrary time standard. One of the reasons for DIY is that you're not on the clock, so taking your time and being safe is most important. Whether or not someone else could do it faster is irrelevant. Suspension jobs have the potential for serious injury if you get careless or hurry.
Dipped all door handles, rear trunk trim, upper&lower grilles, fog buckets.. round 2
Removed running boards, removed headlights (passenger is a moisture collector...both are really oxidized/yellow and pitted) baked & painted internal lights black, re-sealed lights, headlight restoration and buffing... round 3
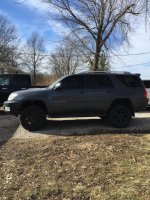
All in all the truck is starting to look the part of the family / dog hauler. My wife called it "Nick-a-fied" ... "T M" I laughed It's true I always put my flavor on my vehicles.
Next is the wheels dipped, and maybe all the window trim dipped. Paint correction if I run out of things to do. I like that the paint is clean but beat up a bit
Took 2 days of on/off work and lots of beers and dog playing
Front blinkers quit working, found out my drivers side socket is burnt right up, plastic is melting and everything. Passenger side socket is loose and the light keeps backing out so it doesn't get connection. Anyone know where I can get a replacement?
Front blinkers quit working, found out my drivers side socket is burnt right up, plastic is melting and everything. Passenger side socket is loose and the light keeps backing out so it doesn't get connection. Anyone know where I can get a replacement?
Oh good! I thought it was going to be super hard to find and expensive! I take it the existing wires just plug in the back of it?
Only thing I can think is that without the splash guard I"m getting water in it. I think I might silicone the back of it after I put in a new one, try and keep moisture out of it. I'm sure I throw tons of it on there. lol
Thanks for the info! I just logged onto the computer to try and find it and you already had it!
Oh good! I thought it was going to be super hard to find and expensive! I take it the existing wires just plug in the back of it?
Only thing I can think is that without the splash guard I"m getting water in it. I think I might silicone the back of it after I put in a new one, try and keep moisture out of it. I'm sure I throw tons of it on there. lol
Thanks for the info! I just logged onto the computer to try and find it and you already had it!
i had to replace mine before so i knew what i was looking for! its just as simple as you think, unscrew from the lens, pop out the bulb, then use a screwdriver to pry the tabs and pull out the socket and do the reverse for installation. i did it in the parking lot of the dealer before driving back home, youll have no issues!
Pulled the rear seats out and started building a (very rough) sleeping platform out of random wood I had laying around. Just need to put the eye bolts in for the turn buckles to hold it down and throw the memory foam on top.
i had to replace mine before so i knew what i was looking for! its just as simple as you think, unscrew from the lens, pop out the bulb, then use a screwdriver to pry the tabs and pull out the socket and do the reverse for installation. i did it in the parking lot of the dealer before driving back home, youll have no issues!





 It's true I always put my flavor on my vehicles.