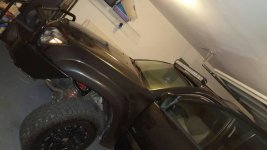
What did you do with your 4runner today?

For all the nooby mechanics out there, don't feel bad about taking your time. It's more important to do the job correctly, and even more importantly safely, than to meet some arbitrary time standard. One of the reasons for DIY is that you're not on the clock, so taking your time and being safe is most important. Whether or not someone else could do it faster is irrelevant. Suspension jobs have the potential for serious injury if you get careless or hurry.
Totally agree and I don't feel bad at all. I'm proud of accomplishing it correctly w/out having to call in a professional.

Spark plugs, air filter, removed HCF, cabin filter, debadged... round 1

Dipped all door handles, rear trunk trim, upper&lower grilles, fog buckets.. round 2

Removed running boards, removed headlights (passenger is a moisture collector...both are really oxidized/yellow and pitted) baked & painted internal lights black, re-sealed lights, headlight restoration and buffing... round 3


All in all the truck is starting to look the part of the family / dog hauler. My wife called it "Nick-a-fied" ... "T M" I laughed :) It's true I always put my flavor on my vehicles.

Next is the wheels dipped, and maybe all the window trim dipped. Paint correction if I run out of things to do. I like that the paint is clean but beat up a bit :)

Took 2 days of on/off work and lots of beers and dog playing :)

EnjoY!
https://drive.google.com/file/d/0B6LPVydHuOOyWXZXMGNJUkJhN00/view?usp=sharing

https://drive.google.com/file/d/0B6LPVydHuOOyNFptWTBDX1VscWM/view?usp=sharing

https://drive.google.com/file/d/0B6LPVydHuOOyMVl3Mkl2S2d3Unc/view?usp=sharing

Looks great! Reflections make it a little hard to tell. Black or blue?
 
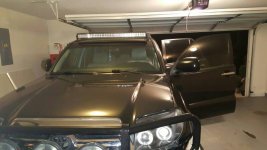
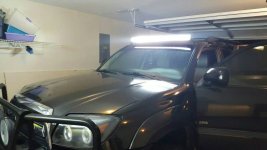
Finally got the bar up, and avoided a 225$ cost of taking it somewhere to have it professionally installed. Thanks to the help of some fire-firefighter buddies, I'd say this is none the less professional

uploadfromtaptalk1454298687187.jpg
uploadfromtaptalk1454298701119.jpg
uploadfromtaptalk1454298710291.jpg

Also tapped into the fuse box, so the switch now lights up when the keys are turned vs staying on, and vehicle doesnt have to be on for it to turn on unlike the 3 fogs.

Overall, a day very very well spent.
 

Attachments

  • uploadfromtaptalk1454298687187.jpg
    uploadfromtaptalk1454298687187.jpg
    35.7 KB · Views: 421
  • uploadfromtaptalk1454298701119.jpg
    uploadfromtaptalk1454298701119.jpg
    40.7 KB · Views: 427
  • uploadfromtaptalk1454298710291.jpg
    uploadfromtaptalk1454298710291.jpg
    36.4 KB · Views: 448
How difficult was it installing the UCAs?

UCAs in general are pretty easy to install. Break loose the OEM ball joints, support the lowers with a jack, unbolt them, wrestle the new ones into place. Hardest part is getting the long bolt out. Driver side has the battery tray in the way, passenger side has some hard lines in the way.
 
UCAs in general are pretty easy to install. Break loose the OEM ball joints, support the lowers with a jack, unbolt them, wrestle the new ones into place. Hardest part is getting the long bolt out. Driver side has the battery tray in the way, passenger side has some hard lines in the way.

Yep just snaking that long bolt all the way out would be the hardest part and not that bad. It helps to leave the washer in the wheel well and pull the bolt out through the engine bay. Then snaking it back in through the engine bay and stabbing the washer again on the wheel well side as it goes back through the control arm.
 
How difficult was it installing the UCAs?

[MENTION=84680]wadle5[/MENTION] That was the easiest part of the whole install. Really just two bolts, one super long one that goes through and holds the UCA on and the other for the ball joint. The passenger side takes like five minutes, the drivers side is a little harder because you have to take the battery out so there is room for the long bolt to slide out.
 
A body lift does wonders to get that bolt out! I didn't have to remove the battery and I could just pull the bolts out. Lol
 
Finally got the bar up, and avoided a 225$ cost of taking it somewhere to have it professionally installed. Thanks to the help of some fire-firefighter buddies, I'd say this is none the less professional

good work! i have always laughed at guys when they go off about something being installed by a "professional"? i can assure you, when i do things on my truck, it is done with much more care than a "professional".

and what really defines "professional"? in the oilfield, one is a professional if he has done it once!! :banana:
 
Spark plugs, air filter, removed HCF, cabin filter, debadged... round 1

Dipped all door handles, rear trunk trim, upper&lower grilles, fog buckets.. round 2

Removed running boards, removed headlights (passenger is a moisture collector...both are really oxidized/yellow and pitted) baked & painted internal lights black, re-sealed lights, headlight restoration and buffing... round 3


All in all the truck is starting to look the part of the family / dog hauler. My wife called it "Nick-a-fied" ... "T M" I laughed :) It's true I always put my flavor on my vehicles.

Next is the wheels dipped, and maybe all the window trim dipped. Paint correction if I run out of things to do. I like that the paint is clean but beat up a bit :)

Took 2 days of on/off work and lots of beers and dog playing :)

EnjoY!
https://drive.google.com/file/d/0B6LPVydHuOOyWXZXMGNJUkJhN00/view?usp=sharing

https://drive.google.com/file/d/0B6LPVydHuOOyNFptWTBDX1VscWM/view?usp=sharing

https://drive.google.com/file/d/0B6LPVydHuOOyMVl3Mkl2S2d3Unc/view?usp=sharing
How much milage are you at currently?
 
good work! i have always laughed at guys when they go off about something being installed by a "professional"? i can assure you, when i do things on my truck, it is done with much more care than a "professional".

and what really defines "professional"? in the oilfield, one is a professional if he has done it once!! :banana:
Couldn't agree more. With careful work and a guidance of sense, anybody can be a "professional" to me
 
7329b4a27a1197038dab897cc7e89316.jpg
f33cbf9a3e99a1bcd5d5bfc5bca0f089.jpg
33af8ba8ebb96eabb0a82de36a5edcca.jpg


Installed a dual battery setup. I had an extra battery become available, so I figured I'd put it to use. I bought two 4gauge amp wiring kits(I'm going to install a power inverter in the back and needed extra wire for that. Plus I needed two fuse holders and the connectors, etc.), a stinger isolator, and new battery tray holder. Took about 2-3 hours. I had a switch and old voltage meter lying around and I want to switch control when the battery gets a charge. Just for now. I'm trying to see how good of a charge it holds with what little is hooked up for now. Later I just tie into proper circuit and done.

Here's a question maybe somebody has an answer:
If I manually switch on the isolator(connecting the two battery's) will it be like a switch for jump starting?

Or do I still do the jumper cable connect?
 
Replaced the splash guards in the wheel wells.


While doing so, I noticed that my lower ball joints boots on both sides were torn, upper ball joint boot on one side was torn as well. Could still see a little grease in them.

New splash guard

f45181ccfb72c0b2465ccfe0a8cde5e6.jpg


UCA BJ

782275f542a345acedadc7ee746cb924.jpg


Lower BJ

407e4f76c7737241d0d29b0103bda5f1.jpg


LCA Bushing

54953cefafa13c8347f1d8fa8eef607e.jpg

My questions are:
1. How important is replacing the boots/joints? I want to get a uniball UCA, does the uniball really need to be replaced almost yearly? or only if wheel'n?
2. Replace the boot, ball joint or the entire arm? (lower) Pretty sure that my cams are likely frozen,couldn't really see the bushings to look for wear.
3. When going over speedbumps I get a squeak/groaning sound from the front suspension. Joints the likely culprit?
 
Last edited:
Replaced the splash guards in the wheel wells.


While doing so, I noticed that my lower ball joints boots on both sides were torn, upper ball joint boot on one side was torn as well. Could still see a little grease in them.

My questions are:
1. How important is replacing the boots/joints? I want to get a uniball UCA, does the uniball really need to be replaced almost yearly? or only if wheel'n?
2. Replace the boot, ball joint or the entire arm? (lower) Pretty sure that my cams are likely frozen,couldn't really see the bushings to look for wear.
3. When going over speedbumps I get a squeak/groaning sound from the front suspension. Joints the likely culprit?
My balljoints made all sorts of noise when they went bad. Got wobbly fast after the boot split.
 
Totally agree and I don't feel bad at all. I'm proud of accomplishing it correctly w/out having to call in a professional.


Looks great! Reflections make it a little hard to tell. Black or blue?
Yah low lighting. It's shadow mica. So greyish green. Dark gray

Loving the look. Just need to dip the wheels and window trim. Replace the window trim rubber. Tire alignment. And a few others
 
Replaced the splash guards in the wheel wells.


While doing so, I noticed that my lower ball joints boots on both sides were torn, upper ball joint boot on one side was torn as well. Could still see a little grease in them.

My questions are:
1. How important is replacing the boots/joints? I want to get a uniball UCA, does the uniball really need to be replaced almost yearly? or only if wheel'n?
2. Replace the boot, ball joint or the entire arm? (lower) Pretty sure that my cams are likely frozen,couldn't really see the bushings to look for wear.
3. When going over speedbumps I get a squeak/groaning sound from the front suspension. Joints the likely culprit?

I don't do anything crazy, or have insane lift so I plan on going with the Camburg UCAs with the standard ball joints for $599. Save some money and ball joint hassle. Maybe something for you to think about.
 
Replaced the splash guards in the wheel wells.


While doing so, I noticed that my lower ball joints boots on both sides were torn, upper ball joint boot on one side was torn as well. Could still see a little grease in them.

My questions are:
1. How important is replacing the boots/joints? I want to get a uniball UCA, does the uniball really need to be replaced almost yearly? or only if wheel'n?
2. Replace the boot, ball joint or the entire arm? (lower) Pretty sure that my cams are likely frozen,couldn't really see the bushings to look for wear.
3. When going over speedbumps I get a squeak/groaning sound from the front suspension. Joints the likely culprit?
Where did you find the splash guards, don't tell me you made them...
 
Where did you find the splash guards, don't tell me you made them... ��
Ok.

Dealer wanted ~$100 for the set, seemed reasonable so I purchased from the dealer.

Actually, I made them after finding out how dang expensive they were. Gimme your email and I'll forward the template. ~10 minutes to make. ~$15

Purchased toolbox liner from Harbor Freight for $7, box of new clips for $7 from Autozone, $1 to get them printed (Requires 11x17 paper)

I don't do anything crazy, or have insane lift so I plan on going with the Camburg UCAs with the standard ball joints for $599. Save some money and ball joint hassle. Maybe something for you to think about.
I was looking at those, I should prob. do new UCAs as post-lift I am sitting at only 1.5° castor. Only a 2.5" lift (low side), so it wasn't super high on my upgrade list given the expense

My balljoints made all sorts of noise when they went bad. Got wobbly fast after the boot split.
They looked pretty sketchy when I installed my lift a couple of months ago. Other than low castor it feels solid. Even at 1.5° castor it still tracks straight, a little bit of wandering at higher speeds but easily manageable and still feel comfortable with it.

Tried to get a video of the squeak, but ended up catching the back more than the front. Back creaks when going over bumps as well, usually more than the body twists some (cornering over a bump) Body mount? Spare tire?

https://www.youtube.com/watch?v=ErkM3uW6fNQ
 
Last edited:
Ok.

Dealer wanted ~$100 for the set, seemed reasonable so I purchased from the dealer.

Actually, I made them after finding out how dang expensive they were. Gimme your email and I'll forward the template. ~10 minutes to make. ~$15

Purchased toolbox liner from Harbor Freight for $7, box of new clips for $7 from Autozone, $1 to get them printed (Requires 11x17 paper)
Lol, I was about to say! That sounds awfully cheap in my eyes, the OEM roof rack plastic covers are about 100$ a piece!

[email protected] - Thanks a lot, I'm really looking forward to this project
 

Members online

Forum statistics

Threads
278,316
Messages
3,554,120
Members
248,016
Latest member
Advally Service

Trending content

Back
Top