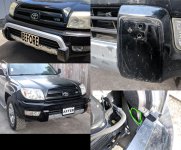
What did you do with your 4runner today?

[MENTION=114846]Bluesky 07[/MENTION], I feel like it's a little bit throatier if you really get on it, but if you were ask most people I'd imagine they wouldn't notice a difference.
 
Completed the front BBK install today.

0162c5b4177e6527b1842fb1a89a8a89.jpg


dc4c6895325c8d2e04fd6093b25194d5.jpg


Here it is san's rust. Here are links to details.

Part 1
Part 2
 
Last edited:
you see the factory ground point at the front seat bracket mounting hump? its a good place for amp ground, better than using seat bracket to sandwich it together. lets us know how that 4 channel worked out, and the ease of install.

Yea, that's where I grounded the amp. I also went with an Alpine 4 channel, which I just received today.

On a side note, the sound deadening of the floor made a HUGE difference. The 4runner feels more solid driving on the road, with zero creaks coming from the ground. It's amazing.
 
Did my annual headlight de-hazing routing with wash/clay/3000grit wet/5000grit wet/polish/wax. Turned out great.

Also, in preparation for tire rotation, dropped the spare (which I include in rotation), and used Nanoskin’s Speedy Brite wheel acid. Wheels have been somewhat neglected with burnt in brake dust. Speedy Brite did an amazing job, first time I’ve used this stuff and I’m glad I found it. Aside from the minimal corrosion from several winters on PA salt roads, the wheels look new. Great product!


Sent from my iPhone using Tapatalk
 
Did a rare thing.

Evap went out. with help from a friend, replaced evap, compressor, condenser, dryer, and expansion valve. back to blowing cold just in time to not need it for fall. lol. took about 8-10 hours. not bad with extra set of hands and eyes working on the dash. it was a beast. saved big money though and learned a lot. worth it. pics to come later. :police:
 
Pics of the 10 hour ordeal. That includes evap, compressor, condenser, dryer, and expansion valve. for the amount of money it saved me, I would do it again. defiantly have a friend to help.

stone618-albums--c+evap+replaced-picture52656-oh-yeah.jpg


stone618-albums--c+evap+replaced-picture52654-almost-there.jpg


stone618-albums--c+evap+replaced-picture52653-now-were-getting.jpg
 
Pics of the 10 hour ordeal. That includes evap, compressor, condenser, dryer, and expansion valve. for the amount of money it saved me, I would do it again. defiantly have a friend to help.

stone618-albums--c+evap+replaced-picture52656-oh-yeah.jpg


stone618-albums--c+evap+replaced-picture52654-almost-there.jpg


stone618-albums--c+evap+replaced-picture52653-now-were-getting.jpg

Wow, what a ton of work! Maybe a silly question, but did you have to tow it to a shop to refill/charge the system? I’m pretty sure the new compressor would be damaged if you start the vehicle without adding the charge and oil.
 
Wow, what a ton of work! Maybe a silly question, but did you have to tow it to a shop to refill/charge the system? I’m pretty sure the new compressor would be damaged if you start the vehicle without adding the charge and oil.

This was in my garage at my house. I used the cheap 8 dollar cans of r134 from autozone. yes, I got in the zone!
I have the gauge set and it was pretty easy. we filled the compressor with the correct oil before we installed. we would have been done on day one, but when we got to hookup the lines to the compressor, the bolts were a little short. old compressor had bolts tapped into it, so it was a nut to remove old compressor. new comp, I had to go to lowes the next day to get two new bolts that were just a bit longer. not a big deal at all, just frustrated that we were down to the last two bolts, and couldn't get finished same day. lol.

 
This was in my garage at my house. I used the cheap 8 dollar cans of r134 from autozone. yes, I got in the zone!
I have the gauge set and it was pretty easy. we filled the compressor with the correct oil before we installed. we would have been done on day one, but when we got to hookup the lines to the compressor, the bolts were a little short. old compressor had bolts tapped into it, so it was a nut to remove old compressor. new comp, I had to go to lowes the next day to get two new bolts that were just a bit longer. not a big deal at all, just frustrated that we were down to the last two bolts, and couldn't get finished same day. lol.
You have to have the system evacuated. They put a pump on it and basically suck all the moisture and contaminants out of it.

If you don't do this you will blow the new compressor. May not happen today or tomorrow. But it will happen. Spend the $150 and finish the job correctly.
 
This was in my garage at my house. I used the cheap 8 dollar cans of r134 from autozone. yes, I got in the zone!
I have the gauge set and it was pretty easy. we filled the compressor with the correct oil before we installed. we would have been done on day one, but when we got to hookup the lines to the compressor, the bolts were a little short. old compressor had bolts tapped into it, so it was a nut to remove old compressor. new comp, I had to go to lowes the next day to get two new bolts that were just a bit longer. not a big deal at all, just frustrated that we were down to the last two bolts, and couldn't get finished same day. lol.

I did this on my fd but it wasn’t as intense as having to remove the whole dash hehe. I have had to remove the whole dash on my 3rd gen before but that was because I wanted to paint it black :lol:
 
Last edited:
FINALLY got rid of the underbite bull bar. I wanted to do it without removing the bumper, but just could not figure out how to get in there. Finally last night I tried going in from right above the bumper with the hood open.

I felt two bolts right where the bull bar connected on both sides. It was JUST possible to get a ratchet wrench in there with a deep socket.

Absolutely hated every second of doing it. About 40 minutes of ratcheting them out. If I was lucky, I got two clicks out of movement each time. Probably 20 degrees, so each thread took ~18 times moving the wrench to get past. Along with it being at a terrible angle, falling off the nut occasionally.

Other than that, it wasn't too bad. And it just popped right off after. Although now there are two pieces in there that are kinda loose, but without the bolts from the bull bar, I don't see what they could attach to. A part of it is highlighted green in the picture. It extends forwards and down and has a bracket that sits against the back of the front of the bumper, and the screws and nuts of the bull bar were holding it in place. Not sure if re-securing it matters or what. It's still attached back further it, it just moves slightly side to side now near the front.

4runner bullbar removal.jpg
 

Attachments

  • 4runner bullbar removal.jpg
    4runner bullbar removal.jpg
    138.9 KB · Views: 338
Last edited:
You have to have the system evacuated. They put a pump on it and basically suck all the moisture and contaminants out of it.

If you don't do this you will blow the new compressor. May not happen today or tomorrow. But it will happen. Spend the $150 and finish the job correctly.

I did it myself. Rented tool. Done. :guitar2:
 
Changed the plugs a few weeks ago, but never got cylinder #1 off. The coil bolt was rusted and rounded. Got an extractor kit, but that didn't work. Used a 3/8 and tapped on it a bit................ came right off............ ughh.

New flange bolts for me.................

FKRTow9l.jpg
 
Changed the plugs a few weeks ago, but never got cylinder #1 off. The coil bolt was rusted and rounded. Got an extractor kit, but that didn't work. Used a 3/8 and tapped on it a bit................ came right off............ ughh.

New flange bolts for me.................

FKRTow9l.jpg
Yeah, the bolts holding my coil packs in were terrifyingly rusted when I first changed em. Made the extra trip to Advance and bought new ones so that they wouldn't be even worse next time
 
Yeah, the bolts holding my coil packs in were terrifyingly rusted when I first changed em. Made the extra trip to Advance and bought new ones so that they wouldn't be even worse next time

Yep. Mine were overdue, but I HATE putting up with rusty/rounded bolts. Living in the NE (rust belt) sucks.
 
Yep. Mine were overdue, but I HATE putting up with rusty/rounded bolts. Living in the NE (rust belt) sucks.

I’ve been dreading this since I bought mine from the same region. I’ll prolly look into replacing them while I’m in there though. Any idea what bolt size it is?
 
I’ve been dreading this since I bought mine from the same region. I’ll prolly look into replacing them while I’m in there though. Any idea what bolt size it is?

ignition coil flange bolt: 10mm

The ignition coil bolts are M6-1.00 x 25mm flange bolts, try to get class 10.9 but class 8.8 will work just the same..

If you insist on OEM: The bolt part number is 90105-A0103

Amazon has them, however it doesn't mention what class they are. (I'm not sure it matters)

above information I got from this link: http://www.toyota-4runner.org/4th-gen-t4rs/190118-urgent-help-needed-ignition-coil-bolt-sheared.html

peace out
 
ignition coil flange bolt: 10mm

The ignition coil bolts are M6-1.00 x 25mm flange bolts, try to get class 10.9 but class 8.8 will work just the same..

If you insist on OEM: The bolt part number is 90105-A0103

Amazon has them, however it doesn't mention what class they are. (I'm not sure it matters)

above information I got from this link: http://www.toyota-4runner.org/4th-gen-t4rs/190118-urgent-help-needed-ignition-coil-bolt-sheared.html

peace out

Thanks haha I happened across the same thread shortly after I posted my reply...:doh:
 
Purchased ~$150 in oils, picked up a CVJ CV and a new Odyssey AGM battery

Replacing upper/lower oil pans tomorrow and replacing the rear ring/pinion
 
Last edited:

Members online

Forum statistics

Threads
278,316
Messages
3,554,120
Members
248,016
Latest member
Advally Service

Trending content

Back
Top