What did you do with your 4runner today?

Replaced the radiator at 182k. Had her in for inspection they noted it was seeping. Sure enough it was. On a test drive now. Idling with A/C and it is sitting 197 degrees. Hoses and new clamps as well. I went with a DENSO.....from Indonesia. Lol. So far so good.
 
Today was HOT, so I didnt do much.
The other day I thought my compressor went out, AGAIN. That would have made abut 8 compressors in about 8 years but turned out to be a bad relay. The relay I had wasn't waterproof so with the help of some friends we figured out the replay was shot he had an extra waterproof reply.
Lets back up a few days, when the compressor stopped working I though it was shot, like all the rest, So I started looking for a CO2 bottle, I wanted either a 10# or 20# tank, then I was going to modify it with a Ant-Siphon tube, sometimes called a "dip tube" but I wanted the tube to curve or bend up, as to be abe to use the CO2 when the bottle is laying on its side.
So I started to remove the compressor, the wiring, and switches.
Then My friend says. bring it over to the shop at we will look at it, I have spare parts to fix it. Like I said, we figureed out it was just the reply. DAMNIT lol.
Today, I wanted to move the compressor and the tank was already sitting in the garage lol so I moved the compressor to the firewall. I bout a small 1/2g tank that "should" fit on the passenger side fender under the hood. I dont want to run hose/wire again to the cargo area, that was a pain. so now everything to run my air horns and as a backup to the CO2 will be under the hood.
I still need to get the tank and rewire it but the compressor is mounted lol.

74

75
 
Discovered that my rear Napa Eclipse calipers are hanging up due to nonretracting pistons... one only has 12k miles on it and the other 40k miles. Once my one man bleeder kit comes in I’ll take them off and swap them for a replacement set from Napa with their warranty on them. I just hope my rotors aren’t warped... but I’m thinking they are.


Sent from my iPhone using Tapatalk
 
Finished phase 2 of sound deadening, the rear wheel wells. Doing the doors made a significant difference and the wheel wells improved on that. Full write-up on the entire project + the reasoning behind my approach, results, & recommendations to anyone considering adding sound deadener coming as soon as I can get it put together.

yI9BpGbl.jpg
 
Last edited:
Finished phase 2 of sound deadening, the rear wheel wells. Doing the doors made a significant difference and the wheel wells improved on that. Full write-up on the entire project + the reasoning behind my approach, results, & recommendations to anyone considering adding sound deadener coming as soon as I can get it put together.

Looking forward to your write up. Been considering doing this as well.
 
Finished phase 2 of sound deadening, the rear wheel wells. Doing the doors made a significant difference and the wheel wells improved on that. Full write-up on the entire project + the reasoning behind my approach, results, & recommendations to anyone considering adding sound deadener coming as soon as I can get it put together.

yI9BpGbl.jpg

knukonceptz for the money, i used a few brands

Damplifier Pro: Reduce Vibration Noise in Your Car - Second Skin Audio
they posted a contest on facebook and you might get lucky, i used this stuff all over my truck along with dynamat extreme.
 
Finally got time to mount my 20# CO2 bottle, sorry no picture. Its storming here now.
Just need to use it up so I can do the Dip Tube mod
:juggle:
 
hung out with a bunch of other 4runners

<iframe width="560" height="315" src="https://www.youtube.com/embed/SiX3RtJZ7kY" frameborder="0" allow="accelerometer; autoplay; encrypted-media; gyroscope; picture-in-picture" allowfullscreen></iframe>
 
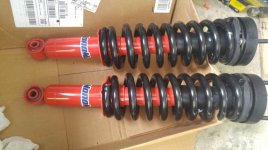
Strut assembly

Assembled my new front struts. Using the moog tall front coils and monomax struts. Went ahead and bought new top plates so I could assemble them before I remove the old ones. Also adding daystar spacers. Finished the rear with the moog tall coils, skyjacker 7000s and daystar spacers. Plan to install the strut assemblies tomorrow.
 

Attachments

  • 0714191459.jpg
    0714191459.jpg
    72.1 KB · Views: 271
  • 0714191507.jpg
    0714191507.jpg
    57.7 KB · Views: 264
Well.... today I tried installing a coverlay dash which I thought was dark blue. Can somebody help me identify the color of the dash and door panels that looks like a very very dark blue, almost black. I ordered the coverlay dash in "dark blue" but it's still too light... significantly lighter. I talked to Rockauto, they said it is the correct one for dark blue. It's not a black dash and door panels. I swear on everything it looks lime a very deep dark blue. I'm assuming others here have the same color. What the heck is it called?? I've searched online for days. Cant find the answer.
 
Well.... today I tried installing a coverlay dash which I thought was dark blue. Can somebody help me identify the color of the dash and door panels that looks like a very very dark blue, almost black. I ordered the coverlay dash in "dark blue" but it's still too light... significantly lighter. I talked to Rockauto, they said it is the correct one for dark blue. It's not a black dash and door panels. I swear on everything it looks lime a very deep dark blue. I'm assuming others here have the same color. What the heck is it called?? I've searched online for days. Cant find the answer.

My dash was replaced by Toyota under the extended warranty, but I would called my interior panels/dash, etc. black, even though the Toyota dash replacement is a but lighter in color than everything else I would still call it black.

I know that some on here have installed the Coverlay dash and maybe they will see your post and reply with which color they bought.
 
My dash was replaced by Toyota under the extended warranty, but I would called my interior panels/dash, etc. black, even though the Toyota dash replacement is a but lighter in color than everything else I would still call it black.

I know that some on here have installed the Coverlay dash and maybe they will see your post and reply with which color they bought.

I was hoping I could identify it by vin number. No luck there. I tried calling the dealer, but it's Sunday :(
 
I was hoping I could identify it by vin number. No luck there. I tried calling the dealer, but it's Sunday :(

I doubt you will get any help from a dealer and even the VIN won't help because they're all, at least with the 4th Gens, the same color so no reason for Toyota to clarify what color it is VIA the VIN or a color description.

If I hadn't had mine replaced by Toyota and was going with the Coverlay option I would order black or at the very least dark gray but I think even the dark gray would be too light in color to match.

If you go to Coverlay's website and click on the different color options it will change the color on the dash image and give you a better idea of which to order, either dark gray or black, but neither may match exactly since the dashes come in generic colors, even Toyota had trouble getting an exact match but that could be from all the other pieces being exposed to UV/sun light.

Link...

Coverlay Dash Cover - Coverlay

As I mentioned before hopefully someone who has gone with a Coverlay may see this or your other post in the DASH topic and reply to help you out!
 
Last edited:
I was hoping I could identify it by vin number. No luck there. I tried calling the dealer, but it's Sunday :(

Go with the black coverlay. It matches as close to OEM as you are going to get.

Coverlay calls it black but it’s not legit black like you might be thinking. It’s more or less the dark dark gray that the OEM dash is. It’s about the same color as my 2nd gen Tacoma dash too.
 
over the weekend i pinned my LED plate light;s wire for tire carrier so it isnt visible or prone to damage; happy to get that light on there for driving legally at night.

changed my rear diff oil and transfer case to Lucas conventional - replaced washers, etc. but wasnt super happy to torque the drain of transfer case a tad too much. made sure the crush washer didnt break/keeping an eye for leaks, seems fine will just keep in mind for next change in 30-50k. truck feels great with these fluids, and switches into 4h/4l Locked/unlocked in seconds now. will do front fluids when engine oil is due (skid)
 
Over the weekend I ended up swapping my Prinsu to a Front Runner

1CSKdmq.png


Got a Wilco Offset carrier from a local FB group 4R member

Gj9KgL8.png


Finally installed my bumper LED bar

ae6Ww8p.png


And did the "driver mod" and went to my first OHV park with a friend who was visiting

Z5xWMOK.jpg


It was a good weekend
 
Did a few items today:

HCF delete - Been on the fence about this for years b/c so many people reported no tangible results. My reasoning evolved b/c just like the transmission fluid, this thing has surely stopped effectively doing whatever it was supposed to do. There's no question that it has to impede airflow, something illustrated by @azgold's recent post (thanks for that). Finally, I thought perhaps people weren't seeing immediate benefits is b/c there's something else that should be done at the same time, which brings me to...

Reset the ECU - Used the fuse-pull method described in several threads. Here's my logic as to how this relates to the HCF delete, with the caveat that I probably know just enough about this stuff to be dangerous: if the ECU does all the computing of fuel/air mixture and so on, and removing the HCF changes the air flow rate, then resetting the ECU to give it a fresh start so to speak just makes sense to me.

Cleaned the throttle body - There are many threads on this but a note of caution about tightening the TB bolts. I broke one the first time I did this despite using 15 ft lbs on my torque wrench. When I cleaned it again today, don't know what the deal is w/ these bolts but I could sense 15 was too much so I lowered the torque wrench to 12. Still felt like something was going to break so I put away the torque wrench and went with the time-honored "Tagn!" method ("That ain't goin' nowhere!"), just snugging them down until they felt tight enough.

Cleaned the MAF sensor - Again, this is described in numerous threads.

I followed a hint in an ECU reset thread: turn the key to ON, wait about 10 seconds, then start the truck. Fired right up, idled nicely, and ran great on a short cruise around the neighborhood. I'm taking a road trip soon and track MPG at every fill-up (miles traveled/gallons to fill, not what the truck panel says) so I'll be able to report back on both highway and city results (if any).
 

Forum statistics

Threads
278,316
Messages
3,554,109
Members
248,016
Latest member
Advally Service

Trending content

Back
Top