What did you do with your 4runner today?

That looks way good. Do you have pictures of the whole interior? How difficult is this to do?

Thanks! Here's some photos of the driver's side and from the passenger side. The rear is relatively unchanged still besides the door sills I dyed across the entire vehicle.

I wouldn't say it's difficult but it is a major commitment and you need to be okay with the interior being two-tone for a period of time. The hardest part is really just figuring out how to remove the trim pieces. Some are easy, some are more involved.

If you prep each piece you shouldn't really have any issues once they're removed. I wash and dry each piece and then I do a coat of plastic adhesion promotor followed immediately with the first coat of the dye. The first coat should barely cover. I let dry for half an hour then do the second coat. For small pieces you should get pretty good coverage after two coats and I just do another for good measure. Larger, more curved pieces will require at least 4 coats I find. I've gone through 3 cans and have 5 left. I may need a few more depending on how the back goes.

The dye (duplicolor matte black) is fantastic, it doesn't leave any streaks or marks. It looks as close to what would've come from the factory.

There are a few pieces I've encountered that can't be removed though. Namely the small edge piece next to the glovebox. It's actually an unwrapped part of the top dashboard. I am going to try and brush apply the dye in this area and see how it holds up. I don't see how else you would be able to spray it even with masking. I would recommend really taking a look at what needs to be removed and attempt to remove a few pieces. If it proves too much effort for you, the last thing you want to do is start and not be able to finish. Also have a clear goal of what you want the end result to be. Do you want black carpet too? What about the headliner and seat belts?

So while it might only be a 3/10 in terms of the physical act of painting the pieces, the commitment required to finish the job is easily a 9/10. I'd also budget at least $200 for supplies because you go through quite a bit of dye and adhesion promotor.

Next I'd like to tackle the doors and where the seat controls are on the side of the seats in preparation for getting black Clazzio seat covers.

Hope that helps! I'm happy to answer any other questions and I'll be posting more updates to the progress as it's made.

IMG-5332.jpg

IMG-5335.jpg
 
Promised you all that I'd update on the headlights. They've been on almost a year and one has fogged up twice but the fog quickly went away. Still very happy with them.

The second pic is a photoshop of what the truck should look like this summer.

rpT32cK.jpg


Yv7omZZ.jpg
 
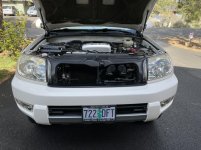
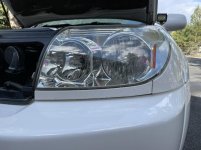
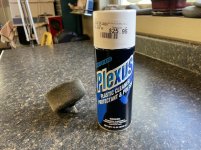
Talking headlamps. Decided today was a good day to do another polish to my original 200k 19 year old headlamps. I’ve upgraded the bulbs some time back. And just need to do a polish every now and then. After polishing I apply Plexus. This stuff is the bomb. Not cheap though. It helps maintain the polish work and debris doesn't stick.
I found it originally for my motorcycle helmet visor and the windscreen on my GS1200. Works great for both of those. Water just rolls off.
 

Attachments

  • 6F0BBB3D-5100-4FF8-91E1-B331037E0F55.jpg
    6F0BBB3D-5100-4FF8-91E1-B331037E0F55.jpg
    132.7 KB · Views: 377
  • 1A805FE0-C7B0-4A58-8DE6-3329014F1C67.jpg
    1A805FE0-C7B0-4A58-8DE6-3329014F1C67.jpg
    114.4 KB · Views: 360
  • 89F49351-2E7F-4A84-B1F8-AE64C70E9294.jpg
    89F49351-2E7F-4A84-B1F8-AE64C70E9294.jpg
    138.2 KB · Views: 360
Front Seat Trim Blackout

This weekend I tackled dyeing my front seat trim black. I thought these would be time intensive and they certainly were! I started on Friday and had them both reinstalled Sunday afternoon.

The hardest part was disassembly and just figuring out how to remove each of the controls and side panels. The panels facing you when you open the door aren't too difficult but the panel that goes against the center console is tricky to remove with the space provided. It can be removed without removing the seat but I ended up removing the seats anyway and found it's easier to just remove it once the seat is out.

You technically could do a 95% job without removing the seats if you just remove the seatbelt receiver but the wire routing under the seat is more complicated than just disconnecting the main connectors so I just left the receiver attached. If you don't remove the seat you won't be able to dye the trim that holds the headrests on. It's a small detail but when I install my seat covers I didn't want that spot to contrast visually.

Once all the controls and panels are removed I dyed them like I did any other part. Wash, adhesion promotor, then 3-4 coats of dye. For the parts on the seat I couldn't wash I wiped them down thoroughly with denatured alcohol.

To mask the seats I just ripped open a few garbage bags and did some sloppy tape work just to keep things in place. For the headrest trim I poked two small holes in the plastic and stretched it just enough to fit over the trim and tucked the rest underneath so it was tight. This worked really well and I didn't have any overspray. I just used painters tape on the seatbelt receiver to keep the button red and stuffed some paper towel in the receiver to not get dye into the actual mechanics.

Overall, I'm really happy with how they came out. The finish is amazing and while it looks a little weird with the gray seats, now when I order my seat covers I can just install and enjoy the transformation. It's a big relief having them finished and while the seats were removed I was actually rewarded with a 2 peso coin I found! :trophy:

Next I'll probably start on the door panels or the last piece of gray trim around the center console. I believe you have to mostly remove the center console to access this piece though.

IMG-5342.jpg

IMG-5344.jpg

IMG-5345.jpg

IMG-5346.jpg

IMG-5347.jpg
 
Did a big overhaul this weekend which included, wheel spacers, new struts along with daystar leveling kit, front calipers, rotors and pads with fluid flush.
 
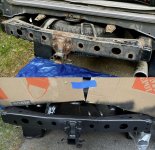
Started the rust removal process this weekend. Wanted to be begin with the rear bumper as access would be easy and allow me to test all my new tools and converters/paints. Worked amazing and I'm super happy with the results. Can't wait to make the rest of the frame look like this.

Forgot to take photos inside the frame but it was super crusty. Way worse than the outside. Loosened up all the rust inside then flushed it out with a hose. Probably should have used a power washer for more power but the results I got afterwards looked fine.

EDIT: Process
Steel wire brush and wire wheel on a drill for light rust
Die grinder with some roloc rust/paint removing discs for the heavy spots
Degrease with water/dish soap
Apply thick coat of Corroseal, wait 15 mins and hit spots that are gray/brown still
Come in with Rustoleum next for 2 coats with a few hours of drying in between
Finish with 2 coats RP 342

I coated the inside of the frame as well best I could.
 

Attachments

  • REsize.jpg
    REsize.jpg
    110.2 KB · Views: 601
Last edited:
spent an hour or so tearing the dash apart to replace my AC Amplifier. I have replaced or tested all the components to try to get my compressor to work and this was the last part. I didn't have the exact part number match, but it was from a 4th gen v8, so it should have worked. but no dice, compressor still was off.

so yeah, I give up. I wired a manual switch to the compressor last year and I'll just keep using that. I'm tired of trying.

anyone need an AC Amplifier unit? posting it in the for sale thread...

J.
 
I yanked a couple of spark plugs to see what they looked like after 67K. I think they were NGK Iridium. Looked like a needle-point. I don't have a feeler gauge so I couldn't check the gap.

I'm thinking new plugs & coils after almost 19 years (on the coils). What are we doing for coils these days? NGK? Denso? I have Delphi on my BMW's and have been happy with them.

Edit: also adjusted the parking brake.
 
Black Door Panels

I got the front two door panels dyed this weekend. This time the masking was the most difficult part. I had a tough time finding a tape that would adhere to the vinyl properly. I eventually settled on aluminum duct tape.

These really add a lot to my blackout efforts. They're noticeable from outside the car looking through the window and from the driver's seat they really darken the interior a bit.

Clazzio seat covers are on order w/ 6-8 week lead time. Carpet dye solution has been decided on so just need to decide on timing for that.

IMG-5375.jpg
 
Took it out for a test drive a couple dozen miles into the mountains and back.
This weekend I knocked out some projects that needed to be done and another I didn’t know I needed.

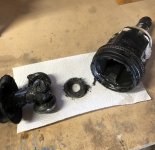
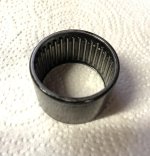
Rotated all 5 tires. Completely flushed and filled the power steering with new Maxlife ATF. Adjusted the Bilstein 5100’s down from 1.75” to .85”. Replaced the roller bearing in the front diff with an ECGS bushing. Replaced the left side diff and hub oil seals. Replaced the front left CV and stretched the inner boot. Greased the driveshafts and UCAs. Checked the rear diff and t-case fluid levels. Reversed the fog light mod.

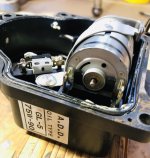
After all that I found my 4hi and diff lock lights flashing during a test drive. After much research I pulled the A.D.D actuator off and opened it up. I soldered the connections at the motor and the micro switch and problem seems to be solved.

Used this video: Toyota Tacoma | No 4wd Fix | 2wd / 4wd Mode Malfunction Fix | (2017 Tacoma) - YouTube
 

Attachments

  • 8BB6B332-79EF-4A3F-BD40-AD281FFA1D72.jpg
    8BB6B332-79EF-4A3F-BD40-AD281FFA1D72.jpg
    127.3 KB · Views: 503
  • 6D102EA2-6655-48B7-8945-880CB84FAAFE.jpg
    6D102EA2-6655-48B7-8945-880CB84FAAFE.jpg
    120.4 KB · Views: 475
  • 6A5521DC-BF19-4CA7-B1D5-050BA1BFEF96.jpg
    6A5521DC-BF19-4CA7-B1D5-050BA1BFEF96.jpg
    112.1 KB · Views: 496
Last edited:
I'll be working on this for a few days but I'm eliminating vacuum line issues before they start like they did with my 3rd gen. I found a kit for 1uz silicone vacuum lines and I'm slowly going through and replacing them. Some are going to be a real mofo to do though. I see that a couple of mine were starting to split at the ends so it seems that it might be a good thing to do.

I'll have pics when I make more progress. It's one line at a time.....literally.

Sent from my SM-G986U using Tapatalk
 
I'll be working on this for a few days but I'm eliminating vacuum line issues before they start like they did with my 3rd gen. I found a kit for 1uz silicone vacuum lines and I'm slowly going through and replacing them. Some are going to be a real mofo to do though. I see that a couple of mine were starting to split at the ends so it seems that it might be a good thing to do.

I'll have pics when I make more progress. It's one line at a time.....literally.

Sent from my SM-G986U using Tapatalk

I switched the vacuum lines in my kids lexus few years back. I found the hoses are not very strong and tended to split easily. If it were me, Id stay with rubber hoses.
 
Desert Armor/Outgear Solutions

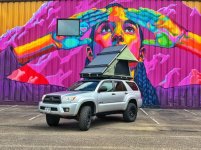
After using my old set-up for a year, I finally realized what I wanted in my RTT/camping set-up and pulled the trigger.

My main reason for a new RTT - getting my roof back. This Desert Armor Ninja is a single channel aluminum body, so only 6.5" tall when closed. It also comes with crossbars so I'm looking forward to freeing up room inside the truck by being able to use my cargo box again.

Low profile/less drag and as much aerodynamics (as much as you can get from putting a box on top of a box) as possible was also a goal. On top of the low pro tent, these Outgear Solutions low profile crossbars are insanely low! Like, you can use a 20mm bolt to mount them, low. They just barely clear the roof. Prior to this, I used LFD ruggedized crossbars with my old (more compact) tent. I was initially going to get the LFD full rack since I already had a couple crossbars. But the LFD bars are only 41" across, and this tent is 50". The Outgear bars are 51" so perfect fit.

Psyched for the Summer!
 

Attachments

  • resized .jpg
    resized .jpg
    141.8 KB · Views: 350
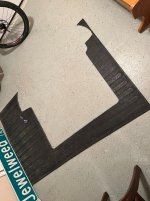
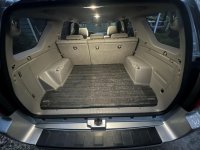
Turned an old truck bed mat that was laying around into a cargo mat.
Just traced out the existing OEM mat and cut it out with a razor.
Better than any of the ones you can buy IMO.
 

Attachments

  • IMG_0807.jpg
    IMG_0807.jpg
    137.8 KB · Views: 346
  • IMG_0805.jpg
    IMG_0805.jpg
    130.6 KB · Views: 366
Turned an old truck bed mat that was laying around into a cargo mat.
Just traced out the existing OEM mat and cut it out with a razor.
Better than any of the ones you can buy IMO.

I jus got one of these rubber bed mats from my brother and am thinking about doing the same thing. It says Dodge on it so I’ll have to flip it over. A while back I made a cargo liner that covers the rear including the seat backs when they’re folded forward out of 40 mil UHMW plastic. I works nice but everything slides around on it. Do you get any dank rubber smell from this?
 
Today was not a good day for my 93 4runr

Today while driving home from work, the 4runr dump all its coolant out the tailpipe in white bellowing smoke. Then it stalled. Do I need to remove the transmission and chekc the back end of the motor since there is no leak coming from the front. I suspect it is hidden between the back of motor and the tranny. 2WD. 195K miles.
 
Today while driving home from work, the 4runr dump all its coolant out the tailpipe in white bellowing smoke. Then it stalled. Do I need to remove the transmission and chekc the back end of the motor since there is no leak coming from the front. I suspect it is hidden between the back of motor and the tranny. 2WD. 195K miles.

I’m no expert but coolant in exhaust is typically a head gasket.
 
Today while driving home from work, the 4runr dump all its coolant out the tailpipe in white bellowing smoke. Then it stalled. Do I need to remove the transmission and chekc the back end of the motor since there is no leak coming from the front. I suspect it is hidden between the back of motor and the tranny. 2WD. 195K miles.

I’m no expert but coolant in exhaust is typically a head gasket.

The coolant and white "smoke" is not coming out of the back of the engine, it's coming out of the exhaust ports and into your exhaust pipe/muffler/tailpipe, as Hi-desertT4R speculated it is indeed a failure inside the engine, either you have a warped head, cracked block or a failed head gasket, failed head gasket is the best guess, there's no other way coolant can come out the exhaust.

Sorry for your loss, the only way to know what actually happened is to pull the head off, if just a head gasket you can repair it or not, warped head will need a new/good used head and head gasket, cracked block will need the engine replaced.
 

Members online

Forum statistics

Threads
278,316
Messages
3,554,108
Members
248,016
Latest member
Advally Service

Trending content

Back
Top