What did you do with your 4runner today?

nothing like not reading the instructions fully. had to buy another set of bushings for the control arms, as i messed up the hardware twice. so now after actually reading the instructions and videos i learned. so waiting on bushings to get here to take the hardware out. painted my control arms while i was at it.

p.s. what a pain in the ass it was removing the old bushings and ball joints. listen to people when they say dont waste time rebuilding, unless you have all the proper tools. ball joint press is a must. very useful for other pressing as well.

I heard to just melt the old ones out in like 30 seconds. No messing around
 
Whipped up a quick retrofit for my '03. First time ever retrofitting!
Went with BI-LED 2.5" amazon projectors, and wired them up with the stock high beams as well, so the high beams are pretty outrageous.
Pretty decent cutoff line on these! I still need to do some final adjustments for heigh/width using the stock adjustment bolts.

tqCXkAW.jpg

4otIFky.jpg

vxYH9wc.jpg
 
these last two months have seen some pretty big changes.

fj rear axle with locker and 4.56
front diff with helical and 4.56
12v guy harness
[MENTION=28464]eimkeith[/MENTION] lower link skids
apache offroad fixed length HD lower links
apache offroad hd extended panhard
new rear brake hard and soft lines
duro bumps front and rear
apache offroad body mount relocation

im on year 5 of ownership and about 35k miles since I got it (sits at ~165k now)

F3pN2bQ.jpg
 
Last edited:
Purchased an 04 last week. Last night, I pulled the mud flaps and running boards off. Replaced interior lights with LED's and fixed one of the bulbs on one of the climate control knobs. Picking up tires today as well as ordering wheels and I think the adjustable 5100's. Open to opinions. The front springs seem soft or the shocks are shot. I may just pick up some springs too. Then, I need to address the rear. Only want 1" lift back there I think.
 
.. and I think the adjustable 5100's. Open to opinions. The front springs seem soft or the shocks are shot. I may just pick up some springs too. Then, I need to address the rear. Only want 1" lift back there I think.

If you can swing for Bilstein 6120's front and 5160 rear, its a nice improvement over 5100's for costing a little bit more than 5100's.
 
Fuel sending unit

I replaced my fuel sending unit last night. It took me a couple days to get the job done. It’s nice to have a working fuel gauge again.
 
Finally pulled the trigger on some TRD wheels today! What a difference! :wow2:


Took the plunge on a YotaWerx tune and I cannot begin to tell everyone here how professional Marc @ YotaWerx is.

I'm computer savvy, but didn't want to do something wrong and brick the ECU. Marc absolutely went above and beyond to make sure I installed their tune package correctly.

I now have no CEL light on anymore (the main reason I purchased the tune after installing headers and Y-pipe). Also have no emissions testing to worry about.

The throttle response and new transmission shift points are absolutely incredible, and I haven't even played with the 91 Octane ACTIVE DUTY tune yet!!

This is the missing piece of the puzzle after deleting the hydrocarbon filter to take advantage of CAI design the 'Yota engineers designed, replacing the most horribly designed factory headers of all time, ditching the factory Y-pipe and replacing the exhaust.

If anyone else out there is thinking of getting a tune for their V8 - I cannot recommend YotaWerx or Marc any higher.

Here is what she sounds like:

4.7 V8 4Runner | Doug Thorley Headers | Gibson Elite | #4Runner #longtubeheaders #headers #exhaust - YouTube

yotawerx-snow-jpg.3269978
 
Last edited:
I don't have enough posts to start my build thread yet :frusty:

The plan was to swap out my SPC control arms for the JBA HD ones and add a few more goodies... But that didnt happen.

I did peel off the remaining SCS small stickers from the wheels and added their full spoke decals... I thought I would like the small letters in white, but I actually much prefer this full spoke decal now that I have had it on a few days.
 

Attachments

  • IMG_3761.jpg
    IMG_3761.jpg
    138.2 KB · Views: 369
Took the plunge on a YotaWerx tune and I cannot begin to tell everyone here how professional Marc @ YotaWerx is.

I'm computer savvy, but didn't want to do something wrong and brick the ECU. Marc absolutely went above and beyond to make sure I installed their tune package correctly.

I now have no CEL light on anymore (the main reason I purchased the tune after installing headers and Y-pipe). Also have no emissions testing to worry about.

The throttle response and new transmission shift points are absolutely incredible, and I haven't even played with the 91 Octane ACTIVE DUTY tune yet!!

This is the missing piece of the puzzle after deleting the hydrocarbon filter to take advantage of CAI design the 'Yota engineers designed, replacing the most horribly designed factory headers of all time, ditching the factory Y-pipe and replacing the exhaust.

If anyone else out there is thinking of getting a tune for their V8 - I cannot recommend YotaWerx or Marc any higher.

Here is what she sounds like:

4.7 V8 4Runner | Doug Thorley Headers | Gibson Elite | #4Runner #longtubeheaders #headers #exhaust - YouTube

yotawerx-snow-jpg.3269978

That sounds fantastic.
 
More upgrades!!!

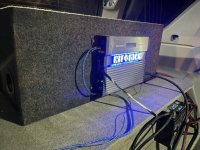
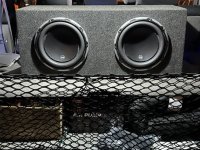
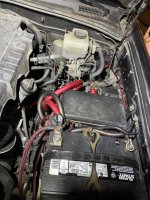
I pulled out my MTX Terminator dual 12" Sub box w/ 250w amp and made some changes.

I inherited a sub box with dual JL 10w6v3-D4 subs that needed refoamed.
--> Amazon.com

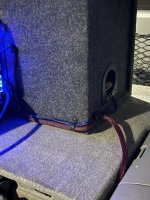
After refoaming these kickass subs and letting them cure for 48hrs I rewired the sealed sub box with new 10 gauge speaker wire, jumpered the dual voice coils and ran them in parallel @ 4 ohms per x 1 ohm to a Hifonics BXX1200.1D Brutus Class D 1200W RMS 1 Ohm Mono Car Subwoofer Amplifier.
--> Amazon.com
YES, this amplifier is bullet proof and a true 1 ohm.

I upgraded to The Big 3
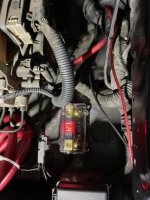
--> Amazon.com and installed a 0/2/4 Gauge Car Audio Digital Led Display Fuse Holder ANL 100Amp Include Fuse Distribution Block.
--> Amazon.com

I threw in a Kinetik HC600 glass mat agm supplemental battery to act as a capacitor for extra power.
--> Amazon.com

Tonight I am installing a Stinger SGP38 80-AMP Battery Isolator and Relay with 12v cutoff to keep the Kinetik from leeching power from the start battery.
--> https://www.amazon.com/Stinger-SGP38-80-AMP-Battery-Isolator/dp/B001HC6UJ0/ref=sr_1_3
I am also adding an additional fuse distribution block between the Kinetik battery and the 1200w amp. Upgrading both fuse blocks to 175 amp ANL fuses.
-->
https://www.amazon.com/gp/product/B081VTGSRY/ref=ppx_yo_dt_b_asin_title_o00_s00

Why the additional battery? I just replaced my alternator recently and I'm reluctant to dole out the required $429.00 for a Mechman 240 Amp Alternator.
--> https://www.mechman.com/alternators...0-amp-alternator-for-4-0l-toyota-lexus-truck/
I will eventually go that direction. Some of this may seem like "overkill", but if you've ever had your car catch fire you'd take every precaution to avoid it.

Now I have a sound system that is simply insane!!

I'm also replacing my stock hood supports with StrongArm 6228PR Hood Lift struts.
--> https://www.amazon.com/dp/B074G8VHCB
Pretty sure they are the same as Monroe.

Maybe this might help anyone doing a similar upgrade. Cheers!
 

Attachments

  • thumbnail_IMG_3483.jpg
    thumbnail_IMG_3483.jpg
    98.7 KB · Views: 320
  • thumbnail_IMG_3485.jpg
    thumbnail_IMG_3485.jpg
    120.9 KB · Views: 311
  • thumbnail_IMG_3486.jpg
    thumbnail_IMG_3486.jpg
    101.9 KB · Views: 311
  • thumbnail_IMG_3487.jpg
    thumbnail_IMG_3487.jpg
    109.3 KB · Views: 313
  • thumbnail_IMG_3489.jpg
    thumbnail_IMG_3489.jpg
    78.7 KB · Views: 310
Last edited:
Well what I did wasn't in one day but ended up taking almost two weeks. I set out to do 2 things. I wanted to add full time power to the outlet in the right rear and I wanted to add a front camera along with the Anytime Camera setup. I pulled out the R/rear interior and the rear seats and ran an 8 gauge wire straight from the battery positive. While I had all that apart I decided to pull out the lh panel as well and do a better job on the routing of the wires to my small sub. All that went well with no hiccups. Then on to the Anytime Camera system. Installed the front camera with no problems. Then pulled the head unit. After trying unsuccessfully to get the camera system to work I called the guy at Anytime Camera and we suspected the unit was bad. He suggested I order another one from Amazon to get it more quickly which was really a good idea until the USPS screwed up and it got lost. I was supposed to receive it on Sunday but the it didn't show up and the tracking showed it left Concord NC on Friday. The tracking never changed so on Wednesday after my car had been apart for 10 days I ordered another one since I didn't know if the first one was ever gonna show up. That evening when I got home the first one had arrived. Long story short I got it installed with a lot of technical support from Anytime Camera. Turns out I had made several errors in wiring it up. So it's likely the first camera was ok to begin with. They still refunded me for it and the one I installed is working flawlessly. Can't say enough about this company, their product and their customer service. Plus, on 4th gens you actually use a 4 way video switcher rather than the total plug and play system on the 5th gens. It's a little more work to install but the cost on the switcher is less than $40 plus whatever camera you choose. I'm totally satisfied with the system. Lastly while I had the console out I decided to clean up the mess of wiring I had. In the power outlet of the console I had a 3 way plug with three cords plus another one installed for my carplay in one of the blind plugs beside the DAC switch. One of the cords hung down from my dashcam and another ran to a rechargeable camera mounted to the rh side of the console. So I bought two USB outlets and wired one inside the console for the flashlight and another in the roof behind the console where the map lights are. Added one more USB outlet on the console for passenger phone charging and I no longer have a hideous bird nest of wiring all over and around my console. Sorry for the long post but I couldn't think of a way to shorten it.
 
Well what I did wasn't in one day but ended up taking almost two weeks. I set out to do 2 things. I wanted to add full time power to the outlet in the right rear and I wanted to add a front camera along with the Anytime Camera setup. I pulled out the R/rear interior and the rear seats and ran an 8 gauge wire straight from the battery positive. While I had all that apart I decided to pull out the lh panel as well and do a better job on the routing of the wires to my small sub. All that went well with no hiccups. Then on to the Anytime Camera system. Installed the front camera with no problems. Then pulled the head unit. After trying unsuccessfully to get the camera system to work I called the guy at Anytime Camera and we suspected the unit was bad. He suggested I order another one from Amazon to get it more quickly which was really a good idea until the USPS screwed up and it got lost. I was supposed to receive it on Sunday but the it didn't show up and the tracking showed it left Concord NC on Friday. The tracking never changed so on Wednesday after my car had been apart for 10 days I ordered another one since I didn't know if the first one was ever gonna show up. That evening when I got home the first one had arrived. Long story short I got it installed with a lot of technical support from Anytime Camera. Turns out I had made several errors in wiring it up. So it's likely the first camera was ok to begin with. They still refunded me for it and the one I installed is working flawlessly. Can't say enough about this company, their product and their customer service. Plus, on 4th gens you actually use a 4 way video switcher rather than the total plug and play system on the 5th gens. It's a little more work to install but the cost on the switcher is less than $40 plus whatever camera you choose. I'm totally satisfied with the system. Lastly while I had the console out I decided to clean up the mess of wiring I had. In the power outlet of the console I had a 3 way plug with three cords plus another one installed for my carplay in one of the blind plugs beside the DAC switch. One of the cords hung down from my dashcam and another ran to a rechargeable camera mounted to the rh side of the console. So I bought two USB outlets and wired one inside the console for the flashlight and another in the roof behind the console where the map lights are. Added one more USB outlet on the console for passenger phone charging and I no longer have a hideous bird nest of wiring all over and around my console. Sorry for the long post but I couldn't think of a way to shorten it.

Almost forgot one other thing I did that I really like. I have a homemade box in the rear that I store all my tools, recovery gear etc in and it also has a pullout table that we use for picnics etc. Well I never seem to have enough light back there after dark so I wanted to upgrade. I bought an led camper dome light, painted the housing gray and installed it where the original light was. It puts out an enormous amount of light. A very cheap, very easy upgrade. This is the one I bought: Amazon.com
 

Members online

Forum statistics

Threads
278,316
Messages
3,554,112
Members
248,016
Latest member
Advally Service

Trending content

Back
Top