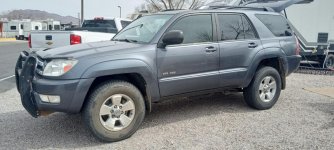
What did you do with your 4runner today?

Started to replace drivers side valve cover on my '03 V8 and took it very slow with the capscrews but unfortunately that didn't work!! Twisted off the heads on the rear two lower ones and this was after several applications of ATF to the capscrews as well as liquid wrench over a period of two weeks. Didn't feel like battling the removal process of those two capscrews today so reinstalled the front two lower that came out with a good amount of antisieze on both.
All the uppers came out easily but all of the lowers were really tough.
If you haven't tried this job yet and you live in the rust belt or your 4Runner is 20 years old like mine, be prepared!!
Going to try double nutting with JB Weld on the threads to se if I can get the stubs out, got a trial capscrew with double nuts and JB Weld on threads curing now and will test out the grip tomorrow, see if I can twist the head off, if so, may give enough grip to get them out.
Trying to get a drill in there on the drivers side will be next to impossible.
 
Taking apart headliner because front pillar with the grab handle on the drivers side is leaking water. So heres the problem. I have installed an after market roof rack and ever since when there’s heavy rain it leaks into the headliner. The thing is though that there is not water coming from the roof rack hole mounts and I properly sealed everything. My sun roof drains aren’t clogged. But whenever the oem roof rack was on I never had a water problem. Is there a chance that water is getting under the rubber trim piece that runs down the windshield and leaking in from there? When I look under the headliner you can see drops of water build up right under where the windshield is. Is there a chance my windshield seal is bad? If anyone has any insight please let me know.
 
Got an alignment after getting the PCK welded on the previous week. My caster won't go above ~3.1 without messing up camber, so that's where it sits. Ultimately it was a pricey toe-and-go (of course, the one thing I could've done myself). I can't tell if my OME 884s are just too stiff and jarring up front on my v6 and cause rebound that translate to wander, but I still don't particularly enjoy driving above 70-75, which is insane as the car handled better 4 years ago before i replaced any suspension/steering/bushings/etc.

Current setup is Dobinsons UCAs/OME 884/Dobs IMS shocks/sway bar with drop spacer. My only theory at this point is that my cam tabs are not holding the cams in place so I hope is that once I drop even more into this money pit, it will hold alignment. Apart from that, I wonder if I should cut my losses on these 884s and go to Dobs with slightly less height.
 
Might to the running board delete. Someone hit me a few years ago and insurance replacements were cheaper metal and someone just bumped into me today and gave me $100 instead of dealing with insurance.
 
Installed RCI steel engine, trans and transfer case skids. Ordered their aluminum gas tank skid, so it will go on next week. 4 of the mounting bolts snapped when removing them, so knocked the welded nuts out with an air hammer, drilled out bigger holes and shoved rivnuts in there.

Noticed rear sway bar bushings and links were in need of replacement, so replaced with new Moog 2nd gen links and energy suspension bushings.

Lastly, replaced the dipstick tube o ring since it was sweating a tiny bit of horsepower.

Week of maintenance/upgrades done amd ready for next month's trip to KAT. 220,800 miles, running like a sewing machine.
 
Got a 2" lift by just removing the bendy aftermarket side steps that were dangerous to actually step on and had a piece cracked out of them.
 

Attachments

  • Screenshot_20240310-130325.jpg
    Screenshot_20240310-130325.jpg
    137.2 KB · Views: 191
I got to play with my SPC adjustable ball joint when it failed going through a wash out in the Mojave desert. Thought it was going to pop my tire. Never go out solo without tools folks!

On a positive note, not quite today, but I installed 2010+ OEM front rotors and calipers. Nice upgrade, much better than the aftermarket rotors that I had. Painted them red for extra stopping power.
 
Started to replace drivers side valve cover on my '03 V8 and took it very slow with the capscrews but unfortunately that didn't work!! Twisted off the heads on the rear two lower ones and this was after several applications of ATF to the capscrews as well as liquid wrench over a period of two weeks. Didn't feel like battling the removal process of those two capscrews today so reinstalled the front two lower that came out with a good amount of antisieze on both.
All the uppers came out easily but all of the lowers were really tough.
If you haven't tried this job yet and you live in the rust belt or your 4Runner is 20 years old like mine, be prepared!!
Going to try double nutting with JB Weld on the threads to se if I can get the stubs out, got a trial capscrew with double nuts and JB Weld on threads curing now and will test out the grip tomorrow, see if I can twist the head off, if so, may give enough grip to get them out.
Trying to get a drill in there on the drivers side will be next to impossible.


Went a different route. Had some nuts that look like a top hat, so I re-tapped them to 6mm-1.0 drilled out the two capscrew holes on valve cover to 5/16" so these top hats would fit through the hole and screwed them on to the broken capscrew stubs and it has worked so far ... no leaks from valve cover.
 
Sold my 4Runner last year, but found my old 3D model of the iPad dash I eventually built. My favorite thing I did to the 4th gen interior. Figured I'll upload it here in case someone ever wants inspiration for a similar build
 

Attachments

  • 2009-Toyota-4Runner-Dashboard-V5.16-2.jpg
    2009-Toyota-4Runner-Dashboard-V5.16-2.jpg
    132.6 KB · Views: 317
Changed the PAS fluid today, what was in there looked clean enough on the dipstick but in a container looked dirty. Not disastrous, but past its best.

It doesn't hold much either, so what is there gets worn out quicker.

The job takes an hour at most, highly recommended maintenance.

Replaced with Motul fully synthetic ATF.

I also double checked where the oil filter is and its a paper element on the bottom of the engine:faint2:...miss my 1GR-FE!
 
Changed the PAS fluid today, what was in there looked clean enough on the dipstick but in a container looked dirty. Not disastrous, but past its best.

It doesn't hold much either, so what is there gets worn out quicker.

The job takes an hour at most, highly recommended maintenance.

Replaced with Motul fully synthetic ATF.

I also double checked where the oil filter is and its a paper element on the bottom of the engine:faint2:...miss my 1GR-FE!

I just did the same here yesterday at the recommendation of member [MENTION=632]toyo[/MENTION] (thanks Steve!). This is an often forgot about maintenance procedure that is not too difficult to DIY and like you said only takes an hour or so and doesnt cost much at all.

I did a small write up to document the process...

4th Gen Toyota 4Runner Power Steering Fluid Exchange Service
 
Greddy Steering Wheel

Theft has been hot, here in Los Angeles CA. So I decided to add an extra safety feature by installing this Greddy Performance Steering/ Quick Release combo. Anyone else have additional anti theft features?
 

Attachments

  • Greddy.jpg
    Greddy.jpg
    117.2 KB · Views: 289
Taking apart headliner because front pillar with the grab handle on the drivers side is leaking water. So heres the problem. I have installed an after market roof rack and ever since when there’s heavy rain it leaks into the headliner. The thing is though that there is not water coming from the roof rack hole mounts and I properly sealed everything. My sun roof drains aren’t clogged. But whenever the oem roof rack was on I never had a water problem. Is there a chance that water is getting under the rubber trim piece that runs down the windshield and leaking in from there? When I look under the headliner you can see drops of water build up right under where the windshield is. Is there a chance my windshield seal is bad? If anyone has any insight please let me know.

If you're sure that you sealed around the outside of the white tubes then I wonder if the rack has pulled the roof out of alignment very slightly which might allow your idea to happen.
 
How was the install? Looking to get a set for mine.

Unless you have a 90° drill with a very thin head, you'll have to mount the sliders with the factory holes and then take them back off after you mark the new holes in order to drill

Also, you could make a cardboard template like we figured out on the second one

You drill 5 holes per side, so not much at all
 
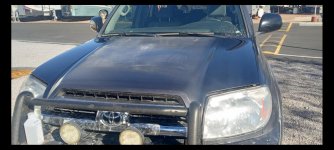
Did half of a half ass job painting my hood with color match paint. Got 2 cans of the Duplicolor for $17 each. 1 can does the outside of the hood. I wasn't sure if the paint would match enough, but the clear coat was so wasted, it is worth the experiment. I might do a black decal on the center portion or just scuff and paint the center and hope there is enough in my second can.

Clear coat with a few runs added for effect as well. As you can tell, it's near ready for a Barret Jackson auction.
 

Attachments

  • Screenshot_20240319-091336.jpg
    Screenshot_20240319-091336.jpg
    134.5 KB · Views: 226
Did an air con refresh by firing the foam up the evaporator drain hose along with a filter change as just using a 'bomb' type one didn't cut it. Much better now.

Changed the rear number plate lights, running board lights and door courtesy light to warm white LEDs.
 

Members online

Forum statistics

Threads
278,316
Messages
3,554,112
Members
248,016
Latest member
Advally Service

Trending content

Back
Top