White 94 Build Thread

Thanks guys I got them all off and besides minor paint wear everything appears pretty solid under them. Got the front lifted and deciding if I want to tackle the rear tonight or wait. I just did New MOOG springs in the back about a month ago before I decided to lift so I know what it entails. Not hard just a little time consuming
 
One place where I really noticed rust/paint issues on the inside lip of the fender where the screw holes are. Looks good without them! What lift are you doing for the rear? I went with moog coils and 1.5” spacers from 4crawler, but found the moogs were too soft, gonna go up to Hd OME could probably come spring or to return season.
 
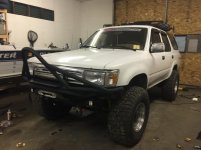
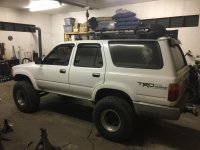
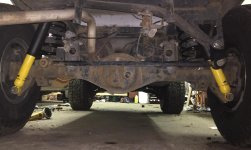
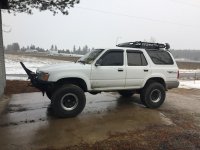
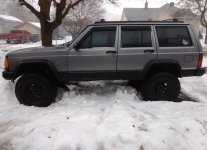
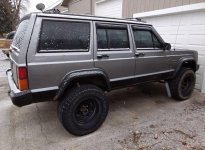
I went with the ome 900 coils in the rear. I considered the 901s but didn't want it to be too stiff as it's mainly a daily driver. Seems from what I read I would have probably been fine either way. Anyway the springs and shocks are on in the back as well as the panhard drop bracket. Going to build a bracket to raise the brake proportioning valve linkage deal ( don't know the proper name and too lazy to look right now). Spacers and shocks are in up front with new upper ball joints. Still need to install the sway bar drops and diff drop tomorrow then get an alignment and it should be all wrapped up. Haven't taken it outside yet but here's a couple quick shots. Front looks a touch higher but measuring from the floor to the pinch weld the rear measures 1/8 higher but if the front still looks higher after things settle I will relax the torsion bars a hair. Rear bumper may find its way off tomorrow too if I find time. Still need to get materials to build the new rear.
 

Attachments

  • IMG_0241.jpg
    IMG_0241.jpg
    121.7 KB · Views: 272
  • IMG_0242.jpg
    IMG_0242.jpg
    123.4 KB · Views: 279
Last edited:
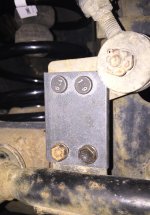
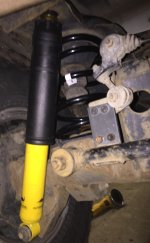
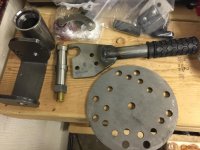
Well I wrapped up the loose ends tonight. Sway bar drops and diff drops are in and fabricated a new bracket to raise the brake proportioning linkage deal. Used a piece of 2 inch flat bar with some bolts in the bottom and the press in studs that came with the new ball joints on the top. Bring it to get aligned tomorrow and it should be all done.
First picture is the bracket I made
Second is the new spring shock and the bracket
Last photo shows it all as a whole. Panhard angle seems good with the drop bracket so it should be good to go...I think lol
 

Attachments

  • 269AD8DD-63FA-41D9-8F1A-F2C6E4E7A9C8.jpg
    269AD8DD-63FA-41D9-8F1A-F2C6E4E7A9C8.jpg
    134.4 KB · Views: 249
  • 0C42A0B5-0A11-42F1-8A0A-D118CC1A823A.jpg
    0C42A0B5-0A11-42F1-8A0A-D118CC1A823A.jpg
    120.9 KB · Views: 248
  • 9C374B6E-2E8B-49DA-B48E-42A0B8F3743E.jpg
    9C374B6E-2E8B-49DA-B48E-42A0B8F3743E.jpg
    132.2 KB · Views: 252
A quick shot of it outside. Didn’t get the alignment done today but rolled it outside to clean up the shop.
 

Attachments

  • 1F0E62A4-0619-4581-84E0-C88206E7DB2C.jpg
    1F0E62A4-0619-4581-84E0-C88206E7DB2C.jpg
    136 KB · Views: 318
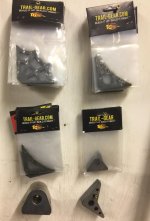
Got my bumper and other stuff building supplies to start on my bumper. May have gotten a little gusset happy but I’ll eventually find a use for them all
 

Attachments

  • C94F621B-7B7F-4347-9E8F-8C1049167C7E.jpg
    C94F621B-7B7F-4347-9E8F-8C1049167C7E.jpg
    129 KB · Views: 234
  • 40BA7264-A110-4083-B3ED-5DC368598965.jpg
    40BA7264-A110-4083-B3ED-5DC368598965.jpg
    121.8 KB · Views: 237
Well after pricing metal and coming up with a build plan and totaling up weight for the rear bumper I’m wishing I would have went with the 901 coils. I’m around 100 pounds on just metal. Then I have a full size spare and fuel/water cans and possibly a hi lift. I feel like I’m going to be right back to a squatting rear. I guess after I build it if it does squat I will either swap to 901s or maybe add 4crawler spacers depending on how bad it is. Tip of the day... plan ahead!
 
Going to start on my bumper build in the next few days but picked up a 94 xj for the girlfriend today and have some things to do to it as well. Couple pics of it. Overall it's in pretty decent shape but has a knock/tap when warm so that's first priority. Also a valve cover leak but not bad for $1200 and I drove it home. 4wd works good and runs down the road straight and pretty smooth for the lift and it's age. I wouldn't trade my runner for anything but I've always loved the xj's.
 

Attachments

  • IMG_0246.jpg
    IMG_0246.jpg
    100.2 KB · Views: 208
  • IMG_0247.jpg
    IMG_0247.jpg
    131.2 KB · Views: 210
Well unfortunately haven't touched my runner in days as I've been working on the girlfriends xj I picked up for her the other day ( fixing leaks and trying to track down this knock/tap) but hopefully progress will resume soon. I know this stuff I'm about to talk about is not 4Runner related and no one will probably read it anyhow but if I get through to maybe one person it's worth my time.

First thing:
RTV sealant is NOT to be used on everything instead of proper cleaning and using a gasket! I'm pretty sure this whole jeep is glued together with rtv and everything is leaking. The po did not take the time to do it right and now I'm paying for it. However with some time cleaning and putting things back together correctly I am rapidly fixing the leaks this thing has.

Second thing:
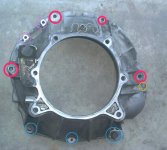
When you put an engine in it is a great idea to install and tighten ALL of the bell housing bolts! Below is a picture of an aw4 bellhousing
The blue circled holes are simply inspection cover mounting holes
Yellow is a starter hole
Purple are for bracket to hold cps
And the red are actual bell housing to engine holes
Out of those 4 red circled holes the 9 o'clock and 3 o'clock bolts were non existent and the 11 o'clock was started but less than finger tight. I haven't reached the 1 o'clock yet but it's safe to say my hopes are not high.

For the sake of who ever may purchase your vehicle (and/or) you/your safety please do things properly. Anyways that's the end of my rant.

And on a positive note I get to go to the junkyard tomorrow! One of my favorite places! It's like a big kids toy box and a treasure hunt all in one! Lol
 

Attachments

  • IMG_0249.JPG
    IMG_0249.JPG
    38.6 KB · Views: 199
My bellhousing bolts were loose and 2 were missing on my 3rd gen. Even missing one of the clutch slave cylinder bolts. Transmission mount wasn't even bolted to the crossmember. Wiring harness was also cut and butt connected back together next to all the plugs
 
It's work like that that makes you feel the need to go through everything on the vehicle before even driving it really. Which I tend to do on a new rig anyways but it really puts a damper on your mood toward what else your going to find. By the way the last bell housing was about half way out.
 
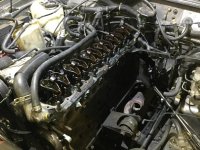
Well I'm in the process of scraping rtv to replace valve cover gasket and replacing broken exhaust manifold until the junkyard opens so I can go grab a couple interior trim pieces and odds and ends. Also hopefully my 12mm ratcheting wrench I left under a rig the other day if it's still there
 

Attachments

  • IMG_0250.jpg
    IMG_0250.jpg
    138.1 KB · Views: 196
Well after spending the day putting in new gaskets and replacing the exhaust manifold on the Xj as well as getting all the bellhousing bolts in and tightened down there is no more engine leaks, no extremely loud exhaust leak and the “engine knock” is officially gone. Thing runs like a top and has a hell of a lot more power than the old runner... and that’s just not going to work. Can’t have the girlfriends rig faster than mine. I need to get this engine swap underway. Her grandfather has a freshly rebuilt 351w that he can’t take with him to the east coast when he moves in the summer and said I can have it for $400 so I may see about going that route. Also now that my shop has room I can go get steel and start my bumper :) well I guess I still have to do a uloint and replace the transfer case output shaft seal but that’s about it
 
Last edited:

Members online

Forum statistics

Threads
278,310
Messages
3,554,079
Members
248,016
Latest member
Advally Service

Trending content

Back
Top