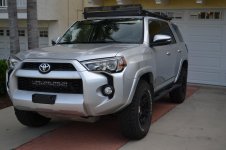
Wild_Turkey 2015 T4R SR5 Premium Build

The canvas cover looks like a good option! Seems to git really nice and looks good too. Is Piper an American Pitbull Terrier mix? Shes pretty!

 
Rescue Dogs

The canvas cover looks like a good option! Seems to git really nice and looks good too. Is Piper an American Pitbull Terrier mix? Shes pretty!

Thanks Caleb! Not sure what all the mixes are for Piper, exactly, but as far as my homeowner's insurance company is concerned, she's a lab mix. :hatsoff:
 
Good Advice!

That's awesome! I don't know how much experience you have with rescues but I found the Cesar Milan (dog whisperer) books super helpful. I implemented a lot of his philosophies on mentally rehabbing ours and it really worked. When we got her she was skittish just like you described, was food aggressive and didn't like kids. Now she is my 3 year old daughters best friend and sleeps next to my 11 month old sons crib. She has turned into the best family dog we could have hoped for.

Wow, super looking dog! Thanks for the tips.

This is not our first dog, but she is our first rescue. I'll check out the Cesar Milan books. I've watched several of his videos and he has a lot of good advice. Piper has not shown an ounce of aggression, so we are hoping that continues. This is the first dog we've ever met that is not food or treat motivated, but hopefully all that changes when we get more trust established. At least she's eating and drinking now...that's a relief. :hungry:
 
Thanks Caleb! Not sure what all the mixes are for Piper, exactly, but as far as my homeowner's insurance company is concerned, she's a lab mix. :hatsoff:

Ha ha, yeah "lab mix" is a common one to use for any insurance or covenant type questions! One of ours is a female American Pitbull Terrier and she has alot of similar qualities to Piper. Ours is also not very food motivated. Typically she prefers to play fetch than have a treat or really any kind of food for that matter. Shes extremely active and also not aggressive at all. Shes a lover and a cuddler and very gentle around children and smaller dogs!
 
Official Sponsor

Also check out the sponsor list on the right side of the page, i have officially become a sponsor on the forum!

Caleb, congrats on becoming an official sponsor. Right at the top of the list, nice! Folks here are going to love your products. I know I do. :cheers:

You have some great looking dogs. Hoping ours keeps her good qualities that we are already seeing and comes out of her shell once she trusts us.
 
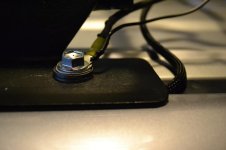
This install was fairly straightforward. I decided to mount the compressor on the passenger fender wall using the existing M6 tapped holes. In order to use the existing holes, I made a butch plate out of 0.125” Aluminum. We tend to have scraps laying around the machine shop of my company.
For piece of mind, I mounted 1 of the bolts through the compressor foot, butch plate, and into the fender wall. This provides a very secure and rigid mounting method. The other 3 feet were mounted to the butch plate using M6 bolts and nylock nuts. Finally, there is 1 more M6 bolt going through the butch plate into the fender wall.

I need to add some additional photos, but here was the sequence for mounting the compressor:

1) Measure and drill holes in the butch plate
2) Remove the 2 top-oriented Allen screws holding the compressor to the mounting feet
3) Loosen the other 2 Allen screws enough to allow the compressor to be flipped 180 onto it’s back (think like opening a clamshell)
4) Install M6 bolts and nuts to secure 3 of the mounting feet to the butch plate, leaving 1 foot free to be bolted to the fender wall
5) Remove air filter box to provide working space
6) Secure butch plate to fender wall using qty 2 M6 bolts (1 will go through the remaining mounting foot)
7) Rotate compressor back up and re-install 2 Allen screws to secure compressor to mounting feet
8) Tighten lower 2 Allen screws

Wiring:

Follow the directions on the wiring and you should be fine. I ran into a little trouble because I hooked the black wires to chassis ground. They actually need to go to the battery negative terminal. I believe this is because the ARB compressor is a DC motor.

I routed the wire harness along the firewall and secured it to an existing wiring harness using zip ties. Once it was routed, I cut the excess wiring. Since I used the Bussmann relay and AOB switch, I did not need the harness connector with the red, black, green, and yellow wires. I ended up using that as my wiring harness extension to move the OEM wiper heater switch to the right of the steering column

Hook all red wires together and connect to Bussmann relay output.
Hook all black wires together and connect to negative battery terminal.
I left the pressure switch relay intact and in the wiring harness.

It works like a charm! It takes me 10 minutes to inflate my 4 LT265/70R17 BFG AT KO2’s from 15psi to 39 psi.


Ordered a ARB CKMTA12 on the GB and need to have it installed. Would love to see more pictures of how and where you have yours installed.

Clean looking truck!
 
Canvasback Liner

Hey [MENTION=130932]wild_turkey[/MENTION], how grippy is the Canvasback liner? Does your dog seem to slide around much back there? For some reason my furry friend refuses to sit down when the car is moving - too much to see - and his paws slide on other fabric liners I've tried. I'm currently leaning toward WeatherTech since I know it's grippy, but I also have 3rd row seating so Canvasback is an intriguing option.
 
Cargo Traction

Hey [MENTION=130932]wild_turkey[/MENTION], how grippy is the Canvasback liner? Does your dog seem to slide around much back there? For some reason my furry friend refuses to sit down when the car is moving - too much to see - and his paws slide on other fabric liners I've tried. I'm currently leaning toward WeatherTech since I know it's grippy, but I also have 3rd row seating so Canvasback is an intriguing option.

The Canvasbacks have some grip, but not nearly as much traction as the all-weather mats since they do not have the ridges. The top is "600 Denier Textured Poly Fabric" that does have a grippy feel to it and the texture provides some grip when I place my hand flat and try to slide it.

Our dog is new to us, so she's still learning how to ride in the back of the 4Runner. If she is standing, she slips around a bit, but I also have the Toyota all-weather mat and she will slide around even with that if she's standing. Their paws just just don't seem to be enough surface area to stop their inertia. She's learned pretty quickly to sit braced up against the corner of the back seat and wheel well. She's fairly solid when she's in that position. I will still hear the occasional clunk when we go over a big bump and then I feel bad.

Contact Canvasback and maybe they will send you a fabric sample so you can judge for yourself. They seem pretty accommodating.

I still like them better for a few reasons:

1) You can pull 1 seat of the 3rd row up and still have cargo protection on the other half that is down
2) It provides protection over the back of the 2nd row when it is folded flat and the entire surface is flat (cargo mat has a ridge, which would be uncomfortable if you were sleeping back there)
3) You can ask them to provide cutouts for the cargo hooks at no additional cost

Hope that helps.
 
I still like them better for a few reasons:
1) You can pull 1 seat of the 3rd row up and still have cargo protection on the other half that is down
2) It provides protection over the back of the 2nd row when it is folded flat and the entire surface is flat (cargo mat has a ridge, which would be uncomfortable if you were sleeping back there)
3) You can ask them to provide cutouts for the cargo hooks at no additional cost

I think you may have sold me. We just got back from a muddy hike with a car full of 2 dogs, 4 adults, and an infant. Needless to say, the 4Runner is nasty and I'll be investing in (most likely) a Canvasback ASAP. Thanks for the review!
 
Less traction than I thought

I think you may have sold me. We just got back from a muddy hike with a car full of 2 dogs, 4 adults, and an infant. Needless to say, the 4Runner is nasty and I'll be investing in (most likely) a Canvasback ASAP. Thanks for the review!

I think you will still like the product, but I remembered the traction incorrectly. The grippiness I was thinking of is on the backside that has the waterproof fabric. The top side isn't all that grippy...sorry. Just felt it again today when I loaded the dog up. Maybe throw a couple of cheap yoga mats back there on top of the canvasback.
 
Updated Compressor Pics

Ordered a ARB CKMTA12 on the GB and need to have it installed. Would love to see more pictures of how and where you have yours installed.

Clean looking truck!

Hey bud, thanks. Sorry for the delay. I've been planning to update the post with some better pics, but just haven't gotten around to doing what I wanted. My plan was to take the compressor back out, trim the plate, paint it, then reinstall, documenting the process. Well...you know how it goes. It's already installed and working, so motivation to redo it is low.

I did update the original post with some better pictures. You should be able to get the idea of where and how it's mounted. Just let me know if you still have questions. ARB Compressor Install
 
Rear Diff Breather Mod

I've been meaning to do this mod just for peace of mind, but we've been in a sustained drought in CA. El Nino has showed up this year, so definitely time to take care of this.

Kit List:
- 10' Fuel Line Hose, 5/16": $17
- Toyota part 90404-51319 (Union): $10
- Toyota part 90930-03136 (Breather) $5
- Stainless steel hose clamp (x2): $2.50 for 4
- Enough zip ties to hold it all together
- Teflon tape

So for $35, it's definitely nice to be safer. One thing to note is the size line to use. Some say 1/4", 5/16", and 3/8". I bought the 3/8" initially and I was not happy with how easily it slipped on the union and it was very loose on the breather. I took it back and got 5/16" line. You really only need 8', but I used 9' and left slack in the fender for a future lift and more wheel articulation.

I'm not going to document much here because I basically followed [MENTION=65614]Antman[/MENTION] and located the breather in the driver side tail light compartment. Antman Rear Diff Mod Tail light

I also followed [MENTION=129593]MTN4RNR[/MENTION] on his advice routing the line. MTN4RNR Rear Diff Breather Mod

The reason I chose here over the others was:

1) No drilling/cutting required
2) No part of the mod comes inside the rig
3) Taillight is pretty easy to remove (2 nuts, unclip the wire harness, and pull like hell straight back)

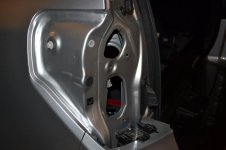
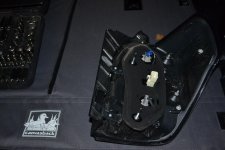
Here are a couple of pics of the tail light area. The white clip at the top of the rear fender is what holds it in tight, so you'll want to put your left hand there when you're pulling. You can see the 2 studs on the tail light where you have to remove the nuts. Pretty easy, but nice to have a picture so you know you have everything off before pulling.

I was pretty much finished and about to zip tie the new breather inside the tail light compartment when I dropped it. NOOOOOO! <Expletive Deleted> <Expletive Deleted> <Expletive Deleted>

So what should have been <1 hr turned into 2+ trying to fish it back up with my telescoping magnet. I should have just pulled the fender off, but you know how it gets when you're frustrated...mind doesn't think clearly.

Anyway, super cheap and easy mod that I would recommend tackling when you have some downtime.
 

Attachments

  • DSC_1102.jpg
    DSC_1102.jpg
    131 KB · Views: 1,327
  • DSC_1103.jpg
    DSC_1103.jpg
    135.2 KB · Views: 1,281
Last edited:
DIY Window Screens / Sox for $6

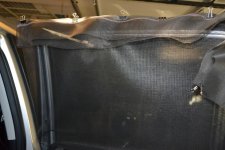
I did some dispersed camping in Big Sur this past weekend, which was awesome. What wasn't awesome was the mosquitoes. I slept in the back of the 4Runner, which was pretty comfortable. It would have been nice to crack the windows, though. So I started to do some research...and found lots of inspiration.

The first info I came across was a YouTube video by [MENTION=107059]Land_Shark[/MENTION]. (5th Gen Window Screens) Very straightforward and the tape made it easy.
[MENTION=112139]Fenix84[/MENTION] has a really nice write-up using magnets and double biased tape, but I wasn't going to tackle the sewing part. This was a very clean and professional looking approach, and I really liked the idea of the magnets so the solution was self contained. (DIY Window Screens)

I also thought about buying the professionally made ones, but $55 seemed steep. (WindowSox)

I decided to DIY and combine what I thought were the best attributes of all 3 options.

1) I really liked that the window sox slipped over the door/window and provided 2 layers of protection
2) I liked how [MENTION=107059]Land_Shark[/MENTION] taped the edges of his screens
3) I liked sealing the edge of the screen with magnets

Supplies:
- Leftover 24" wide roll fiberglass screen material. ($0 to me, $8 retail)
- Black Scotch Duct Tape ($0 to me, $3 retail)
- Black Gorilla Tape ($0 to me, $5 retail)
- qty 2 10-pack of Rare Earth Magnets from Harbor Freight ($3 each)

My cost was $6 because I already had some of the materials on hand.

Procedure:


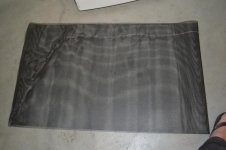
1) Roll out 77"x24" length of screen material
2) Wrap screen around the window and dry fit (note, I wanted the folded part to be on top of the window, but my material wasn't wide enough so I had to wrap around the sides. 6 of one, half dozen of the other)
3) Clamp screen in place using binder clips
4) Use piece of chalk to mark excess areas to trim
5) Trim screen edges along the chalk outline to fit
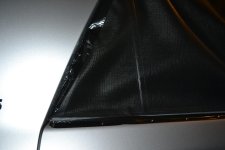
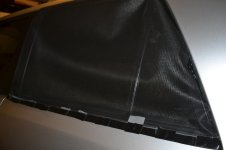
6) Tape edges using black duct tape, sealing off top and side of the sock, leaving the bottom open to slide over the window
7) Dry fit taped screen on window
8) Place magnets on bottom outside screen edge so they hold the screen against the door
9) Mark desired magnet locations with sharpie
10) Tape magnets in place using Gorilla Tape for extra hold

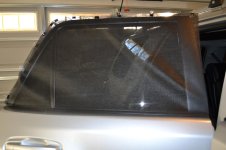
I'm pretty happy with the way it turned out. The 2nd one definitely came out better than the 1st one. There is some excess material, but for 1 hour of time and $6, this is a totally functional solution. Time will tell how it holds up, but it's an easy repair to fix.
 

Attachments

  • DSC_1125.jpg
    DSC_1125.jpg
    135.3 KB · Views: 1,284
  • DSC_1413.jpg
    DSC_1413.jpg
    132.9 KB · Views: 1,259
  • DSC_1416.jpg
    DSC_1416.jpg
    136.7 KB · Views: 1,227
  • DSC_1417.jpg
    DSC_1417.jpg
    160.2 KB · Views: 1,203
  • DSC_1420.jpg
    DSC_1420.jpg
    140.4 KB · Views: 1,199
  • DSC_1422.jpg
    DSC_1422.jpg
    140.6 KB · Views: 1,208
Baja Flat Utility Rack Install

My Baja Flat Utility rack finally arrived from the Tacomaworld group buy! I went with this rack for a few reasons:

1) NO DRILL INSTALL
2) Sits as low as any rack on the market and maximizes my garage clearance
3) Allows me to carry more than just my RTT (Treds for sure, maybe Rotopax in the future)
4) Front and rear light bar tabs already provided
5) Decent price point

The install directions are very good and installing the rack itself was quite easy. I added a fair amount of time fabbing and painting a bracket for my 40" light bar and running all of the wiring. The bracket that came with my 40" KC Hilites sat too high for my taste. I just used some scrap 1/4" aluminum angle bracket and measured/drilled 4 holes. Piece of cake.

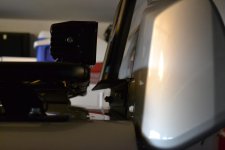
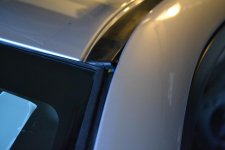
I ran (2) 14 gauge wires under the windshield gasket on the driver's side, then under the roof rain gutter trim, exiting on the rear side of the factory rack's front foot mount. This seemed the cleanest route with minimal trim (only where the wires entered the rain gutter trim by the windshield and it looks like I need to do a better job on this trim). See the pictures below. I also ran installed ground terminal lugs for my lights and future CB antenna so I wouldn't have to remove the bolts later. Glad I pre-installed all of my switches to the Cooper Bussman. Made that part a snap.

I liberally applied marine grade silicon sealant around the bolt "tubes" and pipe thread sealant on the threads of each bolt. I also reused the rubber washers from the factory bolts between the bolt metal washer and the rack foot. I'm hoping this keeps water from going down the thread in the first place.

The only tricky part is the torque...it's 55 in-lbs. My torque wrench is in ft-lbs and lowest is 10 ft-lbs. Conversion says 55 in-lbs = 4.58 ft-lbs (per google search unit conversion). So it seemed my torque wrench would be useless in this endeavor, but I used it to calibrate my hand to 10 ft-lbs so i wouldn't over torque. :jk: But I was sensitive to this because others have noted that over torquing created some small pressure dents in the roof. I snugged them up tight, but not over-cranked.

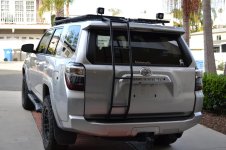
For anyone who is wondering, yes the Gobi ladder clears the Baja Flat Utility Rack (pic below).

Cons: I would have preferred aluminum for weight savings and rust resistance. Unfortunately, the aluminum racks I researched were either too expensive, sat too high, or required drilling 2 inserts for the front feet. After running the wiring, it would be nice to have it pre-run through the tubing like the Gobi Rack. The Gobi is a lot cleaner that way. I also dislike that you almost need a custom mounting bracket for each accessory, which aren't cheap.

First impressions are otherwise very favorable. I gained about 1.5" of clearance over my Yakima rack setup, and it is also much quieter (super quiet unless a cross wind) than the Yakima setup. I bought the tent plates for my RTT and it will make mounting much easier. Rotated 90*, the plates will drop between the crossbars. Get the tent in place, rotate back 90* and tighten up. I imagine this will be easier with my Racor lift than the Yakima's, but we will see since it is tight under the rack (flip side of being low profile).

Looking forward to getting out and putting this rack and camping lights to work!
 

Attachments

  • DSC_0142.jpg
    DSC_0142.jpg
    126.4 KB · Views: 4,231
  • DSC_0144.jpg
    DSC_0144.jpg
    133.9 KB · Views: 1,297
  • DSC_0148.jpg
    DSC_0148.jpg
    122.8 KB · Views: 1,159
  • DSC_0145.jpg
    DSC_0145.jpg
    124.9 KB · Views: 1,196
  • DSC_0147.jpg
    DSC_0147.jpg
    118.6 KB · Views: 1,178
I've been meaning to do this mod just for peace of mind, but we've been in a sustained drought in CA. El Nino has showed up this year, so definitely time to take care of this.

Kit List:
- 10' Fuel Line Hose, 5/16": $17
- Toyota part 90404-51319 (Union): $10
- Toyota part 90930-03136 (Breather) $5
- Stainless steel hose clamp (x2): $2.50 for 4
- Enough zip ties to hold it all together
- Teflon tape

So for $35, it's definitely nice to be safer. One thing to note is the size line to use. Some say 1/4", 5/16", and 3/8". I bought the 3/8" initially and I was not happy with how easily it slipped on the union and it was very loose on the breather. I took it back and got 5/16" line. You really only need 8', but I used 9' and left slack in the fender for a future lift and more wheel articulation.

I'm not going to document much here because I basically followed [MENTION=65614]Antman[/MENTION] and located the breather in the driver side tail light compartment. Antman Rear Diff Mod Tail light

I also followed [MENTION=129593]MTN4RNR[/MENTION] on his advice routing the line. MTN4RNR Rear Diff Breather Mod

The reason I chose here over the others was:

1) No drilling/cutting required
2) No part of the mod comes inside the rig
3) Taillight is pretty easy to remove (2 nuts, unclip the wire harness, and pull like hell straight back)

Here are a couple of pics of the tail light area. The white clip at the top of the rear fender is what holds it in tight, so you'll want to put your left hand there when you're pulling. You can see the 2 studs on the tail light where you have to remove the nuts. Pretty easy, but nice to have a picture so you know you have everything off before pulling.

I was pretty much finished and about to zip tie the new breather inside the tail light compartment when I dropped it. NOOOOOO! <Expletive Deleted> <Expletive Deleted> <Expletive Deleted>

So what should have been <1 hr turned into 2+ trying to fish it back up with my telescoping magnet. I should have just pulled the fender off, but you know how it gets when you're frustrated...mind doesn't think clearly.

Anyway, super cheap and easy mod that I would recommend tackling when you have some downtime.

Going to do this Mod. Do you think both hoses (Diff/locker breather) will fit in the Tail light compartment?
 
Going to do this Mod. Do you think both hoses (Diff/locker breather) will fit in the Tail light compartment?

They should both fit without an issue, but you could also join the 2 lines with a T-coupler somewhere lower and save yourself some hose.
 
T-coupler! Sounds like a plan. Thank you for the help!

Actually, that may or may not work. I didn't have an E-Locker to route, but I thought that I saw a coupler used in another build. Check out this link MTN4RNR Breather Mod where [MENTION=129593]MTN4RNR[/MENTION] used 2 breathers. They will both still fit in the taillight compartment.
 
Actually, that may or may not work. I didn't have an E-Locker to route, but I thought that I saw a coupler used in another build. Check out this link MTN4RNR Breather Mod where [MENTION=129593]MTN4RNR[/MENTION] used 2 breathers. They will both still fit in the taillight compartment.

Ok, that link works. Thank you for the help. Will try to tackle this mod soon. Thanks!
 

Members online

Forum statistics

Threads
278,316
Messages
3,554,120
Members
248,016
Latest member
Advally Service

Trending content

Back
Top