Zombie Truck 2.0 MPAV Build!

You should be close. I took mine over to a loading ramp and put all weight on the front corner to measure. I added 2" over my 265/70 w/1.25 spacers. I'm at 1.3/1.6 caster also.

Never met him, but seen his ride this summer at PC. Didn't get too far snooping around his ride with out him being there. Didn't want to get shoot for crawling around it.
 
I need to adjust my caster this next time. I rub all the time and it's driving me nuts, but I have a crap spring that's about to be replaced. So we'll see if the Tacoma TRD springs fix it.
 
I like that not a lot of people seem to run this wheel and the dark bronze look it has

That's exactly why I like them. Never seen them before, good choice!
As much as I want nice wheels I settled for a cheap set of FJs i got with some MTs since I know I'm going to bang them up on trails. I would hate to buy new wheels and have them all scuffed up
:lookout:
 
Blackworks Take that truck to the doctor cuz it is SICK!!!!!!!

I just lifted mine and pics don't do it justice, it looks bigger in real life.

I love the Bumper, I'm goona get the same one.. Any advice????


I'm running 285/70/17, 3" toytec, 1.25 BL Where is this pinch weld, and/or do you have a picture. I don't think I rubbing there, but I haven't flexed it yet.
 
Blackworks Take that truck to the doctor cuz it is SICK!!!!!!!

I just lifted mine and pics don't do it justice, it looks bigger in real life.

I love the Bumper, I'm goona get the same one.. Any advice????


I'm running 285/70/17, 3" toytec, 1.25 BL Where is this pinch weld, and/or do you have a picture. I don't think I rubbing there, but I haven't flexed it yet.
Not to butt in, but you won't hit the punch welds with 285's, especially with your lift. It's when you hit 35's that you start having issue's. it's a fun and addictive game though!
 
Speaking of pinch welds... I cut them about 1/2" back (to the edge of the spot welds) and also chopped the body mount bracket (will have to fab a reinforcement plate later); I now have enough clearance to almost go lock to lock (which is what I wanted). Problem is that if I am turning and hit a speed bump or driveway decently it still rubs on the pinch weld and possibly the body mount.

I was too tired to try and align it tonight and I am a bit skittish of trying to tap the heads on as I really don't want to scratch my wheels (we don't have the nice newer ones that clamp on the wheel :( ) I really feel like if I bumped up caster another degree it would give me enough clearance on compression when turning to keep me satisfied for a while.

Worst case I suppose I could go with the original idea and just cut the pinch welds down flush and tack the sheetmetal together?
 
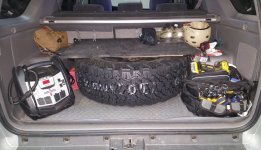
So among other thing I need to address now that I went to 35's is the fact that I still have no place to put the spare (maybe I should start a thread on "will 35's fit the factory spare location? :P )

I keep meaning to get/build a full metal rear bumper and it just keeps getting put on the back burner, at the moment with the move coming up and other things I just don't know when I'll get around to it. In the mean time I have a giant tire taking up room in the cargo area as you can see.

20160223_222837.jpg

My friend and I mused about mounting it straight up (it does actually fit standing up, managed to squeeze all 5 in the back to take to work! :D ) like older Cherokees did. The only thing is that I can't seem to figure out how to secure it. I'd like not to cut/deform the WeatherTech to reach the anchor points, but it seems I may have to do that at this rate since I can't seem to find anything else to secure it to.
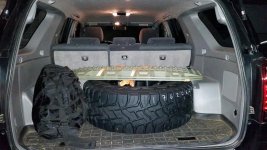
Suggestions/ideas guys?
 

Attachments

  • 20160223_222837.jpg
    20160223_222837.jpg
    61.2 KB · Views: 1,514
Spent more time today trimming the fender a little, chopped and hammered the body mount back a bit, and ziptied the bottom of the plastic fender to the bottom of the body (it's been loose for a while but the 35's keep pulling it from the fender sheetmetal). Still have very slight rubbing at almost full lock, my main goal is trying to get the vehicle to not rub badly in a turn when the spring compresses (an almost impossible feat currently, but the more I can mitigate it the better.) I almost wish Toyo made these R/Ts in 34", but sexy tires are sexy none the less, the price we pay for beauty!

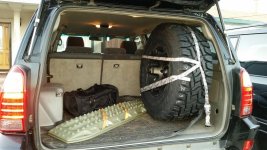
I bought some ratchet straps today and secured the spare on the passenger side, used two of them (one over the top was enough that it didn't really move, but I wanted one horizontally to ensure it wouldn't slip out) and it came out pretty well. I decided not to cut the Weathertechs and just let them sorta curl up a bit at the moment. A shame the MaxTrax are too tall to mount vertically or front to back in the cargo area. :(

20160225_175429.jpg

Post Note-

To add insult to injury I have been battling a damn annoying squeak since before the 35's. Have a feeling I need to pull the driver's front coil over again, wash it, and relube the heim joint as that is what it was last time. No amount of PB Blaster, WD-40, Liquid Wrench, ect. seems to be working.
 

Attachments

  • 20160225_175429.jpg
    20160225_175429.jpg
    69.2 KB · Views: 18,541
Last edited:
After seeing you decided to go to 35s and had them side by side to your old tires, started to make me of going to wanna be 35s (315) instead of 34.

Those look huge and beefy in comparison.
 
After seeing you decided to go to 35s and had them side by side to your old tires, started to make me of going to wanna be 35s (315) instead of 34.

Those look huge and beefy in comparison.

That picture is deceptive as the 35's are closer to the camera and leaning against the 4Runner so they look larger by perspective. But here's a good comparison picture I made for a member in another thread:

http://www.toyota-4runner.org/gener...ook-f*-%ing-retarded-truck-3.html#post2280856
 
Your 4Runner is beast! I love it!

I know the feeling of dealing with the spare.

I hate that it sits in my rear cargo area, so I put a piece of wood on top of it

2016-02-25_22-46-40.jpg
 

Attachments

  • 2016-02-25_22-46-40.jpg
    2016-02-25_22-46-40.jpg
    134.4 KB · Views: 1,282
LOL...I remember seeing KID posting this up. I just kept out of that one.

Pictures there give more of a perspective in appearance, Thanks. Do look much larger still.
I have a feeling I will have to cut up my bumper a little on the tire corner as I don't wish to do a BL to mine.

Truck looks great!!! Good luck on your move, wish I could be able to do a relocate up there myself knowing others I know that have done so already. Beautiful country.

Just keep posting up, your helpful knowledge has done wonders for me, Thanks.
 
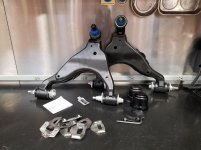
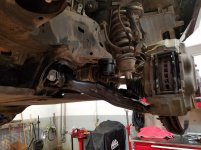
Finally got around to installing my rebuilt LCAs!

I also decided to go with Wheeler's Offroad BumpStops with a 3/8" spacer to limit up travel slightly since the 35's are mashing into the fenders some on full compression. Had the LCAs and all the parts ready to go for a while, I just needed a weekend to throw them in.

Here's all the goodies! The LCAs were from a Tacoma a coworker did a frame on and the bushings are poly-urethanes from WhiteLine Racing. I went with a Raysbestos LBJ per a couple member's recommendations (it appears to be similar to the AC Delco offering as well). Had a local shop powdercoat them satin black for me also. I bought new Total Chaos Cam Tabs to install as well because my tabs were on their last legs.

LCAParts.jpg

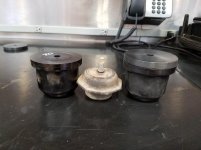
Here's a comparison of the factory bumpstop (extremely hard and barely has any give after 10yrs) and the Wheeler's Offroad squish blocks made of Poly-Urethane Foam, I also included a one with the spacer on top so you get a good comparison.

Bumpstops.jpg

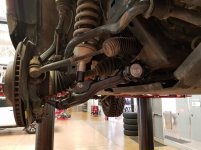
After drilling out the spot welds, prepping the metal, having my coworker weld them in (I'm out of practice so my welds would look horrible), painting, and finally reassembling everything; it all looks good!

From the front:
FrontLCA.jpg

From the Rear:
RearLCA.jpg

Went with all new hardware (my old cambolts and adjusters were actually fine, I decided to keep them as spares since they weren't even corroded and slid out fine) and applied anti-seize to all the cam bolt and adjusters as a precaution. The whole thing took maybe 5 hours or so with alignment? All in all I am very happy I went with this, I was having a steering wheel shake around 50~65mph that was very odd and inconsistent; I had suspected the LCA bushings to be the cause for the longest time and when I pulled the arms out you could easily see they were barely hanging on. Now with the new LCAs she drives perfect and the turn-in response feels better!
 

Attachments

  • LCAParts.jpg
    LCAParts.jpg
    61.4 KB · Views: 3,456
  • FrontLCA.jpg
    FrontLCA.jpg
    69 KB · Views: 1,136
  • RearLCA.jpg
    RearLCA.jpg
    78.5 KB · Views: 1,144
  • Bumpstops.jpg
    Bumpstops.jpg
    50.3 KB · Views: 1,136
Last edited:
Switching to the poly bushing (LCA), definitely helped a lot with my hard brake shakes, steering is a lot tighter also.

Only problem I have been having now with them is getting the squeaks in the bushings in turns going over curbs ect. Need to find/do a zerk lube system to them.
 

Members online

Forum statistics

Threads
278,316
Messages
3,554,120
Members
248,016
Latest member
Advally Service

Trending content

Back
Top