415Yota’s Build

Hahaha....takes a bit of finesse and a half for that and hardly any swear words. Ish. Good work and good time for the oil pan re-fipg if you need it.

Definitely took a lot of finesse haha. I don’t remember it being that difficult on my Tacoma when I did the regear but I also had a 3rz so it might of been a bit easier. I’ll take a good look at my oil pan to check if it needs it.
 
Recently I’ve had a bit of free time so I’ve managed to get a good amount of stuff done.

Got the new rear 3rd installed with 5.29’s and new Allen drain/fill plugs as my old drain plug was difficult to remove because of rocks scrapping right there. Also did my rear axle seals/bearings and brake shoes at the same time with oem parts.
37963236-092-D-4-EB5-8808-4363-AA26-D85-A.jpg


Got my front suspension all back together minus the front diff, still waiting on ECGS. Installed eimkeith shock bucket reinforcements, LCA reinforcements, and heavy friction works spindle reinforcements. Also got new front durobumps warrantied as they were both cracked.
E4784-B5-F-847-F-4-BD3-BA8-C-3-DF0170688-F5.jpg


Added an additional mounting point to my CBI windshield bracket so I can mount a CB antenna.
A95-D890-B-1-B74-4056-BD67-29-F575396096.jpg


Got 2 more switches cut into my dash.. Both the locker buttons will light up amber and all the other switches will light up green like the majority of the other switches on the dash.
1-D504-D1-C-1-A57-4-D73-9459-5317-EE155601.jpg


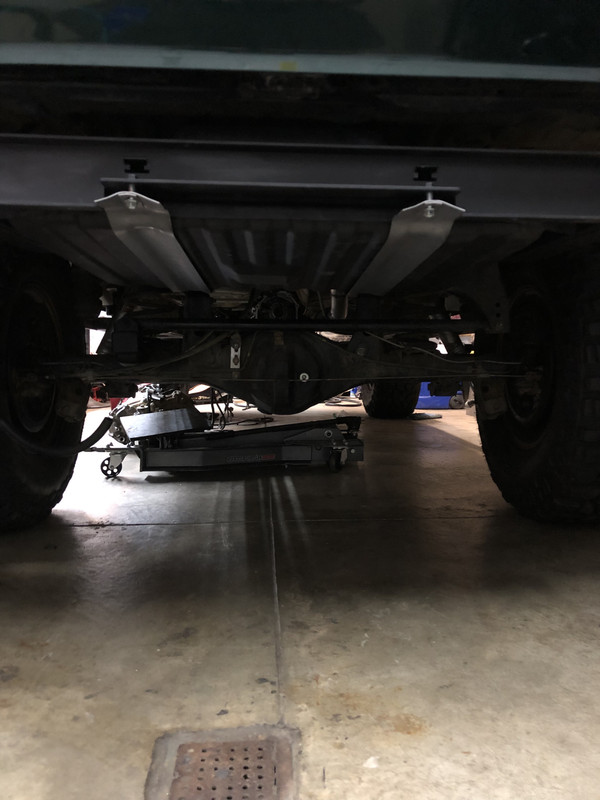
Last but not least I got the rear eimkeith crossmember installed for the rear bumper/f150 tank swap.
1724-A82-F-284-F-4-B45-B533-B15588556286.jpg
 
Gunna be a busy weekend, just got the front diff back from east coast gear supply. Sounds like the compressor is back ordered a few more weeks though..

0497-C79-A-75-B2-4-AAC-96-C8-7-E1-BB18-B2-C17.jpg


Decided I’m going to do a 1” BL due to ease of installation of the f150 tank+dual cases. Also when I ordered the eimkeith non BL bumper i didn’t realize that it’s pushed down 1.25” below the frame because the original design is based on a 1.25” BL. So now I should be able to almost clear 37’s! Lol..

191-B6-A02-AF8-E-4705-BCB7-DF02-D11-E6-E68.jpg
 
Finally making the time to respond to your several previous posts... Wow. You are getting a heck of a lot done! Kudos to you on balancing work, wife and a little one, probably walking about now. Impressive, like your rig!
 
Finally making the time to respond to your several previous posts... Wow. You are getting a heck of a lot done! Kudos to you on balancing work, wife and a little one, probably walking about now. Impressive, like your rig!

She’s fully walking and saying words (almost sentences at times). Crazy how much personality she has now. Trying to get this thing all wrapped up so I can go on some trails/camping! I’ve just been pulling some late nights after baby goes to bed lol. Thank you man.

Just got some energy suspension poly body mounts and the 1” body lift installed last night. Finally put the runner back on its own feet. No pics yet still need to bleed the brakes from the rear 3rd install. Hopefully will be able to get that done tonight.

31-F75-C4-B-0086-4-A6-E-8-EE1-140-BEC29-F194.jpg
 
Sooo something happened.. I accidentally forgot I had the front drive shaft zip tied only and went for a test drive and shifted into AWD… Was pretty heart breaking after putting in so much work. Check out the carnage.

2-D6-D0833-79-C7-4-B25-959-E-B1439-E2-EB811.jpg


AB5-F15-C5-1-EA3-4-FEC-9543-E740-E987111-E.jpg


Front section of tcase housing cracked, transmission bell housing Swiss cheesed, power steering lines chewed up. Good thing I don’t need the sway bar mounts anymore, even made a small dent in the frame.


Went to the salvage yard and picked up a 99 limited transfercase. Was super crusty/rusty so I decided to just use the front section of the case only. Took it all apart and resealed the housing back up with all my original tcase guts.

290-AFF1-F-A32-E-4181-9227-B022-A18-E1-FB5.jpg


Took transmission out to replace bellhousing, decided to start the transgo/solenoid replacement. Realized I got the incorrect solenoids. If you want to do the solenoids I highly recommend dropping the pan before ordering as the ones I got were recommended by mcgeorge (didn’t order them from there though).. Was pretty hard finding the correct part numbers, had to look at the pictures on partsouq to figure it out..

F8-C3-BEDB-E315-4-BA9-881-A-F4-ACAC3332-C6.jpg


FCFE6999-BC0-F-4119-ADF6-163-D4834-C6-DC.jpg


6-ECD043-D-2959-4-F99-ADAE-835-D526-E2-B3-C.jpg


Here’s what the solenoids look like

353-C7037-2110-4676-BC88-48-F925-B6-A4-EA.jpg


Also can’t figure out why my elocker isn’t working after doing the ECGS 3rd. Seems like the actuator/motor works (tested with the battery). Also seems like the ecu is fine, going to have to do some more testing..

 
I don't like the first part of the post (DOH!), but the second part is good recovery.

Post 2589 and on may or may not be of some interest and probably no help locker-wise... habanero's 1996 4Runner Build-Up Thread - Page 130 - YotaTech Forums

Ended up having to take the locker apart a few times to get it back together correctly lol.. I tested the actuator itself with a 12v battery and it goes back and forth just fine but when I plug it into the truck it won’t move. Dash lights up and everything though (only blinking like it’s trying to engage). Next test I’ll do is the wires at diff to make sure they are getting power when I hit the switch.
 
Ended up having to take the locker apart a few times to get it back together correctly lol.. I tested the actuator itself with a 12v battery and it goes back and forth just fine but when I plug it into the truck it won’t move. Dash lights up and everything though (only blinking like it’s trying to engage). Next test I’ll do is the wires at diff to make sure they are getting power when I hit the switch.

Did you maybe take the cover off the motor? Put it back on with the north/south magnet thing in mind? I'm too curious for my own good...
Quoting my ownself
Those magnets are only supposed to go in a certain way. The cover is even pinned so it too can only be put on one way (my pins are gone, so much corrosion there).
locker_magnets_zpsokwkuzxl_0cb921ae7b1482cb5929ff5eb223e4bd06ef0371.gif
 
Did you maybe take the cover off the motor? Put it back on with the north/south magnet thing in mind? I'm too curious for my own good...
Quoting my ownself

Luckily all my magnets seemed in good condition and were still attached to the cover on the motor. First time I put it back together I didn’t notice the pins but when I saw the cover wasn’t sitting flush I knew it was wrong, that was one of the reasons I had to reassemble it a few times lol.
 
Was hoping for a pretty simple solution for you...ah, well. Cross fingers it does turn out to be simple enough.
 
I’ve got quite a bit done over the last couple weeks.

Trans go/shift solenoids installed and transmission is back under the truck. Also was able to use 5/8 quick connect fittings directly on both the breathers which I was really happy with.

E6-DDC2-F7-4340-41-B3-A9-D8-CE38-E907-C8-AB.jpg


2-AEB64-F2-2-E4-E-449-E-90-AD-CF1-D8-EF5-AE8-D.jpg


Opened up my headlights again, when I originally did the retrofits I didn’t clean the dust good enough and I also messed up the paint when I put them in the oven to reseal them. Repainted, cleaned the dust really good, resealed.. Never doing that again lol..

0-AF4-E59-F-48-F4-4763-89-DF-2-DEB21-E94386.jpg


Got the Marlin crawler tcase fully assembled. Now just gotta get the fuel tank dropped and cut out the crossmember and I’ll be able to get that installed.

EF969-D88-77-FF-4-CC0-A034-BD7-AC03-FF062.jpg
 
After about 6 months of planning and part collecting I’m finally doing it.. Gas tank is removed, disassembled, and drained. Learned some pretty cool siphoning methods on YouTube. Had like 13 gallons in the tank still, what a PITA. Luckily my wife was low on gas so I filled her car up a bit. Tomorrow Ill start cutting the tank up to harvest the flanges, then cut the f150 tank and weld the flanges on. Gunna have to look at [MENTION=118207]midcoma[/MENTION]s guide a couple more times..

F6-A750-D6-0573-4830-9-A78-6-ACE2-AAE254-F.jpg


3940-E2-E2-7944-42-CE-8954-2-CAB78-C37-BCF.jpg


Got pretty lit off the gas fumes in the garage (door was open) lol, definitely do it outside next time.
 
Cut off the Oem flanges and bucket, removed the filler nipple from the f150 tank, and modified the fuel pump bracket and the sending unit. Fits perfect inside the bucket now I just have to get the flange and the bucket in the perfect spot so the float doesn’t get stuck. Pretty happy with how it’s coming along so far. Removed approximately 4.375” as per [MENTION=118207]midcoma[/MENTION]’s thread and it seems right on when I put the assembly up to the f150 tank.

Empty:
7-FB8-ED52-82-D6-4751-AF58-A8860-CE71-F5-F.jpg


Full:
39-E56-AA1-E53-F-4757-8868-813-DD120-A6-CB.jpg
 
Got the flanges all welded up, cleaned the tank really well inside and out, and got the bucket placed where it needs to go. I’m going to angle the bucket very slightly to give the sending unit just a bit more room. The pump is literally perfectly touching the bottom of the bucket as well so the 4.375” was spot on. (Edit: had to cut an additional .25-.5” off due to warping)

57-CDC928-4-AA0-4221-9458-587933-F839-F9.jpg


4-F12-ECF0-ECE2-479-E-BE82-C18030308719.jpg
 
Last edited:
After looking over midcoma’s thread a bit more I realized I installed the orange bucket in the wrong orientation.. lol. Too late now, I think it will work fine the way I installed it though as it will still hold the fuel in a steep hill situation..

Got the tank pressure tested and painted, had to fix 3 small leaks.. Adjusted the fuel pump bracket a bit as the plate with the main flange warped a little. Got the crossmember cut out and got the filler/vent trimmed back to where they need to be. Gettin there!

3-F3-D1-B3-D-3-ED1-4-C58-9163-22-C83-C58215-A.jpg


7-F0548-D4-CC89-44-F0-91-EF-45-D76-D0-F5-A21.jpg
 
Got the brackets all welded up and installed, got the nuts welded onto the rear crossmember, finished cutting/cleaning off the spare tire crossmember, and got the tank fully ready to install. Now I just have to run the hoses and electrical connections and i will be done! (Oh wait and still have to re route the exhaust..) Super excited for the truck to be drivable again. Will get the dual cases installed on Tuesday with [MENTION=102606]infamousRNR[/MENTION] then I just have to order some driveshafts!!

73110-E35-80-E1-4-B4-E-941-C-C44-B17-B73068.jpg


F59-D1-E0-D-ABE4-4521-8882-5-CBB9-B1-F4332.jpg


4-C87-E735-8-BE2-4280-9700-08-A0-D1-E8615-B.jpg
 
Got a lot done yesterday but unfortunately Marlin sent the incorrect front adapter plate. They replied very quickly though and I was pleasantly surprised with their customer support.. New front plate will be here tomorrow and then I have to send back the original one.

Cut out the crossmember and painted the frame, I’ve opted to only cut one side for now since the other side doesn’t interfere (mostly laziness lol)..
B9-F807-F1-5-A36-4-BCC-A2-C3-AEF436-CE5-B90.jpg


Tacobox mated to the oem transfercase
A931-ADF7-EDEE-48-DC-873-F-1-BF7-F65-A19-F7.jpg


23 spline adapter and seal sleeve installed.
A5-EC84-BC-65-DF-4-B72-AB2-C-B5-D96-A250787.jpg


Started test fitting the f150 tank
EBFD88-C8-CD45-4-CDA-ACA0-18-BE1-C166-AEE.jpg
 
Mmmmmm.....tacobox....
All that fabricating stuff makes me so happy to have an m/t, but you do make it look so nice.
Looks great so far, looking forwards to more!
 

Members online

Forum statistics

Threads
278,316
Messages
3,554,111
Members
248,016
Latest member
Advally Service

Trending content

Back
Top