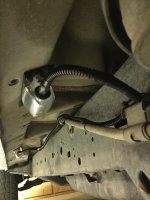
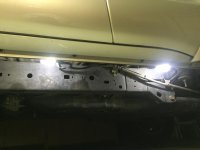
4th gen Ground Lighting (without running boards) for ~$10

I've learned a ton since joining the forum, and figured it's time for me to contribute something.

I removed my running boards recently, but was trying to come up with a way to mount some LEDs underneath to light the ground, and do it on the cheap.

I wanted to keep the same bulb type the the running boards had, so I wouldn't have any electrical problems. I found 194 light sockets on eBay ($3 for 4).

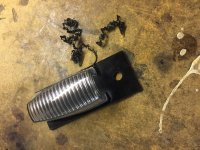
I then had to figure out a way to protect the LEDs. I looked into buying clearance light covers off eBay, but those were too pricey. I came up with the idea of buying C battery sized flashlights at the dollar store, and just using the bulb end to house the LED. The Dollar store was sold out of those, so I settled for nightlights ($4). But the plastic cover is all I used. I went to a local plastic store, and they gave me a scrap of black plastic about 5" x 18" x 1/8" thick. I super glued the nightlight covers onto the plastic, and then drilled a 5/16" hole in one end. This way I was able to use the bolt holes from the running boards.

I had left over wire, inline connectors, and 3/8" wire loom from my under hood LED project, so the only other purchase was a pack of heat shrinks for $2 at Home Depot.

Here's the final result. More info and pics on the way.
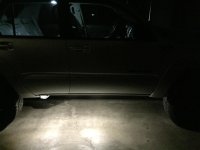
image.jpg
 

Attachments

  • image.jpg
    image.jpg
    139 KB · Views: 4,017
Register to hide this ad
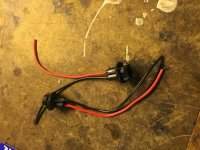
First off, here's the light sockets I bought from eBay. I searched for "194 LED sockets" to find them. They came from China, so it took a few weeks.

image.jpg
 

Attachments

  • image.jpg
    image.jpg
    136.4 KB · Views: 3,764
Last edited:
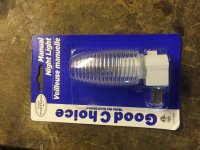
Here's the Dollar Store night lights. The sockets fit almost perfectly, but just to help them stay put I added a bead of clear silicone caulking around the outside of the socket.

image.jpg
 

Attachments

  • image.jpg
    image.jpg
    134.2 KB · Views: 2,799
Last edited:
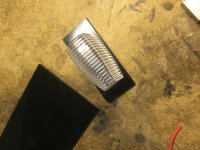
I cut the black plastic into rectangles just larger than the width of the night lights. This doesn't need to be exact. No one will ever see it. I used a box knife, and made a bunch of passes. But a hacksaw would work well too.

image.jpg
 

Attachments

  • image.jpg
    image.jpg
    134.5 KB · Views: 2,758
Last edited:
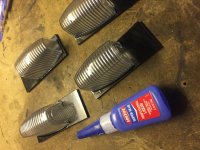
I used super glue on the edge of the light cover, and held it in place for about 30 secs, and it felt solid. It's not a big deal if you make a mess because again, it will not be seen.

image.jpg
 

Attachments

  • image.jpg
    image.jpg
    135.5 KB · Views: 2,726
Last edited:
After the glue set, I drilled a 5/16" hole in the longer end. This was a little tight to fit the running board bolt through, so I enlarged the hole by angling the drill around.

image.jpg
 

Attachments

  • image.jpg
    image.jpg
    137 KB · Views: 2,729
Last edited:
Here's how the housing will mount. I really didn't want to cut the OEM connection, but finally decided to cut it with about a 2" tail so I could always reuse if I needed to.

image.jpg
 

Attachments

  • image.jpg
    image.jpg
    143.6 KB · Views: 2,797
Last edited:
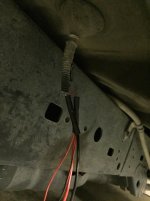
Here's the initial wiring. I connected the pigtails from the front socket along with the wire that goes to the rear, so there are two wires connected to the source of both the positive and negative.

image.jpg
 

Attachments

  • image.jpg
    image.jpg
    138.4 KB · Views: 2,747
Last edited:
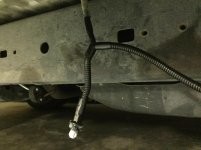
I then wrapped the wires with 3/8" loom, and taped the ends and around the inline connections (even though they were heat shrinked). I should also add that I tested the lights just about every step of the way. I didn't want to have it all put together, and then try to track down a loose connection.

image.jpg
 

Attachments

  • image.jpg
    image.jpg
    135.5 KB · Views: 2,732
Last edited:
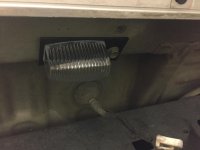
Here's the finished install. I zip tied the loom to the E brake lines. In case it's not obvious in the pics, I installed the lights facing forward to project the light forward, and also to have the opening in the light cover towards the rear. I figure it's less likely to get dirt in that way, but I'm also thinking I may seal up the hole with silicone. It's easy to replace, and I doubt I'll need to change these bulbs very often.

image.jpg
 

Attachments

  • image.jpg
    image.jpg
    135.3 KB · Views: 2,710
Last edited:
In the previous pic you'll see that I used the inner most bolt hole. That way it's much harder to see the light/covers. In fact, I can't even see them while sitting on the garage floor. I have to get the camera to about 8-10" off the ground to start to see the covers, and I have about a 3" lift.

I hope this helps somebody. It took me less than 2 hours to complete. The second side went way faster.

image.jpg
 

Attachments

  • image.jpg
    image.jpg
    129.3 KB · Views: 2,837
Last edited:
not bad, maybe try those waterproof led strips, maybe the ones that are a little stiffer. so do you have it working when you open up the doors? i thought about having it wire with the reverse line, so it lights up the parking stalls lines.
 
I like it man. Good work! I'm about to pull off my RBs due to the mud build up and worst... The snow pack in the winter turns my boards into a greased watermelon.

That said I want to keep my lights below functioning.

Did you end up cutting the connector off the end of the wiring or just tap the lines and leave the connector if for some reason you wished to return the boards?


Sent from my iPhone using Tapatalk
 
not bad, maybe try those waterproof led strips, maybe the ones that are a little stiffer. so do you have it working when you open up the doors? i thought about having it wire with the reverse line, so it lights up the parking stalls lines.

I thought about LED strips, but wanted to keep it cheap. That way if I smash it, it's cheap to replace.
Since it runs off the same wires as the RB lights, they turn on when the doors are open, and shutoff after about 10-15 secs.
 
Did you end up cutting the connector off the end of the wiring or just tap the lines and leave the connector if for some reason you wished to return the boards?

Sent from my iPhone using Tapatalk

I cut the connector off, but left about 2" of wire attached to the connector so I could just use an inline splicer if I ever want to put the RBs back on. I also thought about selling the RBs, but quickly saw that you can hardly give them away.
 
Can anyone please take a picture or provide info about the stock running board lighting wires? Mine came with unlit running boards and I don't know which wires to tap into to add running board lighting or where I would find it. I would assume it's already a part of my wiring harness, it's just not being used?


Sent from my iPhone using Tapatalk
 
Nice work. I removed my running boards about a year ago and I wanted to do the same as you. Lack of spare time has been getting in the way. This thread has motivated me to make this project a priority again.

Any chance you could post a photo from about 10-20 feet away? I'm curious how this would look as you're approaching the vehicle and pressing the unlock.
 
nice job... i would use some thing better then super glue to hold the lens. use some kind of L bracket or drill a hole through the center and a bolt, stopper then nut.
 
Nice work. I removed my running boards about a year ago and I wanted to do the same as you. Lack of spare time has been getting in the way. This thread has motivated me to make this project a priority again.

Any chance you could post a photo from about 10-20 feet away? I'm curious how this would look as you're approaching the vehicle and pressing the unlock.

Thanks. I'll snap a pic after dark, and hopefully remember to post it.
 

Members online

Forum statistics

Threads
278,312
Messages
3,554,087
Members
248,016
Latest member
Advally Service

Trending content

Back
Top