Aftermarket power lift gate finally available

Hey everyone--

The installation/review article is now live on Trail4Runner.com.

Autoease Electric Powered Liftgate Review & Install for 5th Gen 4Runner

As for the Gobi ladder, you can see in my video in the article that I have it installed with an unfilled Rotopax and it works for me. They don't recommend any additional weight on the tailgate since they probably calibrate the lift speed and pressure based on a tailgate with nothing attached. I took the ladder off and it worked just as smoothly with it on.

I did try to open it driving through a parking lot at slow speeds and it would not open. I'm no expert, but my assumption is that because this kit taps into the lock/unlock wire, while the car is in anything but Park it won't allow you to unlock the gate. I could be wrong there and that may not be the way it works, but it wouldn't open while driving for me.

If you do wind up buying this kit, I highly suggest you refer to my article vs. the instructions included in the kit. I had the hardest time finding the right CANbus wires and where they say "run the wires through the liftgate", that is no simple task and we needed to put the wire fish I had to the test to make it work.

If you get one, hit me up with any install questions you have. I'm not normally the early adopter with this stuff but my girlfriend has the power liftgate on her Evoque and I've wanted one on my 4Runner ever since.

I bought mine last week, arrives tomorrow. Best believe I used that group buy and got the 3 year warranty.

And I will more than certainly be using your writeup and messaging you about the installation. Thanks in advance
 
Great writeup, thank you so much for a detailed writeup. Curious if anyone has this system and a remote start system that uses the 3 lock command for the remote starting. The drilling for the button was my biggest question, thank you for covering that in detail
 
Great writeup, thank you so much for a detailed writeup. Curious if anyone has this system and a remote start system that uses the 3 lock command for the remote starting. The drilling for the button was my biggest question, thank you for covering that in detail

I have the factory remote start so I will be a tester for that, but like I believe is covered above the tailgate is opened with 3 presses of the unlock button. The factory remote start is activated with 3 presses of the lock button. Shouldn't interfere with each other.
 
I am assuming that this lift system, and others like it, will not work if the battery goes dead, is that correct or can you manually lift the tailgate?

I'm going to keep my wife from seeing this post as long as possible, because once she does, I'll have to order one :D
 
I am assuming that this lift system, and others like it, will not work if the battery goes dead, is that correct or can you manually lift the tailgate?

I'm going to keep my wife from seeing this post as long as possible, because once she does, I'll have to order one :D

If the battery is dead the rear hatch opener won't work either
 
If the battery is dead the rear hatch opener won't work either

he2ue.jpg
 
3x unlock is what opens the liftgate, so those with the factory remote start should be good. But yeah, no power means the rear liftgate won't unlock. BUT, if you have power and for whatever reason the liftgate struts don't work, you can open the gate with no power and they have the ability to stay open without power. I only know that because you mount everything up during the install before you connect the power.
 
My kit arrived yesterday and during my inspection I have already come across a couple changes from Gibburnz installation writeup.

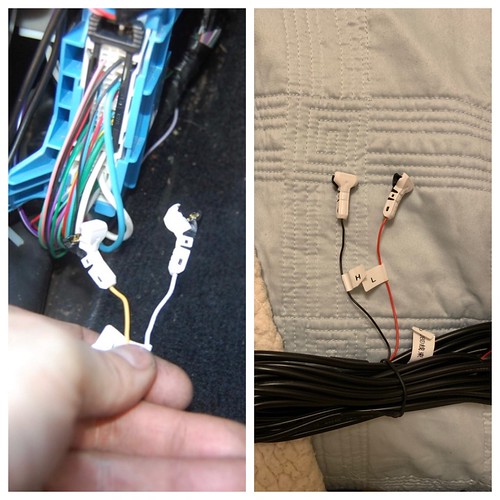
The group buy kits changed the CANBUS wiring from Yellow/White to Red/Black. After speaking with the main contact through WhatsApp he confirmed the color swap.

Original White (CANBUS H) swaps to new Black wire
Original Yellow (CANBUS L) swaps to new Red wire

Hope that helps for any within the group buy.

 
My kit arrived yesterday and during my inspection I have already come across a couple changes from Gibburnz installation writeup.

The group buy kits changed the CANBUS wiring from Yellow/White to Red/Black. After speaking with the main contact through WhatsApp he confirmed the color swap.

Original White (CANBUS H) swaps to new Black wire
Original Yellow (CANBUS L) swaps to new Red wire

Hope that helps for any within the group buy.


Wow, good to know. I'm going to see if I can edit the article with that update. Thanks brother!
 
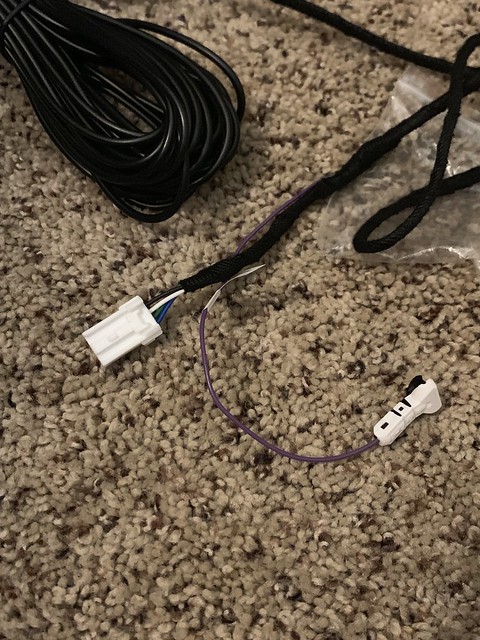
[MENTION=147513]gibburnz[/MENTION] Here's one for you, I was laying out the wiring and connecting everything to make sure I understood the layout.

I can't figure out where the white male connector that's on the lock wire goes. The connector right next to the purple wire tap that goes to the rear control box. Picture below.

 
[MENTION=147513]gibburnz[/MENTION] Here's one for you, I was laying out the wiring and connecting everything to make sure I understood the layout.

I can't figure out where the white male connector that's on the lock wire goes. The connector right next to the purple wire tap that goes to the rear control box. Picture below.


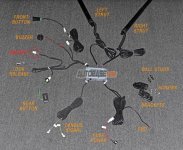
If memory serves me correctly, you ignore that connector. I found this picture in my e-mails. I haven't installed the foot sensor yet, so I wonder if it has something to do with that, but I believe one of the connections on the control box is for the foot sensor.

Wires.jpg
 

Attachments

  • Wires.jpg
    Wires.jpg
    139.3 KB · Views: 2,319
If memory serves me correctly, you ignore that connector. I found this picture in my e-mails. I haven't installed the foot sensor yet, so I wonder if it has something to do with that, but I believe one of the connections on the control box is for the foot sensor.

View attachment 341383

That's what is looks like to me, a dead connector but why it is included is beyond me.

The connection point for the foot sensor is on the control box next to the lock assembly connector.
 
That's what is looks like to me, a dead connector but why it is included is beyond me.

The connection point for the foot sensor is on the control box next to the lock assembly connector.

Yeah, weird they included it but I believe the control box is a newer model, so that wiring bundle could be from the previous control box. Also, I think a lot of those parts are universal for other makes and models, so it could tap into another harness on another vehicle but for the 4R, it's not used. #ShoulderShrug
 
I ordered the kit on Sunday and it was delivered on Thursday. Not bad.

I just unpacked everything and all of the parts and bits arrived in great condition. The packaging was great. They even included a drill bit for mounting the rear switch.
However my kit (V3) did not include the screws for the brackets or any manual or reference on connecting the foot kick switch.

The foot kick switch I received has a couple of extension cables with mating connectors and the last one only has separate wires that have the insulation prepped for removal with no connectors to interface with the control box.

I sent an email to Autoease, let's see what they have to say.

Update: Tao with Autoease emailed back very quickly.
The newer kits use the existing screws for the new brackets.
As for the loose wires on the foot kick switch: The red ACC wire is not used, the green KEY wire gets connected to the grey wire at the existing control box (Step #8), the ground and BAT wires get connected appropriately. (Tao suggested that they could be connected at the liftgate control box).
 
Last edited:
The install went fairly well. Lots of wire fishing!
I decided not to install the foot kick switch.
Once I had all of the wiring run and the struts and brackets changed I held my breath and connected the power wire.
The LED in the control box blinked about 17 times or so and went out. I pushed the rear button and nothing happened... No beep, no movement, nothing... It was about o'dark thirty so I called it a night.

The next morning, with a fresh set of eyes, I went through the entire install and disconnected/reconnected every plug and re-verified that I had a good ground.
This time the system beeped and started to close when I pressed the rear button. When the liftgate closed it did not latch. "No biggie", I thought. I just need to adjust the latch.
The system will give you two beeps when the liftgate closes but does not latch and a single beep when it does.
Now I began to look at the latch. It appeared that the latch on our 4Runner had always been rubbing on one side. Apparently when we manually closed the liftgate it did not matter. The power system, however, did not like the extra drag. I spent the next few hours trying to adjust both the latch loop (the stationary part at the bottom of the opening) and the latch receiver in the door. I even tried reaming the holes in the receiver mounts in the door to give me more movement.
The best that I got is now if the door is all the way open and I push the button, the door will sometimes latch when it closes.
But, if the door is only half way open, (as the door is opening you can push the button to stop the door) it will latch consistently. Go figure.
The struts seem to close with more power and authority from the half open position. When you close the door from the fully open position the struts seem a little tired when they get to the closed position.
During the hours that I was trying to adjust the latch I must have actuated the system dozens of times. Now the struts sound different than they did at the beginning. They are a bit noisier and click a bit. The liftgate is moving at the same speed and the fully locked/not fully locked ratio is about the same.
I always used the buttons (the stock hatch button to open and the rear button to close) to move the door.
Overall, while the concept is cool I am not sure about the reliability or longevity.
If this does not end up working out, going back to stock is easy enough.
I finally got around to making a video: YouTube
 
Last edited:
I don't suppose anyone knows a shop in SoCal (LA) that would be able to install this? I normally wouldn't mind tackling this myself but have a few too many things going on right now. I checked the AutoEase website but the only 'official' installer they list is in FL --

Where to install – Autoease
 
Holy hell is fishing the wire the hardest part. I've got the actuators installed, all the wires are good to go at the driver kick panel and they have all been run to the rear. But damn if I can't get a single wire (let alone all of them) fished down the sides of the window. Can you guys give me any tips or encouragement for this to work? I've read every post I can find on this and the trial4runner write-up.

I've only managed to get a fish wire from the speaker opening to the grommet hole on the passenger side of the window. Even with the connectors taped inline to the fish wire, it seems impossible to pull back down.

I'm not one to back down from a challenge, but damn is this not fun.
 
Holy hell is fishing the wire the hardest part. I've got the actuators installed, all the wires are good to go at the driver kick panel and they have all been run to the rear. But damn if I can't get a single wire (let alone all of them) fished down the sides of the window. Can you guys give me any tips or encouragement for this to work? I've read every post I can find on this and the trial4runner write-up.

I've only managed to get a fish wire from the speaker opening to the grommet hole on the passenger side of the window. Even with the connectors taped inline to the fish wire, it seems impossible to pull back down.

I'm not one to back down from a challenge, but damn is this not fun.

Probably the biggest reason why I haven't started my installation yet either. I've heard from most the fishing was exceedingly difficult. Just take your time and you should be able to pull it off. As an electrical engineer and part-time electrician I am even worried about it, if that helps.
 
trail4runner install notes

"Just don’t go into this underestimating the work needed to fish the wires through the gate. We considered rolling the truck off a cliff a few times during this step alone!"

This was their quote before install notes. I didn't take it lightly....:ybrick:
 

Members online

No members online now.

Forum statistics

Threads
278,316
Messages
3,554,121
Members
248,016
Latest member
Advally Service

Trending content

Back
Top