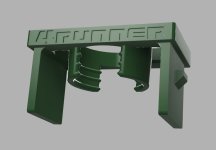
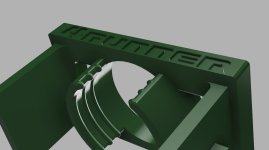
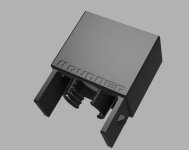
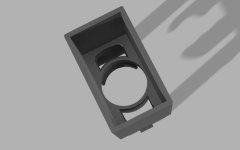
Custom hidden mic bracket for aftermarket head unit

[MENTION=42864]KP Texan[/MENTION] ..... thanks for work and the file! My local library printed the mount this week for $0.40. The mount fit perfectly. Those of you who have the SOS button in the console should leave the OEM microphone plugged in as unplugging it will result in the red LED next to the SOS button staying on anytime the truck is running as I found it. I just zip tied the OEM microphone to wiring harness And left it plugged in.

CA1643-C8-2-A46-4178-9-B17-B44-C16-EC7-BE3.jpg


E5637268-3306-4-DF7-ACC8-9-F082-E10-EF5-F.jpg


B8088-B17-7-B40-42-AA-A50-B-C590-D36-B376-E.jpg

That's great! I didn't get my file dropped off until this weekend, so I actually haven't had the opportunity to test it yet. I would've felt terrible if it didn't work for you, so I'm happy it fit!

I also noticed the same about my SOS light when I had my mic unplugged.
 
That's great! I didn't get my file dropped off until this weekend, so I actually haven't had the opportunity to test it yet. I would've felt terrible if it didn't work for you, so I'm happy it fit!

I also noticed the same about my SOS light when I had my mic unplugged.

I only had to use a 220 grit sandpaper around the top of the bore to insert the microphone. It was just to tight for the microphone to go through. half dozen wipes with the sandpaper took care of it. I just coughed it up to the tolerance of the print machine used. The high-end printers we have at my office typically result in very slightly oversized dimensions, which is same as undersized bores.
 
I only had to use a 220 grit sandpaper around the top of the bore to insert the microphone. It was just to tight for the microphone to go through. half dozen wipes with the sandpaper took care of it. I just coughed it up to the tolerance of the print machine used. The high-end printers we have at my office typically result in very slightly oversized dimensions, which is same as undersized bores.

Great to know! I'll check mine out when I get it and check the bore diameter compared to my design dimensions.

I'll probably end up using the one you printed, but I also played around with a few other designs. Not that it matters since it will never be seen, but I also tried to do some engraving. One design is pretty much identical to the one you printed (dimensions are the same, but with engraving), and one has sides that extend closer to the top of the mic since I was thinking I could insert a piece of foam there to block sound from the roof. Who knows, it may echo worse or something since I'm not an acoustics engineer!:
 

Attachments

  • 5.1-2.JPG
    5.1-2.JPG
    29.5 KB · Views: 1,405
  • 5.1.JPG
    5.1.JPG
    44.1 KB · Views: 1,156
  • 6.1.JPG
    6.1.JPG
    30.8 KB · Views: 1,359
  • 6.1-2.JPG
    6.1-2.JPG
    25.9 KB · Views: 1,429
Nice. I have a coworker printing mine and I pick it up on Wednesday.

For the SOS, you can also pull Mayday 7.5a fuse under the hood.

This is good info. I figured I was going to have to leave the mic plugged in, but then it again it may not be bad to leave it in there if I ever decide to go back to stock (doubtful).

Now on to my 3D printed 3.5" dash speaker mount project!
 
OK everyone, I had all of my designs printed and was able to do some testing. Bottom line, I ultimately ended up going with my original clip design, but with the later improved bottom dimensions. I recommend you go this route if you are able to pass the microphone connector through first (as if you are doing a new install). This is most likely dependent on the material, but r5's bottom clips are too short in my opinion and it's hard not to break them when pushing the mic through the top. I also found out that trying to do engraving on something that small is difficult and the detail just isn't there.

I've updated my Thingiverse link to have the one I ended up using (r7) and the other version if you absolutely have to pass the mic through the top (r5). Thingiverse link so you don't have to dig for it: 5th Gen 4Runner Kenwood Bluetooth Microphone Mount by KPTexan - Thingiverse

After installation, I'm happy to report that sound seems to be great. I called my wife while driving down the highway and I tried to press her for sound quality information... she said it sounded perfectly clear with no back ground noise, but she wasn't willing to give me tons of feedback (still a bit miffed about the amount of time I've spent on this project, haha). Additionally, I added some Tesa tape as a sound barrier so you can find more notes in my install thread here on the forum: My Stereo Install Thread

This little experiment led me to realize how much I truly enjoy 3D design and printing. I've now invested in my own 3D printer, so no more hour long round trips to the library to have things printed!

A few images of the mic mount (purple, because you can't choose color at my library):

Nuh4JHm.jpg


SPlNQ9W.jpg


mpTkmhW.jpg
 
Last edited:
How is that project going? Can't wait to see what you come up with.

Actually just pulled the dash speakers this weekend, and started working on the design! I'll either start a new thread or post about it in the dash speaker thread/my stereo build thread when I'm done. I'm just hesitant to post un-tested prototypes because I don't want people to waste their time on something that doesn't work/fit.

I've also got to complete the build of my Prusa i3 MK3s and enclosure so I can start printing on my own! It arrived on Friday so I'm pretty excited about it.
 
I just installed a kenwood as well. Would you sell one of them ? I would like to move my mic up to that oe location too.
 
I just installed a kenwood as well. Would you sell one of them ? I would like to move my mic up to that oe location too.

Given that my 3D printer isn't set up yet, the easiest thing is to probably e-mail the .stl file over to a local UPS store that does 3D printing (Looks like there is one in Denver: 3D Printing Service Locations | The UPS Store ). They print in ABS as well, so that's ideal here. I got a quote from my local UPS store and it was $6 - pricey for the amount of material, but not too bad since it's such a small part. They were also able to do it within a day. I would honestly have a hard time beating that price if I were to charge you for material only and then pay to ship it to you!
 
Followup question, the STL file has 2 builds for the part, which do I use?


.

There should be two different stl file versions (r5 and r7) on Thingiverse, each with a single part. Are you seeing more than one part in one of those files?

r7 is for if you can pass the connector end of the mic through the mount first (mic goes in from the bottom). I recommend r7 if possible.

On r5, the mic enters through the top, and you don't have to put the cable through first. On this design, the mic fit is pretty tight on purpose since the Kenwood mic has a taper which makes fitment difficult. The mic holding tabs are also prone to breakage on this one if you aren't careful.
 
There should be two different stl file versions (r5 and r7) on Thingiverse, each with a single part. Are you seeing more than one part in one of those files?

r7 is for if you can pass the connector end of the mic through the mount first (mic goes in from the bottom). I recommend r7 if possible.

On r5, the mic enters through the top, and you don't have to put the cable through first. On this design, the mic fit is pretty tight on purpose since the Kenwood mic has a taper which makes fitment difficult. The mic holding tabs are also prone to breakage on this one if you aren't careful.

Was looking at my r7 stl and something seemed a bit off - somehow one of the tabs that locks the mount into the overhead console was off by 1mm. It's fixed now on Thingiverse, but I'm sorry if some of you already printed it. I really don't think it would make a difference since I'm pretty sure I printed that same file and installed it myself! It would also be a very easy fix with a jewelers file if you already printed it and it caused an issue. I'm just a bit OCD so I wanted to make sure it was correct.
 
[MENTION=42864]KP Texan[/MENTION] ..... thanks for work and the file! My local library printed the mount this week for $0.40. The mount fit perfectly. Those of you who have the SOS button in the console should leave the OEM microphone plugged in as unplugging it will result in the red LED next to the SOS button staying on anytime the truck is running as I found it. I just zip tied the OEM microphone to wiring harness And left it plugged in.

CA1643-C8-2-A46-4178-9-B17-B44-C16-EC7-BE3.jpg


E5637268-3306-4-DF7-ACC8-9-F082-E10-EF5-F.jpg


B8088-B17-7-B40-42-AA-A50-B-C590-D36-B376-E.jpg

Hey, any possibility you can get one for me and ill pay you? thanks in advance
 
Anybody having issues with the microphone sound? Everybody I call tells me I sound like I am talking thru a walkie talkie or there's an echo. Tried adjusting the mic position inside the overhead console since I have a similar 3d mount, also adjusted few settings on the kenwood head unit but no luck. I am about to replace the mic with a new one.
 
Would some one be able to 3d print me a microphone mount? i really dont have anyone or any place that can do it for me. i tried a place but they were talking about $150 which its crazy! much appreciated. obviously i will pay cost of printing and shipping.
 
Would some one be able to 3d print me a microphone mount? i really dont have anyone or any place that can do it for me. i tried a place but they were talking about $150 which its crazy! much appreciated. obviously i will pay cost of printing and shipping.

What I ended up doing was using 3/16th ABS sheet and cutting out a rectangle at the inside dimensions of the place where the factory mic mounts and then drilling a 1/2" hole in it for the Pioneer mic. Used a bit of ABS glue to set the piece in the factory spot and a bit of glue to insert the mic into the hole. Came out perfect, cost next to nothing and took about 20 minutes.


.
 
I wonder if anyone has attempted this for a 4th Gen 4Runner. If anyone has, can someone point me in that direction?
 
Don’t mean to drag up an old thread.....
But

1. I live in Alaska, not many 3D printing options available here. Can I zelle or Venmo someone some cash to print and toss one in the mail for me?

2. Does anyone have a link to instructions/pictures on how to remove the ceiling console to access the back so I can install this?

Thanks guys

Owen
 

Members online

Forum statistics

Threads
278,316
Messages
3,554,111
Members
248,016
Latest member
Advally Service

Trending content

Back
Top