DIY: Interior LED swap (cluster, HVAC, switches, window, *steering wheel)

boostedprozac said:
this is super awesome! Where did you get the leds? I want to do the white too...can you get me the site or location and list? how much did you spend.

Here is the costs and links:
(100) 3mm Flat top LED's (for all switches and center console) from ebay -
http://cgi.ebay.com/100-3mm-FLAT-TO...66954QQcmdZViewItemQQ_trksidZp1742.m153.l1262 - $12.97
(20) PLCC-2 Surface Mounted LED's from Oznium -
http://www.oznium.com/plcc-2 - $9.80 ($14.00 w/ shipping)
(50) 1/8W 1.2K ohm resistors - $9.99 at a local computer shop. you could probably find these at your nearest radio shack.

so all in all, it cost about $37.

Also, to replace the airbag LED in the center console, you need to get this one http://www.lc-led.com/View/itemNumber/32 UT-692NB for $1.35. I haven't done this yet because once you open it up, you'll see why. the only way i can see to do this is to desolder the temp LCD from the PCB and i haven't had time to do this. plus screwing it up will cost big time.
 
Last edited:
That looks so sick dude. I PM'd you about this, but I dont know if you check them. So take a look and get back at me.
 
dheeter said:
That looks so sick dude. I PM'd you about this, but I dont know if you check them. So take a look and get back at me.

Sorry man...i haven't checked my PM's for a few weeks. Replied to everyone that sent me something.
 
hey darkie3495, every LED you've installed comes with a resistor too? I'm just curious coz in the picture, the bulb for HVAC has a resistor but the one on the door control has nothing on it.
 
aaf said:
hey darkie3495, every LED you've installed comes with a resistor too? I'm just curious coz in the picture, the bulb for HVAC has a resistor but the one on the door control has nothing on it.

no, the resistors and LED's came separately. when i was replacing a bulb that received a full 12V, i added the resistor. for the LED on the window control, it was already an LED. It already had a resistor located on the PCB.
 
darkie3495 said:
no, the resistors and LED's came separately. when i was replacing a bulb that received a full 12V, i added the resistor. for the LED on the window control, it was already an LED. It already had a resistor located on the PCB.
Oh i see...then how would i know if the bulb will receive a full 12v? Were those on the instrumental panel and HVAC control received full 12V or which of those you replaced doesn't need a resistor?
Sorry to bother you but i really need to know. Most lights on my HVAC control were broken since 2 yrs ago and now i decided to fix it myself than go to the dealership which costs me $120 for the diagnose alone.
Thanks.
 
aaf said:
Oh i see...then how would i know if the bulb will receive a full 12v? Were those on the instrumental panel and HVAC control received full 12V or which of those you replaced doesn't need a resistor?
Sorry to bother you but i really need to know. Most lights on my HVAC control were broken since 2 yrs ago and now i decided to fix it myself than go to the dealership which costs me $120 for the diagnose alone.
Thanks.

no bother at all....the bulbs that get 12V are the ones that use the bulb holder aka the backlighting. for the HVAC unit: 3 for the LCD, 1 for the reset/mode, 1 for defrost, 1 for recirculate and 1 each for the fan speed, temp and fan location. If you take the HVAC unit out and look at the back, the bulb holders are flat-head screw type connectors.

Pretty much any bulb that can be disconnected easily it gets 12V. the ones that don't need a resistor have to be soldered off. $120 is nuts!! do you have a picture of what lights are out?
 
darkie3495 said:
no bother at all....the bulbs that get 12V are the ones that use the bulb holder aka the backlighting. for the HVAC unit: 3 for the LCD, 1 for the reset/mode, 1 for defrost, 1 for recirculate and 1 each for the fan speed, temp and fan location. If you take the HVAC unit out and look at the back, the bulb holders are flat-head screw type connectors.

Pretty much any bulb that can be disconnected easily it gets 12V. the ones that don't need a resistor have to be soldered off. $120 is nuts!! do you have a picture of what lights are out?
Ok i got it now. Thanks for your help darkie3495. All your info are very helpful and hopefully i could replace all those lights flawlessly.
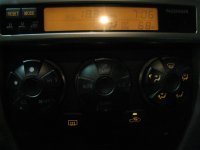
Sorry, I dont have a photo but it's the HVAC control for Fan speed and Thermostat control.
 

Attachments

  • bulbs 013.jpg
    bulbs 013.jpg
    113.5 KB · Views: 9,677
darkie3495 said:
no bother at all....the bulbs that get 12V are the ones that use the bulb holder aka the backlighting. for the HVAC unit: 3 for the LCD, 1 for the reset/mode, 1 for defrost, 1 for recirculate and 1 each for the fan speed, temp and fan location. If you take the HVAC unit out and look at the back, the bulb holders are flat-head screw type connectors.

Pretty much any bulb that can be disconnected easily it gets 12V. the ones that don't need a resistor have to be soldered off. $120 is nuts!! do you have a picture of what lights are out?

oh sorry, i thought i could not post the photo but fortunately i miraculously made it. hehehe.
 
aaf said:
oh sorry, i thought i could not post the photo but fortunately i miraculously made it. hehehe.

ok, well you have another alternative if you don't want to do the full LED swap. if you just want to replace the bulb and holder, here is the part number:

90010-09019 Long Green light bulb

It should be about $2.50 - $3.30 each.

You could also go to radio shack and just buy the bulb itself and place it in the holder.

Found a place that shows you how to take the HVAC apart and give you an idea of what the holder looks like (long green one).

<A HREF="http://www.toyota120.com/html/center_console_lights.html">Link</A>
 
darkie3495 said:
ok, well you have another alternative if you don't want to do the full LED swap. if you just want to replace the bulb and holder, here is the part number:

90010-09019 Long Green light bulb

It should be about $2.50 - $3.30 each.

You could also go to radio shack and just buy the bulb itself and place it in the holder.

Found a place that shows you how to take the HVAC apart and give you an idea of what the holder looks like (long green one).

<A HREF="http://www.toyota120.com/html/center_console_lights.html">Link</A>
I already ordered LED lights and the Surface Mount from the links you've posted. So, there's no more turning back for me..hehehe.
In fact, my '04 T4R is getting older and never tasted such an upgrade except for the sexy looking toyo tires i installed a year ago. I think she deserve a LED swap.
Thank you again.
 
aaf said:
I already ordered LED lights and the Surface Mount from the links you've posted. So, there's no more turning back for me..hehehe.
In fact, my '04 T4R is getting older and never tasted such an upgrade except for the sexy looking toyo tires i installed a year ago. I think she deserve a LED swap.
Thank you again.
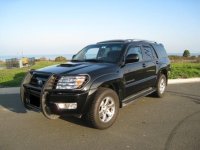
Here's my T4R. Her looks still amazes me even she's almost 5yrs old.
 

Attachments

  • bulbs 001.jpg
    bulbs 001.jpg
    33.1 KB · Views: 8,901
aaf said:
I already ordered LED lights and the Surface Mount from the links you've posted. So, there's no more turning back for me..hehehe.
In fact, my '04 T4R is getting older and never tasted such an upgrade except for the sexy looking toyo tires i installed a year ago. I think she deserve a LED swap.
Thank you again.

I hear you. Well good luck and let me know if i can help in any way.

Kevin
 
Awe---SOME

It's beautiful.
I'm getting tired of looking at yellow instruments, but this seems to be big project. Maybe after my computer upgrade, I have time.
Excellent post. Keep up the good work.
 
Re: Awe---SOME

dothe4runner said:
It's beautiful.
I'm getting tired of looking at yellow instruments, but this seems to be big project. Maybe after my computer upgrade, I have time.
Excellent post. Keep up the good work.

Thanks man....if you have all the tools and supplies it shouldn't take you more than a day or so. The best way to do it is to tackle the hard stuff first (cluster, steering wheel, HVAC and door). the switches you can do at your leisure:)

I live in edmonds so if you need any help, let me know.
 
Re: Re: Awe---SOME

darkie3495 said:
Thanks man....if you have all the tools and supplies it shouldn't take you more than a day or so. The best way to do it is to tackle the hard stuff first (cluster, steering wheel, HVAC and door). the switches you can do at your leisure:)

I live in edmonds so if you need any help, let me know.

I appreciated it very much. I'll be sure to asking for advise from you. :D
 
This process for getting the cluster out is the best way to get rid of the pesky TPMS sensor light!!!!

You only have to take off the front cover, pull the speed needle off and put a piece of black tape on the cluster liner back side. Works perfect for those that have upgraded to other wheels and did not bother with the TPMS sensors.
 

Members online

Forum statistics

Threads
278,316
Messages
3,554,120
Members
248,016
Latest member
Advally Service

Trending content

Back
Top