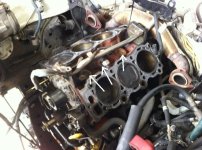
Head Gasket symptoms starting to show...

Ordering my gaskets and other stuff while I wait on the heads get resurfaced. Someone mentioned changing out the head bolts as well, said that shops usually put new ones in when they do head gasket jobs. Did you guys buy new head bolts or re-use the old ones?

Question... Did you id those camshaft collars? Don't see them in the pics. Don't mix them. Same thing with the camshafts...

Put them back onto the heads before i sent them in to the machine shop. Camshafts i put in paper bags, wrapped them with tape and labeled each bag left and right.

Take the window to replace those water seals right on the middle top of the block.

Which water seals are you referring to? In the valley between the pistons?
 
I had to torch it for a few minutes. No matter what breaker bar or how i used leverage, the bolt would just not come out. It was skipping teeth on the belt from the crank gear. Be careful though!
 
One cracked head =(

The machine shop just called and told me the that passenger head was cracked after a compression test.

Looks like i'll be in search for a head. Does anyone know any places that sell used or rebuilt heads? Ebay has some that are $350 shipped with the return of your cracked head as a core. A nearby shop in my area sells them for $400. Anyone in the bay area know anybody that will hook a fellow 4runner owner up?
 
Do i need to torque the cam gear bolts to a certain spec? It was hard enough to get them loose when i pulled the cam gears off, i'm wondering if it needs to be as tight as it was.

The other thing is that once i get the valve covers on, i won't be able to use the open wrench groove located on the camshaft to hold it down while i torque. If i put the valve covers back on, the gear would spin freely.

Any help on those who have reassembled their heads?
 
Torque both bolts before getting the valve covers on. As per my Haynes manual, camshaft pulley bolts should be torqued at 81 Ft-lbs each.

Also FYR:
Crankshaft pulley bolt 184 Ft-lbs
Cylinder Head Bolts
12 point head
Step 1.............................. 25 Ft-lbs
Step 2.............................. Turn an additional 90-degrees (1/4turn)*
Step 3.............................. Turn an additional 90-degrees (1/4turn)*
*Those 1/4 extra turn should be applied to each bolt following the torque sequence.
Recessed head bolts............... 13 Ft-lbs (only torque once, no extra turns are needed
like the 12 point head bolts)

Kinda tricky. Check on other threads, I've seen discussions about those 1/4 turns. I haven't had any issues so far and I followed that procedure. Also replaced old bolts by new ones.
 
Bummer about the cracked head. Mine should be at the machine shop this week.

Have you sourced your new ones yet? Also have you or anyone else got the actual name/description for those seals that go in the valley of the engine for those coolant lines under the intake? Mine are leaking so I'll be replacing them as well, but I'm having a hard time finding them online. Thanks.
 
I stripped out the allen screw. At least it is the one in the back. I wouldn't want it to be too easy. 13 foot pounds +/- a buttload and some corrosion.

I'm following along but working slow.
 
Have you sourced your new ones yet?

So my driver side head has been resurfaced. Paid $180 for the resurfacing and $20 for them to figure out the passenger side head was cracked so total $200.

For the passenger side head, i'm found a shop in the area that sells rebuilt complete heads for $400. They're located in Union City. Plus tax, my total head work will be roughly $650 ish?

Here' a picture of the resurfaced head: (before photos can be found earlier on the thread)

8A9E4415-6BE9-4B73-8E83-1BD820153B30-15634-00000A7FBA174998.jpg~original


ED9815F3-D97F-45B4-924A-077026499FD7-15634-00000A7FC2D08D5F.jpg~original


EF39FA1D-4B14-4786-94D9-331FFF452D49-15634-00000A7FCA09973E.jpg~original


Also have you or anyone else got the actual name/description for those seals that go in the valley of the engine for those coolant lines under the intake? Mine are leaking so I'll be replacing them as well, but I'm having a hard time finding them online.

I haven't found the seals that were recommended by Charlie as well. Charlie, can you shed some light on where these seals are? I'm wondering if i'm leaking from that hose too due to all of that rust in the valley. Could be the lower intake manifold gasket too though..

Where in the valley?
3cf9f75e.jpg~original


498b5a00.jpg~original
 
I added 3 arrows to one of the pictures posted showing where these seals are.

I have the receipts but can't find them right now. Did a search and found this link: PLUG, TIGHT, NO.1(FOR CYLINDER BLOCK). CYLINDER BLOCK for 1999 TOYOTA 4RUNNER3400CC EFI, AUTOMATIC 4-SPEEDLUXURY(-0008),LIMITED(0008-) (9033135005)

It does not specifically shows those three seals on the engine valley, but if I'm not wrong all of the seals on the engine are the same. If that is the case, then part number should be 11431A - PLUG, TIGHT, NO.1(FOR CYLINDER BLOCK).

Will do a search on a file I have to see if I can confirm the part number.
 

Attachments

  • 3cf9f75eseals.jpg
    3cf9f75eseals.jpg
    77.2 KB · Views: 6,486
Found the receipt!

Part No. 90331-35005 PLUG, TIGHT $8.49 each

Don't know if part numbers change depending on the dealer location (don't think so). Anyway they should show you an exploded view of the engine so you can confirm you're getting the right part :)
 
Another pestering question i have is how did you take the old ones out? I'll have to go to the garage tomorrow to take a look but if i recall correctly, i felt around those three rings and they were solid (not rubbery). Should those be pried out?

thanks !!:thanks:
 
Hit them with a small drive pin at any spot close to the edge. You'll notice they'll start to rotate in place. Once in vertical position, pry them out.

I applied a small amount of silicone around the new caps prior to installation and hit them with a piece of wood to avoid deformations and eventual leaks.
 
I have never heard of one of those freeze plugs failing. Then again, I dont get out much. Anyone got any stories? Im kinda curious now.
 
Rare to see them fail but in my case, they were already reachable, couple of extra bucks and the forget about a difficult to find possible future leak. Mine were severely corroded although they seem fine from the exterior. I replaced the red coolant my runner brought from factory when it was time to replace it (long time ago) with the green one. Pretty sure that corroded all carbon steel part (water seals, head gaskets middle layer, areas around cooling fluid passages in the engine block. No damage to heads whatsoever (aluminum). Now I started using the red coolant again.

I am no expert on coolants, but since my failure, I read some articles on the matter. Red coolant is based on phosphates, green on silicates. Info was not so clear, so I decided to pour what it brought from day 1. I have couple of pics showing damage on heads gaskets, they are the multilayer steel type, I was able to see corroded material coming from between the outer layers and also damage on the water seals, pump impeller and areas around the cooling media passages which I was able to fix by using a file (there was just slight damage).
 

Members online

Forum statistics

Threads
278,317
Messages
3,554,128
Members
248,016
Latest member
Advally Service

Trending content

Back
Top